Low battery
Battery level is below 20%. Connect charger soon.


1996 Chevy Blazer Mirror Wiring Diagram: The Essential Fix Every Owner Needs
The 1996 Chevy Blazer, a rugged and reliable SUV, holds a special place in the hearts of many. However, like any vehicle of its era, it’s prone to certain electrical gremlins. One common issue that can plague Blazer owners is malfunctioning side mirrors. Whether it’s the power adjustment that’s stopped working, the defroster that’s given up the ghost, or the turn signal integrated into the mirror that’s gone dark, the culprit often lies within the wiring. Understanding the 1996 Chevy Blazer mirror wiring diagram is crucial for diagnosing and fixing these frustrating problems. This guide will walk you through the essential information you need to keep your mirrors functioning properly.
Why Your 1996 Chevy Blazer Mirror Wiring Matters
Functional side mirrors are more than just a convenience; they are a critical safety feature. They provide essential visibility, allowing you to see the traffic around you and make informed decisions on the road. When your mirrors malfunction, it can:
- Impair Visibility: Obstructed or non-functioning mirrors create blind spots, increasing the risk of accidents.
- Hinder Maneuvering: Parking, changing lanes, and other maneuvers become significantly more challenging.
- Cause Frustration: Constant fiddling with manually adjusted mirrors or driving with limited visibility is a major annoyance.
Therefore, addressing mirror wiring issues promptly is vital for your safety and driving experience.
Decoding the 1996 Chevy Blazer Mirror Wiring Diagram
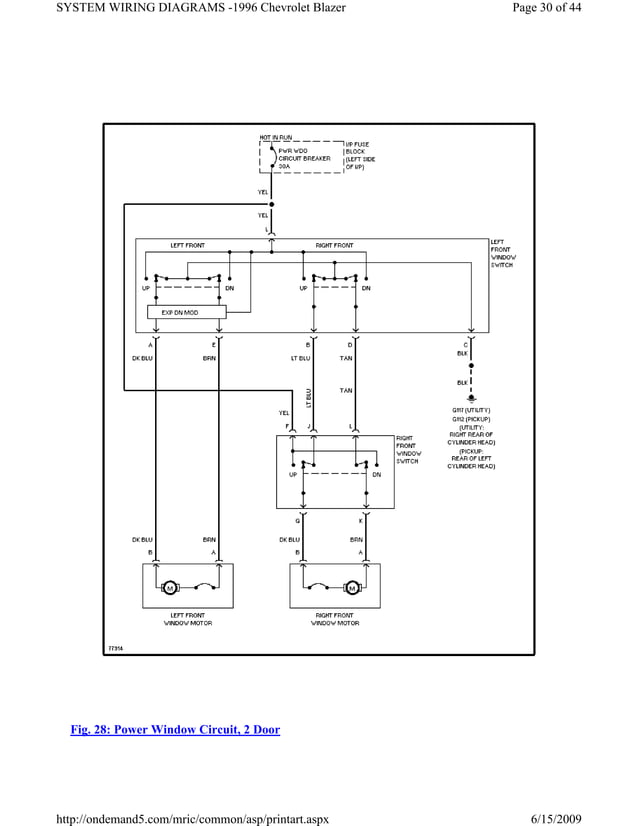
The wiring diagram is the key to understanding how your Blazer’s mirror system is connected. It provides a visual representation of the wires, connectors, and components involved, including:
- Power Windows and Mirrors Fuse: This fuse protects the circuit and, if blown, will cause all power mirror functions to fail.
- Mirror Control Switch: This switch, typically located on the driver’s side door panel, controls the mirror adjustments.
- Mirror Motors: These small motors are responsible for moving the mirror glass.
- Mirror Defroster (if equipped): This feature utilizes a heated element in the mirror glass to clear fog and ice.
- Turn Signal (if equipped): Integrated turn signals receive power and ground through the mirror wiring.
- Wiring Harness and Connectors: These connect all the components, and are often the source of corrosion and connection problems.
Where to Find the Wiring Diagram:
- Online Resources: Websites like AllDataDIY and AutoZone offer wiring diagrams specific to your 1996 Chevy Blazer. Search online using the term “1996 Chevy Blazer wiring diagram” along with terms like “power mirrors” or “defroster.”
- Factory Service Manuals: The most comprehensive diagrams are found in the official service manuals for your Blazer. These are available for purchase online or at some auto parts stores.
Common Mirror Wiring Problems and Troubleshooting Steps
Once you have the wiring diagram, you can begin to diagnose the issue. Here are some common problems and how to troubleshoot them:
Power Mirror Adjustment Failure:
- Check the Fuse: Start by inspecting the fuse for the power windows and mirrors. Replace if blown.
- Inspect the Switch: Test the mirror control switch for proper operation. Use a multimeter to check for continuity.
- Examine the Wiring: Look for damaged or corroded wires, especially at the connectors on the door and at the mirror itself.
- Test the Motors: If the wiring and switch are good, the mirror motors may be faulty.
Mirror Defroster Not Working:
- Check the Defroster Fuse: Locate and check the fuse for the defroster circuit (this may be a separate fuse from the power mirrors).
- Inspect the Wiring: Examine the wiring for the defroster element within the mirror glass. Look for breaks or damage.
- Test for Voltage: Use a multimeter to check for voltage at the defroster connectors when the defroster is activated.
Turn Signal Not Working (if equipped):
- Check the Bulb: Ensure the turn signal bulb in the mirror is not burned out.
- Inspect the Wiring: Look for breaks or corrosion in the wiring that connects the turn signal to the main vehicle wiring harness.
- Test for Power and Ground: Use a multimeter to verify that the turn signal circuit is receiving power and ground.
Step-by-Step Repair Guide (General)
While the specific steps will vary depending on the problem, here’s a general outline for repairing mirror wiring:
- Safety First: Disconnect the negative battery cable to prevent electrical shorts.
- Locate the Problem: Use the wiring diagram and a multimeter to pinpoint the faulty component or wiring section.
- Access the Wiring: Remove the door panel (if necessary) to access the wiring harness and connectors.
- Repair or Replace: Repair damaged wires by soldering and using heat shrink tubing. Replace corroded connectors or faulty components.
- Reassemble: Carefully reassemble all components.
- Test and Verify: Reconnect the battery and test the mirror functions to ensure the repair was successful.
Preventing Future Mirror Wiring Problems
Proactive measures can help prevent future issues:
- Regular Inspection: Periodically inspect the wiring and connectors for corrosion or damage.
- Proper Maintenance: Keep the door seals in good condition to prevent water from entering the door panel and causing corrosion.
- Use Quality Parts: When replacing components, use high-quality parts to ensure longevity.
- Avoid Harsh Chemicals: When cleaning your Blazer, avoid using harsh chemicals that can damage the wiring.
Conclusion: Keeping Your Blazer’s Mirrors in Top Shape
Understanding and utilizing the 1996 Chevy Blazer mirror wiring diagram is essential for maintaining the functionality and safety of your side mirrors. By following the troubleshooting steps, performing necessary repairs, and taking preventative measures, you can keep your mirrors working properly and enjoy a safer and more enjoyable driving experience. Don’t let faulty mirrors compromise your visibility – take action and ensure your Blazer is ready for the road!
Frequently Asked Questions (FAQs)
1. Where can I find a reliable 1996 Chevy Blazer mirror wiring diagram?
You can find reliable wiring diagrams online at websites like AllDataDIY and AutoZone. Factory service manuals are another excellent source.
2. What tools do I need to diagnose and repair the mirror wiring?
You’ll need basic tools like a multimeter, wire strippers, crimping tool, soldering iron (optional but recommended), electrical tape, and possibly a screwdriver or panel removal tool.
3. How difficult is it to replace a mirror motor?
Replacing a mirror motor can vary in difficulty depending on the specific Blazer model and your mechanical experience. It generally involves removing the mirror glass and accessing the motor from behind. Refer to a repair manual for detailed instructions.
4. Can I replace the mirror wiring myself, or should I take it to a mechanic?
If you have basic electrical and mechanical skills, you can likely handle the repair yourself. However, if you’re uncomfortable working with electrical systems or have limited experience, it’s best to consult a qualified mechanic.
5. What if my mirror defroster doesn’t work, and the fuse is good?
If the fuse is good, the problem likely lies in the wiring to the defroster element within the mirror glass or the defroster switch itself. Use your multimeter and wiring diagram to trace the circuit and identify the fault.
