Low battery
Battery level is below 20%. Connect charger soon.

1996 Quest Fuse Box Diagram: The Essential Map to Solve Electrical Nightmares
Owning a vehicle, especially one that’s been around for a while, comes with the occasional electrical gremlin. Lights flicker, accessories fail, and sometimes, your entire vehicle feels like it’s staging a power outage. For owners of the 1996 Nissan Quest, understanding your fuse box diagram is the key to unlocking the secrets of your electrical system and conquering those frustrating issues. This comprehensive guide will provide you with the information you need to locate, understand, and utilize the 1996 Quest fuse box diagram, turning you from a frustrated driver into a confident problem-solver.
Why is Understanding Your Fuse Box Diagram So Important?
The fuse box diagram acts as your vehicle’s electrical blueprint. It’s a map that tells you:
- What each fuse controls: From headlights to power windows, every electrical component is protected by a fuse.
- The location of each fuse: Knowing where a specific fuse is located saves you valuable time and effort during troubleshooting.
- The amperage rating of each fuse: Using the correct amperage is crucial for protecting your electrical system from damage.
Without this knowledge, you’re essentially navigating a labyrinth blindfolded. Diagnosing electrical problems becomes a guessing game, potentially leading to wasted time, unnecessary expenses, and even further damage to your vehicle.
Locating Your 1996 Nissan Quest Fuse Boxes
The 1996 Nissan Quest typically has two primary fuse boxes:
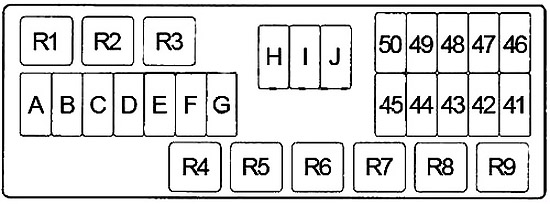
- Interior Fuse Box: This box is usually found inside the vehicle, most commonly located underneath the dashboard on the driver’s side. You might need to remove a small panel or cover to access it.
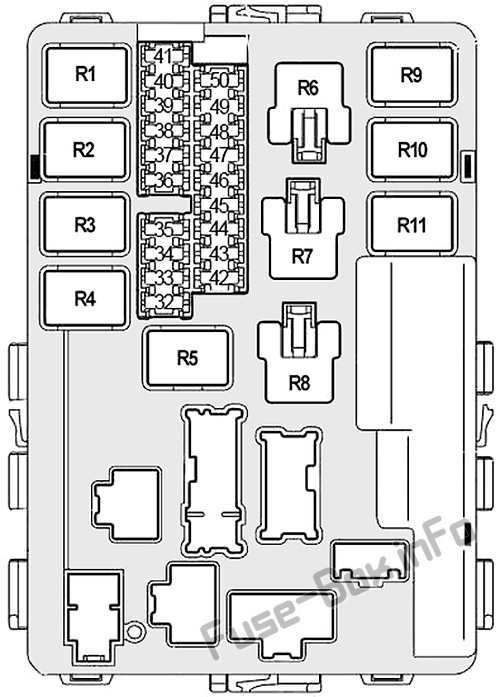
- Engine Compartment Fuse Box: This box is located in the engine bay, often near the battery or on the driver’s side fender well. It’s typically enclosed in a black plastic box.
Finding the Exact Location:
- Consult Your Owner’s Manual: The owner’s manual is your best friend! It will contain detailed diagrams and descriptions of both fuse boxes.
- Look for a Label: Often, the fuse box cover itself will have a diagram printed on it, detailing the fuse layout and their functions.
- Online Resources: If you don’t have your owner’s manual, search online for “1996 Nissan Quest fuse box diagram.” Many websites and forums offer free diagrams and helpful information.
Decoding the 1996 Quest Fuse Box Diagram
Once you’ve located the fuse boxes, you need to understand the diagram itself. Here’s a breakdown of what to expect:
- Fuse Symbols: The diagram will use symbols to represent different electrical components. These symbols are usually standardized but may vary slightly depending on the diagram.
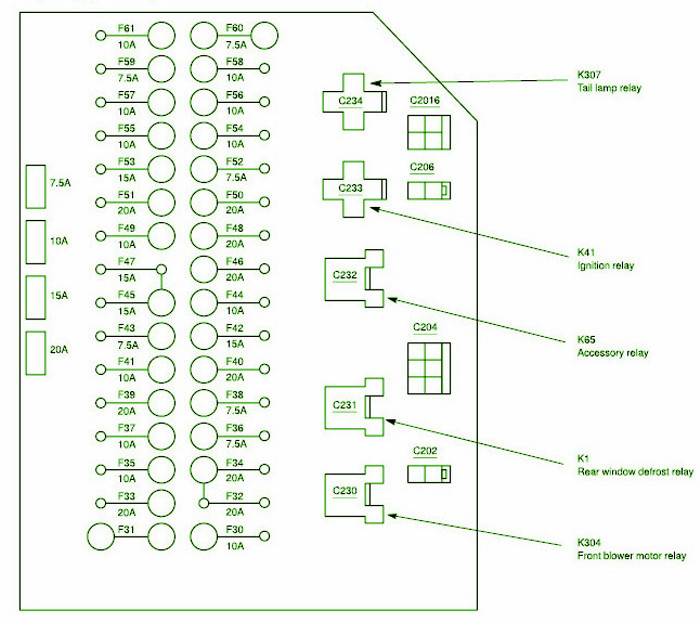
- Fuse Numbers: Each fuse will have a corresponding number, allowing you to quickly identify and locate the fuse you need.
- Amperage Ratings: The diagram will clearly indicate the amperage rating for each fuse (e.g., 10A, 15A, 20A). This is crucial for replacing a blown fuse. Never use a fuse with a higher amperage rating than specified.
- Component Descriptions: The diagram will list the components each fuse protects, such as “Headlights,” “Power Windows,” “Radio,” etc.
Troubleshooting Electrical Problems with Your Fuse Box Diagram
Armed with your fuse box diagram, you can effectively troubleshoot electrical issues. Here’s a step-by-step approach:
- Identify the Problem: Determine which electrical component is malfunctioning (e.g., headlights, turn signals, radio).
- Consult the Diagram: Locate the fuse that controls the problematic component.
- Inspect the Fuse: Carefully remove the fuse and visually inspect it. A blown fuse will have a broken wire inside.
- Replace the Fuse: If the fuse is blown, replace it with a new fuse of the exact same amperage rating.
- Test the Component: After replacing the fuse, test the electrical component to see if it’s functioning correctly.
- Recurring Issues: If the fuse blows again immediately, there’s likely a short circuit or other electrical problem. You’ll need to investigate further, potentially seeking professional assistance from a qualified mechanic.
Important Safety Tips When Working With Fuses
- Disconnect the Battery: Before working on any electrical components, disconnect the negative (-) terminal of your vehicle’s battery to prevent accidental short circuits.
- Use the Correct Tools: Use a fuse puller (often included in the fuse box) or needle-nose pliers to safely remove fuses.
- Never Use Metal Objects: Do not use metal objects to probe or replace fuses, as this can cause a short circuit.
- Avoid Over-Fusing: Never install a fuse with a higher amperage rating than specified in the diagram. This can damage the wiring and electrical components.
- Consult a Professional: If you’re uncomfortable working with electrical systems, or if you can’t diagnose the problem, consult a qualified mechanic.
Frequently Asked Questions (FAQs)
1. Where can I find a replacement fuse box diagram for my 1996 Nissan Quest?
You can find replacement diagrams in your owner’s manual, online on various automotive websites, or by searching specifically for “1996 Nissan Quest fuse box diagram” on search engines.
2. What should I do if a fuse blows repeatedly?
If a fuse blows repeatedly, there’s likely a short circuit or an overload in the electrical system. You should stop replacing fuses and have the vehicle inspected by a qualified mechanic to diagnose and repair the underlying problem.
3. Can I use a fuse with a higher amperage rating than what’s specified?
No, you should never use a fuse with a higher amperage rating than specified. Doing so can overload the wiring and potentially cause a fire or damage to electrical components.
4. What do I do if I can’t locate the fuse box diagram in my vehicle?
Check your owner’s manual first. If you don’t have the manual, search online for a digital copy or consult automotive forums for diagrams.
5. What kind of fuses does a 1996 Nissan Quest typically use?
The 1996 Nissan Quest typically uses blade-type fuses. These are the most common type and come in various sizes and amperage ratings.
Conclusion
Understanding your 1996 Nissan Quest fuse box diagram is an essential skill for any vehicle owner. By knowing where the fuse boxes are located, how to read the diagram, and how to troubleshoot electrical problems, you can save time, money, and frustration. This guide provides the foundation you need to confidently navigate your electrical system and keep your Quest running smoothly. Remember to prioritize safety and, when in doubt, consult a qualified mechanic.
