Low battery
Battery level is below 20%. Connect charger soon.


1999 Chevy Malibu Fuse Diagram: The Essential Guide to Electrical Issues
The 1999 Chevrolet Malibu, a stalwart of its era, is a vehicle many still rely on today. However, as with any car, electrical gremlins can arise. Understanding your car’s electrical system is crucial, and the fuse box is the central hub. This guide provides a comprehensive overview of the 1999 Chevy Malibu fuse diagram, helping you diagnose and address common electrical problems. Knowing where to find the right fuse and what it controls can save you time, money, and a lot of frustration.
Locating the Fuse Box in Your 1999 Chevy Malibu
Before diving into the fuse diagram itself, it’s essential to know where to find the fuse boxes in your 1999 Chevy Malibu. There are typically two main fuse boxes:
- Interior Fuse Box: This is usually located on the driver’s side, under the dashboard, often behind a small access panel. You might need to remove a few screws or clips to access it.
- Underhood Fuse Box (Power Distribution Center): This box is located in the engine compartment, typically near the battery or on the driver’s side fender.
Important Note: Always consult your owner’s manual for the exact location of both fuse boxes in your specific Malibu model. The manual will also provide detailed diagrams specific to your car’s configuration.
Decoding the 1999 Chevy Malibu Fuse Diagram
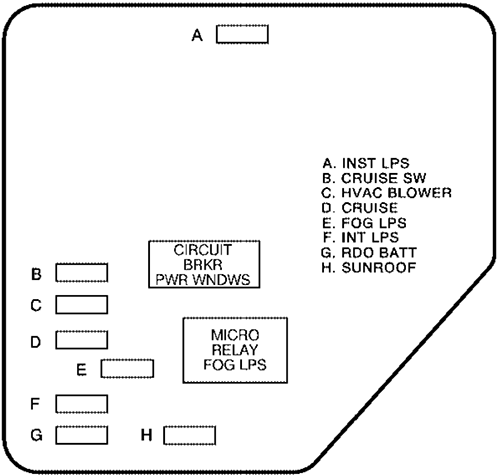
The fuse diagram, usually found on the inside of the fuse box cover or in your owner’s manual, is your key to understanding the electrical system. It will typically show:
- Each Fuse’s Location: A visual representation of where each fuse is placed within the fuse box.
- Fuse Ampere Rating (Amps): The current rating of each fuse, indicating the maximum current it can handle before blowing. This is often indicated by a color code.
- Circuit Protection: The specific electrical components or circuits each fuse protects. This is crucial for troubleshooting.
Understanding Common Fuse Types and Colors:
- Mini Fuses: These are the most common type of fuse used in the 1999 Malibu.
- Colors and Ampere Ratings:
- Tan - 3 Amp
- Violet - 5 Amp
- Brown - 7.5 Amp
- Red - 10 Amp
- Blue - 15 Amp
- Yellow - 20 Amp
- Clear/Natural - 25 Amp
- Green - 30 Amp
- Orange - 40 Amp
- Colors and Ampere Ratings:
Common Electrical Issues and Their Corresponding Fuses
Here’s a breakdown of some common electrical problems in the 1999 Chevy Malibu and the fuses you should check:
- Headlights Not Working: Check the fuses for the headlights and high beams, typically located in the underhood fuse box. Also, check the headlight relay.
- Brake Lights Not Working: Examine the fuse for the brake lights, often located in the interior fuse box. Also, inspect the brake light switch.
- Turn Signals/Hazard Lights Not Working: Inspect the turn signal/hazard light fuse and the flasher relay, usually found in the interior or underhood fuse box.
- Radio Not Working: Check the radio fuse, often located in the interior fuse box.
- Power Windows Not Working: Check the power window fuse, frequently located in the interior fuse box.
- Cigarette Lighter/Power Outlet Not Working: Inspect the fuse for the cigarette lighter/power outlet, typically located in the interior fuse box.
- Windshield Wipers Not Working: Check the wiper fuse, usually located in the underhood fuse box. Also, check the wiper motor relay.
- Dashboard Lights Not Working: Check the instrument panel fuse, often located in the interior fuse box.
Troubleshooting Tips:
- Visual Inspection: Before replacing a fuse, visually inspect it for a broken filament.
- Use a Fuse Tester: A fuse tester is a simple and inexpensive tool to quickly check if a fuse is blown.
- Replace with the Correct Ampere Rating: Always replace a blown fuse with a fuse of the same ampere rating. Using a higher-rated fuse can damage the electrical system.
- Check for Short Circuits: If a fuse blows repeatedly, there may be a short circuit in the wiring. This requires professional diagnosis.
- Consult Your Owner’s Manual: Your owner’s manual is your best resource for specific fuse locations and circuit information.
Safety Precautions
- Disconnect the Battery: Before working on any electrical components, disconnect the negative battery cable to prevent accidental shorts and electrical shocks.
- Avoid Touching Metal: Be careful not to touch any metal parts of the electrical system while the battery is connected.
- If Unsure, Consult a Professional: If you are not comfortable working on electrical systems, it is best to consult a qualified mechanic.
Conclusion
Understanding the 1999 Chevy Malibu fuse diagram is a vital skill for any owner. By knowing where to find the fuse boxes, how to read the diagram, and which fuses control specific circuits, you can effectively diagnose and resolve many common electrical problems. Always prioritize safety, and remember that your owner’s manual is your best resource. With this guide and a little patience, you can keep your 1999 Chevy Malibu running smoothly for years to come.
Frequently Asked Questions (FAQs)
Where can I find the fuse diagram for my 1999 Chevy Malibu?
The fuse diagram is typically located on the inside of the fuse box cover and in your owner’s manual.
What should I do if a fuse keeps blowing?
If a fuse keeps blowing, there is likely a short circuit in the wiring. This requires professional diagnosis and repair.
Can I use a higher ampere fuse than the one specified in the diagram?
No, using a higher ampere fuse can damage the electrical system and potentially cause a fire. Always replace a blown fuse with one of the same rating.
What tools do I need to check and replace fuses?
You will need a fuse puller (often included in the fuse box lid or as a separate tool) and potentially a fuse tester.
How do I know if a fuse is blown without a tester?
You can visually inspect the fuse. Look for a broken filament inside the fuse housing. However, a fuse tester is more reliable.
