Low battery
Battery level is below 20%. Connect charger soon.


2000 Harley-Davidson Road King Wiring: The Blueprint Every Rider Must Have
The 2000 Harley-Davidson Road King, a classic American icon, demands respect – and a thorough understanding of its electrical system. Whether you’re troubleshooting a faulty turn signal, installing aftermarket accessories, or simply performing routine maintenance, a comprehensive grasp of your Road King’s wiring is essential. This guide provides the blueprint every 2000 Road King rider must have, offering insights into the system’s complexities and empowering you to tackle electrical challenges with confidence.
Understanding the 2000 Road King’s Electrical System
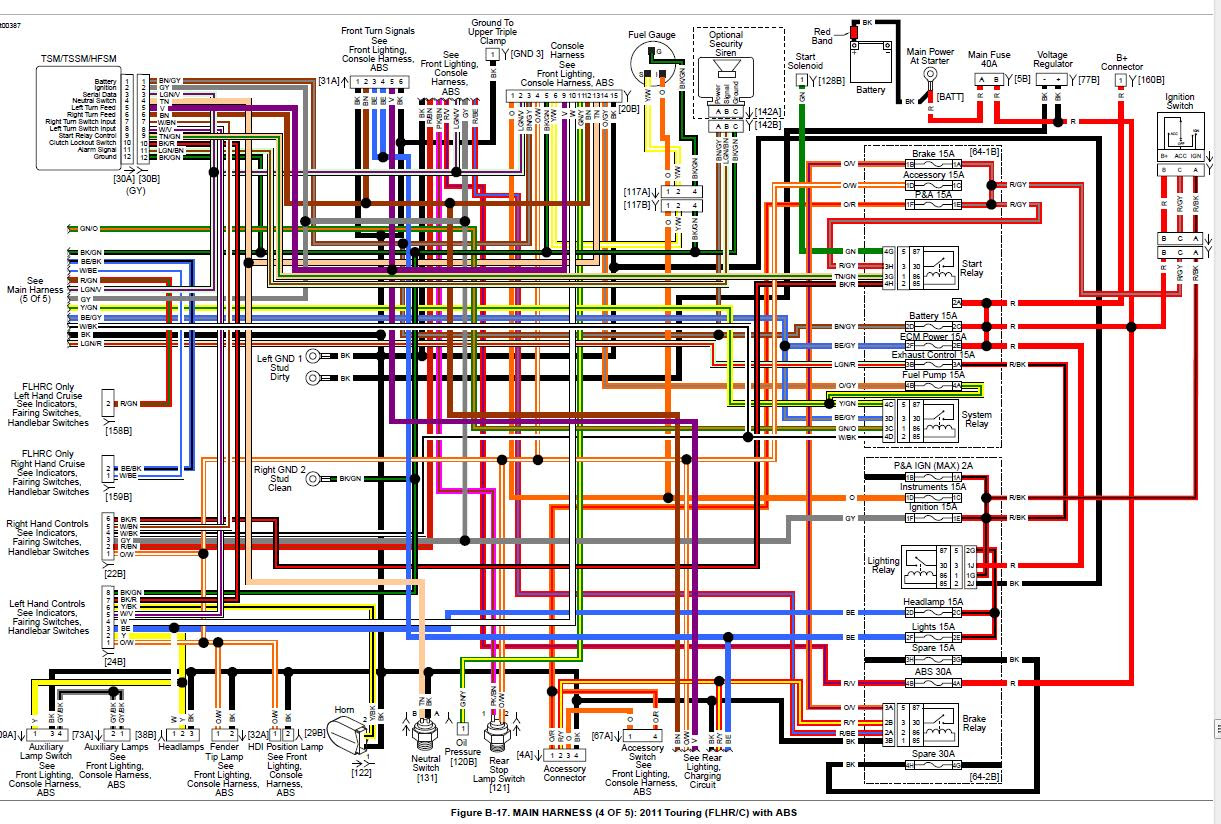
The 2000 Road King’s electrical system, while seemingly complex, is built upon a logical architecture. It relies on a combination of circuits, fuses, relays, and the main wiring harness to distribute power throughout the motorcycle. Understanding these components is crucial for effective troubleshooting and modifications.
- Main Wiring Harness: The central nervous system, connecting all electrical components.
- Fuse Block: Protects circuits from overloads. Regular inspection is vital.
- Relays: Control high-current devices like the starter motor and headlights, protecting the ignition switch.
- Circuit Breakers: Provide additional protection against short circuits and overloads.
- Grounding System: Proper grounding is critical for reliable electrical function. Corrosion can significantly impact performance.
Locating Your Wiring Diagram
Before embarking on any electrical work, obtaining the correct wiring diagram is paramount. While a generic diagram may offer some assistance, a diagram specific to your 2000 Harley-Davidson Road King is absolutely necessary for accurate troubleshooting and repairs. You can obtain this diagram through several avenues:
- Harley-Davidson Dealership: The most reliable source; they can provide factory-specific diagrams.
- Online Retailers: Many online retailers specializing in motorcycle parts sell wiring diagrams. Ensure compatibility with your specific year and model.
- Repair Manuals: Comprehensive repair manuals for your year and model often include detailed wiring diagrams. These manuals provide additional valuable information beyond just the wiring.
Common Wiring Issues and Troubleshooting
Several common issues plague the 2000 Road King’s electrical system. Knowing the potential problems and troubleshooting steps can save you time and frustration.
- Faulty Headlight: Check the bulb, fuse, and wiring connections.
- Non-functioning Turn Signals: Inspect bulbs, fuses, and the turn signal switch. Relays are also a common culprit.
- Dead Battery: Check the charging system and battery condition. A faulty voltage regulator can lead to battery drain.
- Intermittent Electrical Problems: Look for loose connections, corroded terminals, and damaged wiring.
Essential Tools for Road King Electrical Work
Having the right tools makes the job easier and safer.
- Multimeter: Essential for testing voltage, continuity, and current.
- Wire Strippers and Crimpers: For working with wires and connectors.
- Soldering Iron and Solder: For creating strong and reliable connections.
- Test Light: Useful for quickly checking for power at various points in the circuit.
- Safety Glasses and Gloves: Protect yourself from injury.
Modifying Your 2000 Road King’s Electrical System
Adding aftermarket accessories requires careful planning and execution. Always consult your wiring diagram and consider the amperage draw of new components. Improper modifications can lead to blown fuses, damaged components, or even fire.
Conclusion
Understanding the wiring system of your 2000 Harley-Davidson Road King is crucial for safe and efficient operation and maintenance. By utilizing the appropriate resources, tools, and techniques outlined in this guide, you can confidently tackle electrical challenges, ensuring your iconic machine remains in top condition. Remember always prioritize safety and consult a professional if you feel unsure about any aspect of the electrical system.
Frequently Asked Questions (FAQs)
Q1: Where can I find a free wiring diagram for my 2000 Road King?
A1: While free diagrams exist online, their accuracy and completeness are questionable. It’s strongly recommended to obtain a verified diagram from a Harley-Davidson dealership or a reputable parts supplier to ensure accuracy and avoid potential damage.
Q2: How often should I check my Road King’s fuses?
A2: Regularly inspecting your fuses, especially before long rides, is recommended. A visual inspection can identify blown fuses, preventing potential electrical failures.
Q3: Can I install aftermarket accessories myself?
A3: While possible, installing aftermarket accessories requires electrical knowledge and careful planning. If you’re unsure, consulting a professional motorcycle mechanic is advisable.
Q4: What should I do if I encounter a short circuit?
A4: Immediately disconnect the battery’s negative terminal. Then, carefully inspect the wiring for damaged insulation or loose connections. Never attempt repairs while the system is energized.
Q5: My Road King’s battery keeps dying. What could be the cause?
A5: Several factors can cause a dying battery, including a faulty charging system (voltage regulator, stator), parasitic drain (leaving lights on), or a simply aging battery. Testing the charging system and battery is crucial for diagnosis.
