Low battery
Battery level is below 20%. Connect charger soon.


2004 Ford E-150 Fuse Diagram – Every Fuse Explained
Owning a 2004 Ford E-150 can mean reliable transportation for work or leisure. However, electrical issues can quickly sideline your van. One of the most common culprits? Blown fuses. This comprehensive guide provides a detailed 2004 Ford E-150 fuse diagram, explaining each fuse’s function and location, helping you diagnose and resolve electrical problems efficiently. By understanding your fuse box layout, you’ll be prepared to handle common issues and maintain your van’s electrical system effectively.
Understanding Your 2004 Ford E-150 Fuse Boxes
The 2004 Ford E-150 typically features two fuse boxes: one located inside the passenger compartment and another under the hood in the engine bay. Identifying these locations is the first step in tackling electrical problems.
- Passenger Compartment Fuse Box (Central Junction Box): Usually found on the lower left side of the dashboard, often behind a small access panel.
- Engine Compartment Fuse Box (Power Distribution Box): Located in the engine bay, usually near the battery or on the driver’s side fender.
It’s crucial to consult your owner’s manual for the exact location of your fuse boxes, as minor variations can occur.
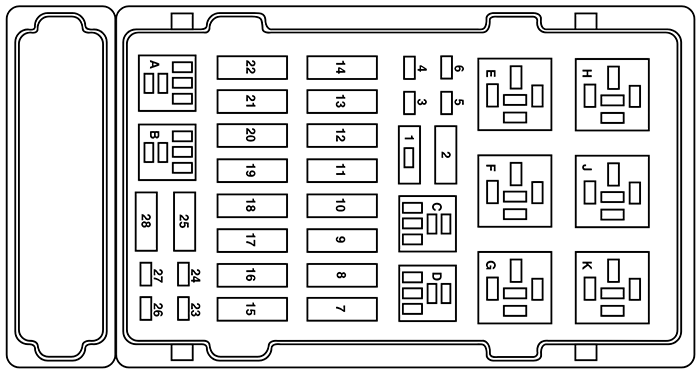
2004 Ford E-150 Fuse Diagram – Passenger Compartment (Central Junction Box)
This fuse box primarily protects circuits related to the interior lights, accessories, and driver comfort features. The following table provides a detailed breakdown of the fuses, their amperage, and the components they protect. Note: The exact fuse layout may vary slightly depending on the specific trim and optional equipment installed on your E-150. Always refer to your owner’s manual for the definitive diagram.
| Fuse Number | Amperage | Protected Circuit |
|---|---|---|
| 1 | 15A | Rear Wiper Motor, Rear Wiper Washer Pump |
| 2 | 20A | Trailer Tow Park Lamps |
| 3 | 20A | Power Door Locks, Power Windows, Remote Keyless Entry |
| 4 | 10A | Instrument Cluster, Back-Up Lamps, Cruise Control |
| 5 | 15A | Radio, Clock, Interior Lamps |
| 6 | 15A | Cigarette Lighter, Power Outlet |
| 7 | 15A | Turn Signals, Hazard Warning Lamps, Brake Lights |
| 8 | 10A | Horn |
| 9 | 20A | Air Conditioning Clutch Relay, Blower Motor Relay |
| 10 | 10A | ABS Module |
| 11 | 15A | Brake Lights |
| 12 | 10A | ABS Module |
| 13 | 20A | Power Seat |
| 14 | 10A | Interior Lamps, Dome Light |
| 15 | 10A | Anti-Theft System |
| 16 | 15A | Radio, Amplifier |
| 17 | 10A | Airbag Control Module |
| 18 | 20A | Trailer Tow Stop Lamps |
| 19 | 10A | Headlamps |
| 20 | 20A | Power Antenna |
Important Considerations for the Passenger Compartment Fuse Box:
- Fuse Puller: Many fuse boxes include a small fuse puller tool, making it easier to remove and replace fuses.
- Spare Fuses: Keep a supply of spare fuses with various amperages in your glove compartment.
- Proper Amperage: Always replace a blown fuse with one of the same amperage rating. Using a higher amperage fuse can damage the protected circuit and potentially cause a fire.
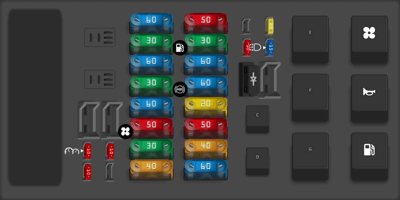
2004 Ford E-150 Fuse Diagram – Engine Compartment (Power Distribution Box)
The engine compartment fuse box protects circuits related to engine management, starting, and essential vehicle functions. This is a critical area to understand for maintaining your van’s performance. Again, consult your owner’s manual for the precise diagram.
| Fuse Number | Amperage | Protected Circuit |
|---|---|---|
| 1 | 60A | ABS Module |
| 2 | 40A | ABS Hydraulic Pump |
| 3 | 40A | Power Windows |
| 4 | 30A | Starter Relay |
| 5 | 50A | Anti-Lock Brake System |
| 6 | 30A | Fuel Pump |
| 7 | 30A | Cooling Fan Relay |
| 8 | 60A | Blower Motor |
| 9 | 30A | Power Door Locks |
| 10 | 10A | PCM (Powertrain Control Module) |
| 11 | 10A | Ignition Coil |
| 12 | 10A | Fuel Injectors |
| 13 | 10A | Transmission Control Module |
| 14 | 15A | Horn Relay |
| 15 | 10A | PCM Relay, Starter Solenoid |
| 16 | 15A | Headlamps |
| 17 | 15A | Windshield Wiper Motor |
| 18 | 20A | Headlamps |
| 19 | 10A | Fuel Pump Relay |
Important Considerations for the Engine Compartment Fuse Box:
- High-Amperage Fuses: This fuse box often contains higher amperage fuses and relays, which protect crucial components.
- Relays: Some circuits are protected by relays, which are electromechanical switches. If a circuit isn’t working, check the corresponding relay for proper function.
- Water Resistance: The engine compartment fuse box is designed to withstand the elements, but ensure the cover is securely closed to prevent water damage.
Troubleshooting Tips for Blown Fuses
If you suspect a blown fuse, follow these steps:
- Identify the Affected Circuit: Determine which component or system isn’t working (e.g., headlights, radio, horn).
- Locate the Corresponding Fuse: Use the fuse diagrams (above or in your owner’s manual) to find the fuse for the affected circuit.
- Inspect the Fuse: Visually inspect the fuse. A blown fuse will have a broken wire inside. You can use a fuse tester for confirmation.
- Replace the Fuse: Replace the blown fuse with one of the same amperage rating.
- Test the Circuit: Turn on the component to see if it works. If the new fuse blows immediately, there’s a short circuit or other underlying issue that needs further diagnosis by a qualified mechanic.
Conclusion
Understanding the 2004 Ford E-150 fuse diagram is crucial for maintaining your van’s electrical system and preventing unexpected breakdowns. By knowing the location of your fuse boxes and the function of each fuse, you can efficiently diagnose and resolve common electrical problems. Remember to always consult your owner’s manual for the most accurate information and to prioritize safety when working with electrical systems. Regular maintenance and a good understanding of your vehicle’s electrical system will contribute to a reliable and enjoyable driving experience.
Frequently Asked Questions (FAQs)
1. Where can I find the fuse diagram for my 2004 Ford E-150?
The fuse diagrams are typically found in your owner’s manual. You can also often find diagrams printed on the inside of the fuse box covers. Online resources and repair manuals are also available.
2. What should I do if a fuse keeps blowing?
If a fuse keeps blowing, there’s likely a short circuit or an overloaded circuit. Stop replacing the fuse and have the system inspected by a qualified mechanic to identify and repair the underlying issue.
3. Can I use a higher amperage fuse than specified?
No. Using a higher amperage fuse can damage the protected circuit, potentially causing a fire. Always replace a blown fuse with one of the same amperage rating.
4. What do I do if the fuse box cover is missing?
If the fuse box cover is missing, replace it as soon as possible. The cover helps protect the fuses and the electrical components from the elements. You can often find replacement covers at auto parts stores or online retailers.
5. What tools do I need to replace a fuse?
You typically only need a fuse puller (often included in the fuse box) and a replacement fuse of the correct amperage. A flashlight can be helpful for seeing in dimly lit areas. A fuse tester can also confirm if a fuse is blown.
