Low battery
Battery level is below 20%. Connect charger soon.


2010 Cadillac CTS Fuse Box – Diagram & Troubleshooting Guide
The 2010 Cadillac CTS is a sophisticated machine, offering a blend of luxury, performance, and advanced technology. However, like any vehicle, it relies heavily on a complex electrical system. A crucial component of this system is the fuse box, which protects vital circuits from overloads and short circuits. Understanding your 2010 CTS fuse box is essential for troubleshooting electrical problems and maintaining your vehicle’s functionality. This comprehensive guide provides a detailed overview of the fuse box locations, diagrams, and troubleshooting tips to help you keep your Cadillac running smoothly.
Understanding the Importance of Fuses
Before diving into the specifics, it’s important to understand the role fuses play. Think of them as safety valves for your car’s electrical system. They are designed to:
- Protect electrical circuits: Fuses prevent excessive current from flowing through wires and components, which can cause damage or even fire.
- Prevent component failure: By interrupting the flow of electricity in case of a fault, fuses safeguard sensitive electronics like the radio, lights, and engine control unit (ECU).
- Simplify troubleshooting: When an electrical component fails, the first place to check is the corresponding fuse.
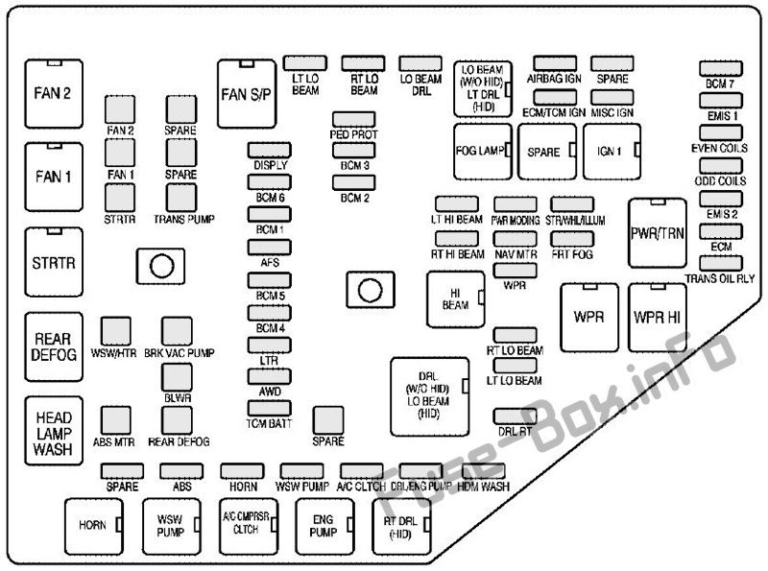
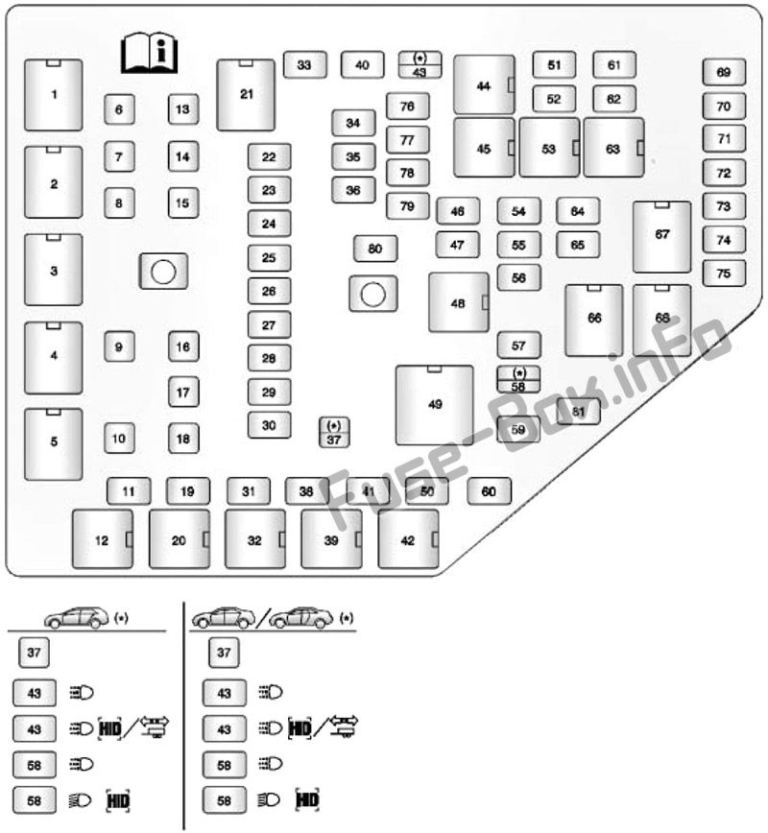
2010 Cadillac CTS Fuse Box Locations
The 2010 Cadillac CTS typically has multiple fuse boxes located in different areas of the vehicle. Knowing where these are located is the first step in diagnosing an electrical issue. Here’s a breakdown:
- Engine Compartment Fuse Box (Underhood): This is the primary fuse box and houses fuses for critical engine and electrical components. It is usually found on the driver’s side, near the battery. The location is often marked with a diagram on the fuse box cover.
- Instrument Panel Fuse Box (Interior): Located inside the vehicle, this fuse box protects components like the radio, interior lights, and power windows. It’s often found on the driver’s side, behind the dashboard or under the steering wheel.
- Rear Compartment Fuse Box (If Equipped): Some CTS models may have a fuse box in the trunk or rear cargo area, protecting circuits for features like the power trunk release and rear audio components. (This is less common than the other two).
Important Note: Always consult your owner’s manual for the precise locations of each fuse box in your specific model, as there might be slight variations.
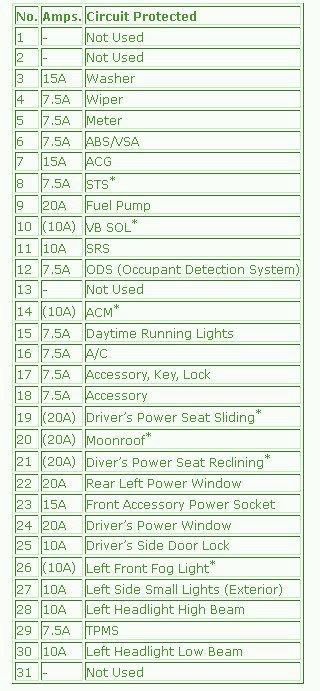
2010 Cadillac CTS Fuse Box Diagram – Decoding the Symbols
The fuse box cover usually contains a diagram that identifies each fuse and its corresponding circuit. These diagrams use symbols and abbreviations to convey the purpose of each fuse. Here’s a guide to understanding the common symbols and abbreviations you might encounter:
- Fuse Amperage: The number next to the fuse indicates its amperage rating (e.g., 10A, 15A, 20A). This represents the maximum current the fuse can handle before it blows.
- Common Symbols:
- Headlights: Represents the headlights.
- Taillights: Represents the taillights.
- Brake Lights: Represents the brake lights.
- Horn: Represents the horn.
- Radio: Represents the radio.
- Power Windows: Represents the power windows.
- Cigarette Lighter/Power Outlet: Represents the cigarette lighter or power outlet.
- ABS (Anti-lock Braking System): Represents the ABS system.
- ECU (Engine Control Unit): Represents the engine control unit.
- HVAC (Heating, Ventilation, and Air Conditioning): Represents the climate control system.
- Common Abbreviations:
- PWR: Power
- IGN: Ignition
- BATT: Battery
- LT: Lights
- HTR: Heater
- W/S: Windshield
Pro Tip: Keep your owner’s manual and the fuse box diagram readily available in your vehicle.
Troubleshooting Electrical Problems with the Fuse Box
When an electrical component malfunctions, the fuse box is usually the first place to investigate. Here’s a step-by-step guide to troubleshooting:
- Identify the Problem: Determine which component is not working (e.g., headlights, radio, power windows).
- Consult the Diagram: Locate the corresponding fuse for the faulty component on the fuse box diagram.
- Locate the Fuse Box: Identify the fuse box that contains the fuse you need to check (underhood, interior, or rear compartment).
- Visually Inspect the Fuse: Carefully examine the fuse. A blown fuse will have a broken filament (the thin wire inside the fuse). You may need a fuse puller (often included in the fuse box lid) to remove it.
- Test the Fuse (Recommended): Use a multimeter to test the fuse for continuity. If the multimeter doesn’t read any resistance, the fuse is good. If it reads infinite resistance, the fuse is blown.
- Replace the Fuse: If the fuse is blown, replace it with a new fuse of the same amperage rating. Using a higher amperage fuse can damage the circuit.
- Test the Component: Turn on the component to see if it works.
- Persistent Problems: If the fuse blows again immediately after replacement, there’s a short circuit in the wiring or the component itself. This likely requires professional diagnosis and repair.
- Check Multiple Fuses: Sometimes, a single problem can affect multiple circuits. Check all fuses related to the system that is malfunctioning.
Safety Precautions:
- Disconnect the Battery: Before working on any electrical system, disconnect the negative (black) battery cable to prevent accidental short circuits.
- Use the Correct Amperage: Always replace fuses with the correct amperage rating.
- Avoid Metal Objects: Use plastic fuse pullers and avoid using metal objects to remove fuses, as this can create a short circuit.
- If in doubt, seek professional help: Complex electrical issues can be challenging to diagnose and repair. If you’re not comfortable working with electrical systems, consult a qualified mechanic.
2010 Cadillac CTS Fuse Box – Common Issues and Solutions
Here are some common electrical problems and the fuses often associated with them:
- Headlights Not Working: Check the headlight fuse (usually in the engine compartment fuse box). Also, examine the bulbs and headlight relay.
- Radio Not Working: Check the radio fuse (usually in the instrument panel fuse box).
- Power Windows Not Working: Check the power window fuse (usually in the instrument panel fuse box).
- Cigarette Lighter/Power Outlet Not Working: Check the cigarette lighter fuse (usually in the instrument panel fuse box).
- ABS Light On: Check the ABS fuse (often in the engine compartment fuse box).
Conclusion
Understanding your 2010 Cadillac CTS fuse box is a critical aspect of vehicle maintenance. By knowing the locations, diagrams, and troubleshooting techniques, you can effectively diagnose and resolve many common electrical problems, saving you time and money. Remember to consult your owner’s manual for the most accurate information specific to your vehicle. Regular inspection and maintenance of your fuse boxes will help ensure your CTS continues to deliver the luxurious and reliable driving experience you expect.
Frequently Asked Questions (FAQs)
- Where can I find the fuse box diagram for my 2010 Cadillac CTS? The fuse box diagram is typically found on the inside of the fuse box cover and in your owner’s manual.
- What should I do if a fuse keeps blowing? If a fuse blows repeatedly, there’s likely a short circuit in the wiring or a faulty component. You should have the system inspected by a qualified mechanic.
- Can I use a higher amperage fuse to prevent it from blowing? No, using a higher amperage fuse is dangerous and can damage the electrical system and potentially cause a fire. Always use the correct amperage fuse specified in the diagram.
- What tools do I need to check and replace a fuse? You will typically need a fuse puller (often included with the fuse box cover) and a multimeter (optional, but highly recommended for testing fuses).
- Where can I buy replacement fuses? Replacement fuses are available at most auto parts stores, hardware stores, and online retailers. Ensure you purchase fuses with the correct amperage rating.
