Low battery
Battery level is below 20%. Connect charger soon.


2010 GMC Sierra Radio Wiring Harness – Full Diagram: Your Guide to Audio Upgrades and Repairs
The 2010 GMC Sierra, a workhorse of a truck, offers a robust platform for customization. One of the most common upgrades or repair needs for Sierra owners is the audio system. Whether you’re looking to install a new head unit, replace a faulty radio, or troubleshoot speaker issues, understanding the 2010 GMC Sierra radio wiring harness is crucial. This article provides a comprehensive guide, including wiring diagrams and helpful information to navigate your audio project with confidence.
Understanding the Importance of the Wiring Harness
The radio wiring harness is the central nervous system of your audio system. It’s a collection of wires that connect your radio to various components, including:
- Speakers: Transmitting audio signals to your speakers.
- Power Source: Providing the necessary voltage to operate the radio.
- Ground: Completing the electrical circuit.
- Antenna: Receiving radio signals.
- Accessory Wires: (e.g., illumination, ignition) enabling features.
Incorrectly connecting or damaging the wiring can lead to:
- Non-functional radio: No sound, no power, or no display.
- Speaker issues: Static, distortion, or complete lack of sound.
- Electrical shorts: Potentially damaging your vehicle’s electrical system.
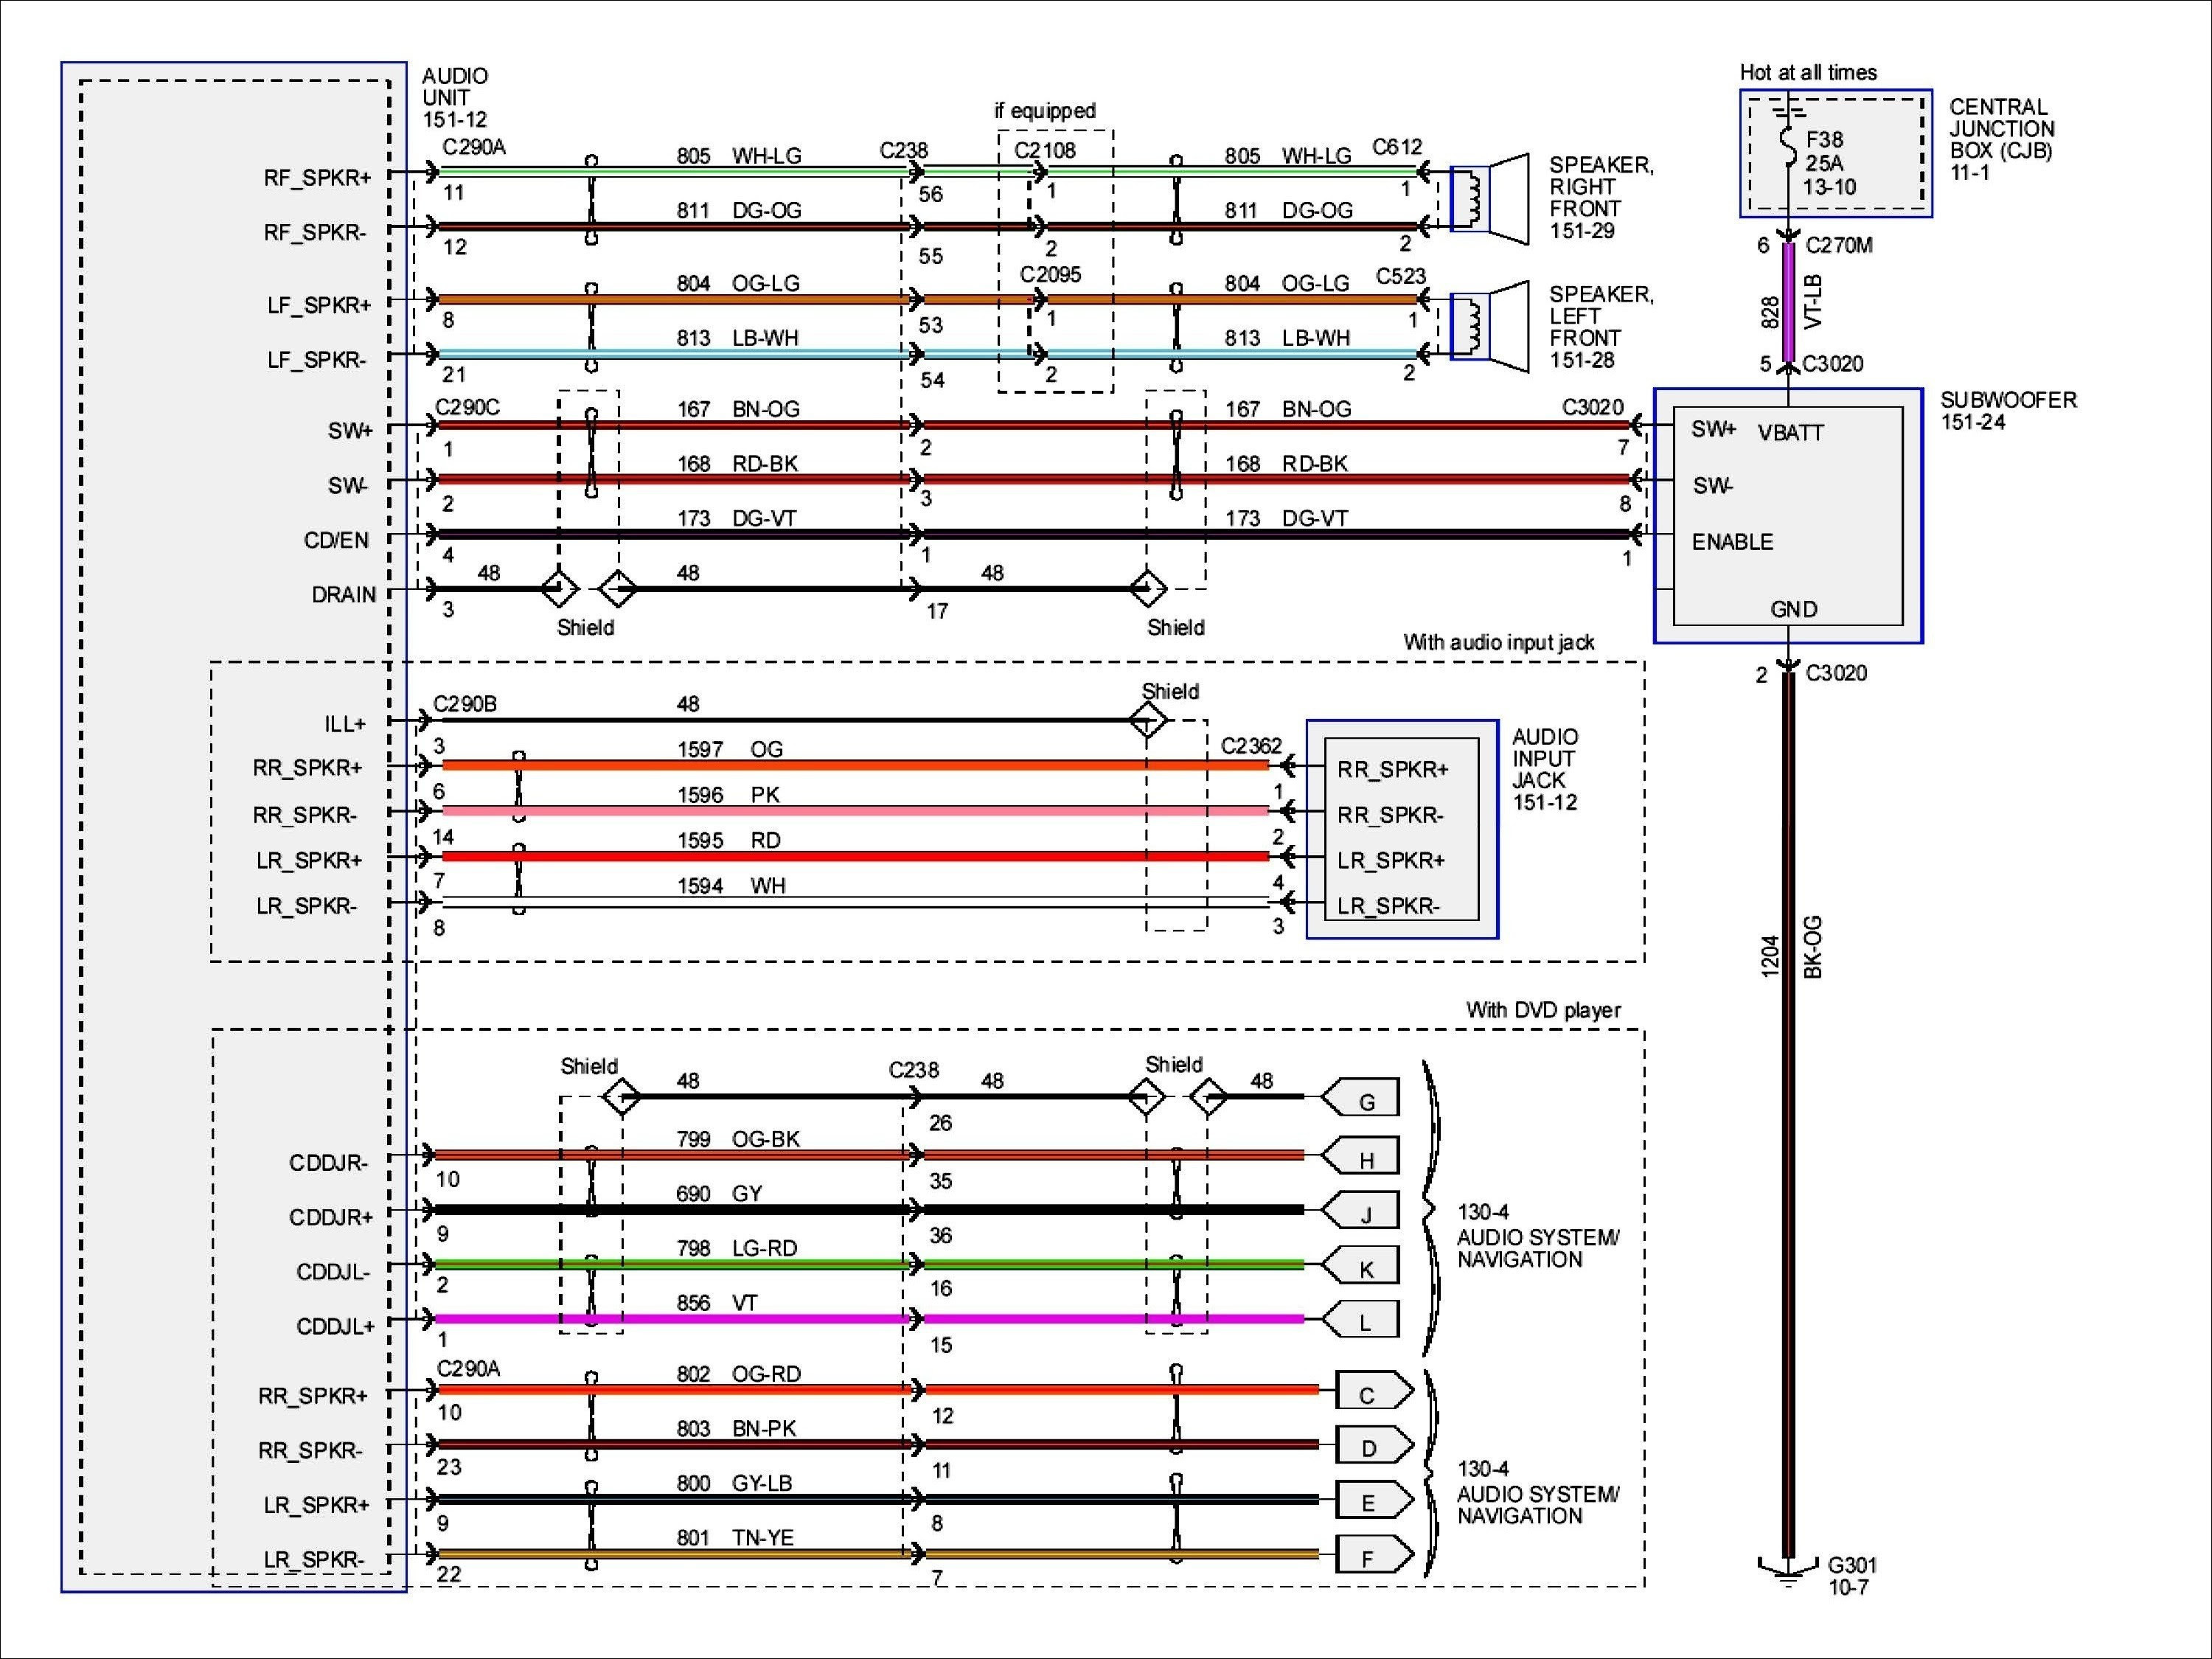
2010 GMC Sierra Radio Wiring Diagram: Color Codes and Functions
While a physical wiring diagram is highly recommended, especially a specific one for your trim level and options, the following information provides a general overview of the typical wiring configuration in a 2010 GMC Sierra. Always verify with a specific diagram for your vehicle before making any connections.
Here’s a breakdown of the common wire colors and their functions:
(Important Note: Wire colors can vary slightly depending on the factory radio options and trim level. Always consult a specific wiring diagram for your truck.)
| Wire Color | Function | Notes |
|---|---|---|
| Power Wires | ||
| Red | 12V Battery (Constant Power) | Provides power to maintain radio presets and clock. |
| Yellow | 12V Ignition (Switched Power) | Provides power only when the ignition is turned on. |
| Black | Ground | Essential for completing the electrical circuit. |
| Speaker Wires | ||
| Gray (Left Front +) | Front Left Speaker (+) | |
| Gray/Black (Left Front -) | Front Left Speaker (-) | |
| White (Right Front +) | Front Right Speaker (+) | |
| White/Black (Right Front -) | Front Right Speaker (-) | |
| Green (Left Rear +) | Rear Left Speaker (+) | |
| Green/Black (Left Rear -) | Rear Left Speaker (-) | |
| Purple (Right Rear +) | Rear Right Speaker (+) | |
| Purple/Black (Right Rear -) | Rear Right Speaker (-) | |
| Accessory Wires | ||
| Orange | Dash Lights/Illumination | Provides power to illuminate the radio’s display and buttons when the headlights are on. |
| Blue | Power Antenna/Amp Turn-On | Used to control a power antenna or turn on an external amplifier. May not be present depending on factory options. |
Key Considerations:
- Aftermarket Harnesses: When installing an aftermarket radio, you’ll likely use a wiring harness adapter. These adapters typically plug into the factory harness and provide the correct connections for your new radio.
- Factory Amplifiers: If your 2010 Sierra came with a factory amplifier, the wiring will be more complex. You’ll need to understand how to integrate the new radio with the existing amplifier or bypass it.
- Steering Wheel Controls: If your truck has steering wheel controls, you’ll need an adapter to retain this functionality when installing an aftermarket radio.
Finding a Specific Wiring Diagram for Your 2010 GMC Sierra
The best way to ensure accurate wiring information is to obtain a diagram specific to your vehicle. Here are some resources:
- Haynes or Chilton Repair Manuals: These manuals often include detailed wiring diagrams.
- Online Wiring Diagram Websites: Search online for your specific truck’s year, make, and model, along with “wiring diagram.”
- Factory Service Manual: If you’re serious about audio upgrades, a factory service manual is the most comprehensive source of information.
- Professional Installation Shops: Local car audio shops often have access to wiring information and can provide diagrams.
Tools and Materials You’ll Need
Before starting your project, gather the necessary tools and materials:
- Wiring Diagram (Specific to your vehicle)
- Wire Strippers/Crimpers
- Butt Connectors or Solder and Heat Shrink Tubing
- Electrical Tape
- Multimeter (for testing)
- Aftermarket Radio (if applicable)
- Wiring Harness Adapter (if applicable)
- Screwdrivers and other basic tools
Troubleshooting Common Radio Issues
If your radio isn’t working correctly, here’s a basic troubleshooting checklist:
- Check Fuses: Inspect all fuses related to the radio, including the radio fuse and any related fuses.
- Verify Power and Ground: Use a multimeter to confirm that the radio is receiving power and has a good ground connection.
- Inspect Speaker Wires: Check the speaker wires for shorts or breaks.
- Test Speakers: Connect a known-good speaker to the radio to see if the problem lies with the speakers.
- Check Antenna Connection: Ensure the antenna is properly connected.
Conclusion: Mastering Your 2010 GMC Sierra Audio
Upgrading or repairing your 2010 GMC Sierra’s radio system can be a rewarding project. By understanding the wiring harness, utilizing the correct diagrams, and following safety precautions, you can ensure a successful and enjoyable audio experience. Remember to always prioritize safety and consult with a professional if you are unsure about any aspect of the installation.
FAQs: Frequently Asked Questions
1. Where can I find a specific wiring diagram for my 2010 GMC Sierra?
The best sources are repair manuals (Haynes or Chilton), online wiring diagram websites, or a factory service manual. Also, consult a local car audio shop.
2. What is a wiring harness adapter, and do I need one?
A wiring harness adapter plugs into your factory radio harness and provides the correct connections for an aftermarket radio. You’ll likely need one when replacing the factory radio.
3. What if my 2010 Sierra has a factory amplifier?
If your truck has a factory amplifier, the wiring will be more complex. You may need to integrate the new radio with the existing amplifier or bypass it using a specific adapter or wiring method outlined in your vehicle’s diagram.
4. How do I retain my steering wheel controls with an aftermarket radio?
You’ll need a special adapter designed to retain steering wheel controls. These adapters connect to the wiring harness and translate the steering wheel control signals to the new radio.
5. What precautions should I take when working with car wiring?
- Disconnect the negative battery terminal before starting any electrical work.
- Double-check all connections to avoid shorts.
- Use proper crimping or soldering techniques for secure connections.
- Insulate all connections with electrical tape or heat shrink tubing.
- Consult a professional if you’re unsure about any aspect of the installation.
