Low battery
Battery level is below 20%. Connect charger soon.


2013 Dodge Avenger Radio Wiring Harness – Complete Diagram: Your Guide to Audio Bliss
The 2013 Dodge Avenger, a mid-size sedan offering a blend of performance and practicality, often sees owners looking to upgrade or repair their factory radio systems. Whether you’re aiming for a new head unit with modern features like Bluetooth and navigation, or simply troubleshooting a malfunctioning radio, understanding the 2013 Dodge Avenger radio wiring harness is crucial. This comprehensive guide provides you with the information you need to navigate the complexities of your car’s audio system.
Understanding the Importance of the Wiring Harness
Before diving into the specifics, let’s understand why the wiring harness is so important. The radio wiring harness acts as the central nervous system for your car’s audio system. It’s a collection of wires, connectors, and terminals that transmit power, ground, and audio signals between the radio and other components like speakers, amplifiers, and the car’s electrical system.
- Connection Point: It’s the crucial link between your radio and the car’s electrical system.
- Signal Transmission: Facilitates the flow of audio signals to the speakers.
- Power and Ground: Provides the necessary power supply and ground connections for radio operation.
- Component Integration: Connects to other components like steering wheel controls and external amplifiers.
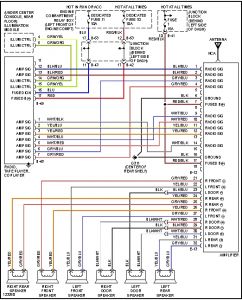
Decoding the 2013 Dodge Avenger Radio Wiring Diagram
While providing a precise, copyrighted wiring diagram isn’t possible here, we can break down the essential components and common wire colors you’ll likely encounter in the 2013 Dodge Avenger radio wiring harness. This information will help you identify and connect your new aftermarket radio or troubleshoot existing issues.
Important Note: Always disconnect the negative battery terminal before working on any electrical components in your vehicle to prevent short circuits and potential damage.
Here’s a general overview of the wire colors and their typical functions. Remember that variations might exist, so always consult a specific wiring diagram for your vehicle’s trim level and options.
- Power Wires:
- Red (Switched Power): Typically connects to the ignition switch and provides power when the key is in the “ACC” or “ON” position.
- Yellow (Constant Power/Battery): Supplies continuous power to the radio, preserving memory settings (like radio presets).
- Ground Wire:
- Black: Provides a ground connection, completing the electrical circuit.
- Speaker Wires:
- These wires come in pairs, with each pair corresponding to a speaker. Common color combinations include:
- Front Left Speaker: White (+) / White with Black Stripe (-)
- Front Right Speaker: Gray (+) / Gray with Black Stripe (-)
- Rear Left Speaker: Green (+) / Green with Black Stripe (-)
- Rear Right Speaker: Purple (+) / Purple with Black Stripe (-)
- These wires come in pairs, with each pair corresponding to a speaker. Common color combinations include:
- Other Wires:
- Orange (Illumination): Connects to the car’s interior lighting and dims the radio display when the headlights are on.
- Blue (Power Antenna/Amplifier Turn-On): Used to control an external amplifier or power antenna.
- CAN Bus Wires (Typically Orange/Green and Orange/Brown): These wires are crucial for communication with the vehicle’s computer system and often control features like steering wheel controls. Do not cut these unless you know what you are doing!
Where to Find More Detailed Diagrams:
- Online Repair Manuals: Websites like Chilton, Haynes, or AllData provide detailed wiring diagrams for a subscription fee.
- Aftermarket Radio Install Kits: Many aftermarket radio installation kits include wiring adapters that simplify the process and often come with detailed color-coded diagrams.
- Specialized Automotive Wiring Books: These books can provide comprehensive information and diagrams for various car models.
Step-by-Step Guide to Radio Wiring (Simplified)
- Disconnect the Battery: Safety first! Disconnect the negative battery terminal.
- Remove the Old Radio: Consult your vehicle’s manual for instructions on removing the factory radio. This usually involves removing trim panels and screws.
- Identify the Wires: Carefully identify the wires in the factory wiring harness. Use the color codes above as a reference and compare them with the diagrams you’ve obtained.
- Connect the Aftermarket Radio Harness: Use a wiring harness adapter (if available) to connect your new radio to the factory wiring. This adapter plugs into the factory harness and provides the correct connections for your new radio.
- Connect Speaker Wires: Connect the speaker wires from the new radio to the corresponding speaker wires in the factory harness.
- Connect Power and Ground: Connect the power and ground wires, ensuring a solid connection.
- Test the Radio: Before reassembling everything, reconnect the battery and test the radio to ensure it functions correctly.
- Reassemble: Once you’ve confirmed everything works, reassemble the dash components.
Troubleshooting Common Radio Problems
Understanding the wiring harness can help you diagnose and fix common radio problems:
- No Power: Check the fuse for the radio. Then, confirm that the constant power (yellow) and switched power (red) wires are receiving power. Ensure the ground wire (black) has a good connection.
- No Sound: Check the speaker wires for proper connection. Verify that the radio’s volume is not muted and that the balance and fader settings are correctly configured.
- Static or Poor Sound Quality: Check the speaker wires for shorts or damage. Ensure the ground wire is securely connected. If using an external amplifier, check its connections.
Conclusion: Empowering Your Audio Experience
By understanding the 2013 Dodge Avenger radio wiring harness, you’re equipped to upgrade your audio system, troubleshoot problems, and enjoy a more immersive driving experience. Remember to always prioritize safety, consult reliable diagrams, and take your time during the installation process. With the right knowledge and patience, you can transform your car’s sound system into something truly exceptional.
Frequently Asked Questions (FAQs)
1. Where can I get a specific wiring diagram for my 2013 Dodge Avenger?
Detailed wiring diagrams can be found in online repair manuals from companies like Chilton or Haynes. You can also purchase a subscription to AllData, which provides comprehensive repair information.
2. What if my car has steering wheel controls? How do I connect them to my new radio?
You’ll typically need a special adapter to retain steering wheel controls. These adapters connect between the car’s wiring harness and the new radio and translate the steering wheel control signals. Look for adapters specifically designed for your vehicle and the new radio’s brand.
3. Is it necessary to use a wiring harness adapter?
While not always necessary, a wiring harness adapter is highly recommended. It simplifies the installation process, eliminates the need to cut and splice wires, and reduces the risk of damaging the factory wiring.
4. What if I’m not comfortable working with car wiring?
If you’re not comfortable working with electrical systems, it’s best to consult a professional car audio installer. They have the expertise and tools to ensure a safe and correct installation.
5. What size speakers does my 2013 Dodge Avenger have?
The speaker sizes vary depending on the trim level and options. Generally, the front speakers are 6x9 inch or 6.5 inch, and the rear speakers are typically 6x9 inch or 6.5 inch. Consult your vehicle’s manual or search online using your specific trim level (e.g., “2013 Dodge Avenger R/T speaker size”).
