Low battery
Battery level is below 20%. Connect charger soon.


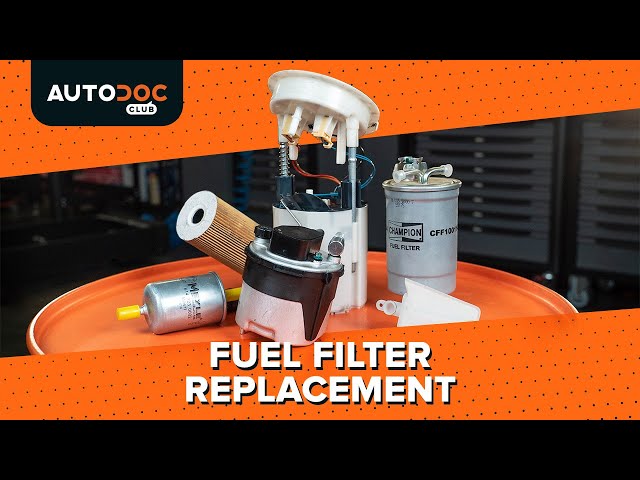

2013 Nissan Rogue Fuel Filter Location – Quick DIY Replacement Guide
Is your 2013 Nissan Rogue experiencing sputtering, difficulty starting, or reduced engine performance? These symptoms could point to a clogged fuel filter, hindering the proper flow of fuel to your engine. Replacing the fuel filter is a relatively straightforward maintenance task that can significantly improve your Rogue’s performance and fuel efficiency. This guide provides you with a comprehensive overview of the 2013 Nissan Rogue fuel filter location and offers a step-by-step DIY replacement guide.
Understanding the Importance of a Clean Fuel Filter
The fuel filter plays a crucial role in your vehicle’s health. It acts as a barrier, preventing dirt, rust, and other contaminants from entering your engine. A clogged fuel filter restricts fuel flow, leading to:
- Reduced Fuel Efficiency: The engine struggles to receive the necessary fuel, leading to increased fuel consumption.
- Poor Engine Performance: You might experience hesitation, sputtering, or a loss of power.
- Difficulty Starting: A clogged filter can prevent sufficient fuel from reaching the engine, making it difficult to start.
- Potential Damage to Fuel Pump and Injectors: Overworking the fuel pump due to the restriction can shorten its lifespan, and contaminants can damage fuel injectors.
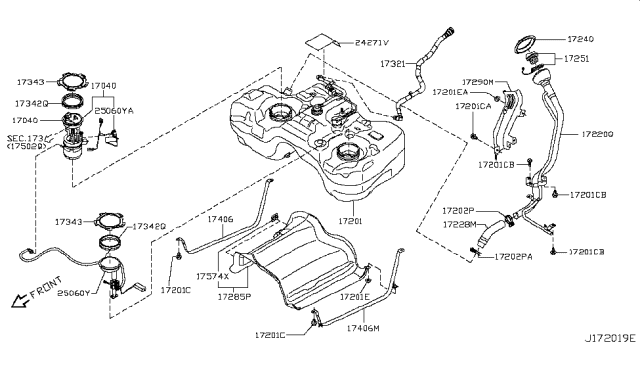
2013 Nissan Rogue Fuel Filter Location: Where to Find It
Fortunately, the 2013 Nissan Rogue fuel filter is located in a readily accessible location, making the replacement process easier for DIY enthusiasts. The fuel filter is integrated within the fuel pump assembly, which is situated inside the fuel tank. This means you’ll need to access the fuel tank to replace the filter.
DIY Fuel Filter Replacement: Step-by-Step Guide
Disclaimer: Working with fuel can be dangerous. Always prioritize safety and take necessary precautions. If you are uncomfortable performing this task, consult a qualified mechanic.
Tools and Materials You’ll Need:
- New fuel filter (specifically designed for your 2013 Nissan Rogue)
- Jack and jack stands
- Wheel chocks
- Safety glasses
- Gloves
- Wrench or fuel line disconnect tool (if needed)
- Siphon or fuel pump tool (to remove fuel from the tank – optional, but highly recommended)
- Screwdrivers (Phillips and flathead)
- Clean rags
- Bucket for fuel (if draining the tank)
Procedure:
- Safety First:
- Park your Rogue on a level surface and engage the parking brake.
- Chock the rear wheels.
- Disconnect the negative (black) battery cable.
- Work in a well-ventilated area, away from any open flames or sparks.
- Relieve Fuel Pressure:
- Locate the fuel pump fuse (refer to your owner’s manual for its location).
- Remove the fuse.
- Start the engine and let it run until it stalls. This will relieve pressure in the fuel lines.
- Turn the ignition off.
- Reinstall the fuel pump fuse.
- Access the Fuel Tank:
- Raise the rear of the vehicle using a jack and secure it with jack stands.
- Locate the fuel tank. The fuel tank is usually located under the rear seats or near the rear axle.
- You may need to remove underbody panels or shields to access the fuel tank.
- Disconnect Fuel Lines (If Necessary):
- Carefully inspect the fuel lines connected to the fuel tank.
- If fuel lines need to be disconnected, use the appropriate fuel line disconnect tool or a wrench to loosen and disconnect them. Be prepared for some fuel leakage. Have clean rags ready to absorb any spilled fuel.
- Remove the Fuel Tank (Important Note: This step may vary depending on your model. Consult your repair manual):
- Carefully lower the fuel tank. This usually involves disconnecting fuel lines, electrical connectors, and any straps or mounting hardware securing the tank.
- Important: If you are uncomfortable removing the fuel tank, consider having a mechanic perform this portion of the task.
- Access the Fuel Pump Assembly:
- Once the fuel tank is lowered, locate the fuel pump assembly on top of the tank.
- Remove the retaining ring or screws that secure the fuel pump assembly to the tank.
- Remove and Replace the Fuel Filter:
- Carefully remove the fuel pump assembly from the tank.
- The fuel filter is integrated within the fuel pump assembly.
- Consult your new fuel filter’s instructions and the vehicle repair manual for the specific removal and installation procedure, as it varies depending on the design.
- Replace the old fuel filter with the new one, ensuring all connections are secure.
- Reassemble and Test:
- Reinstall the fuel pump assembly into the fuel tank.
- Reconnect all fuel lines and electrical connectors.
- Raise the fuel tank back into position and secure it.
- Reconnect the negative battery cable.
- Start the engine and check for any fuel leaks.
- Let the engine run for a few minutes to ensure proper operation.
Conclusion
Replacing the fuel filter in your 2013 Nissan Rogue is a worthwhile maintenance task that can significantly improve your vehicle’s performance and longevity. By following this guide, you can confidently tackle this DIY project and save money on costly repairs. Remember to prioritize safety, consult your owner’s manual, and seek professional help if you are unsure about any step. Regular fuel filter replacement, along with other routine maintenance tasks, will help keep your Rogue running smoothly for years to come.
Frequently Asked Questions (FAQs)
1. How often should I replace the fuel filter in my 2013 Nissan Rogue?
Nissan recommends replacing the fuel filter every 60,000 miles or as needed based on your driving conditions. However, it’s always best to consult your owner’s manual for the most accurate recommendation.
2. What are the signs of a clogged fuel filter?
Common signs include difficulty starting, sputtering, loss of power, reduced fuel efficiency, and rough idling.
3. Can I use a generic fuel filter instead of the one specifically designed for my Rogue?
It’s highly recommended to use a fuel filter specifically designed for your 2013 Nissan Rogue to ensure proper fit and performance. Using a generic filter can lead to issues and potential damage.
4. Is it necessary to drain the fuel tank before replacing the fuel filter?
While not strictly necessary, draining or partially draining the fuel tank significantly reduces the risk of fuel spills and makes the replacement process cleaner and safer. You can use a siphon or a fuel pump tool to remove fuel.
5. What if I’m not comfortable performing this task myself?
If you’re uncomfortable working on your vehicle, it’s best to take it to a qualified mechanic. They have the expertise and tools to perform the fuel filter replacement safely and efficiently.
