Low battery
Battery level is below 20%. Connect charger soon.


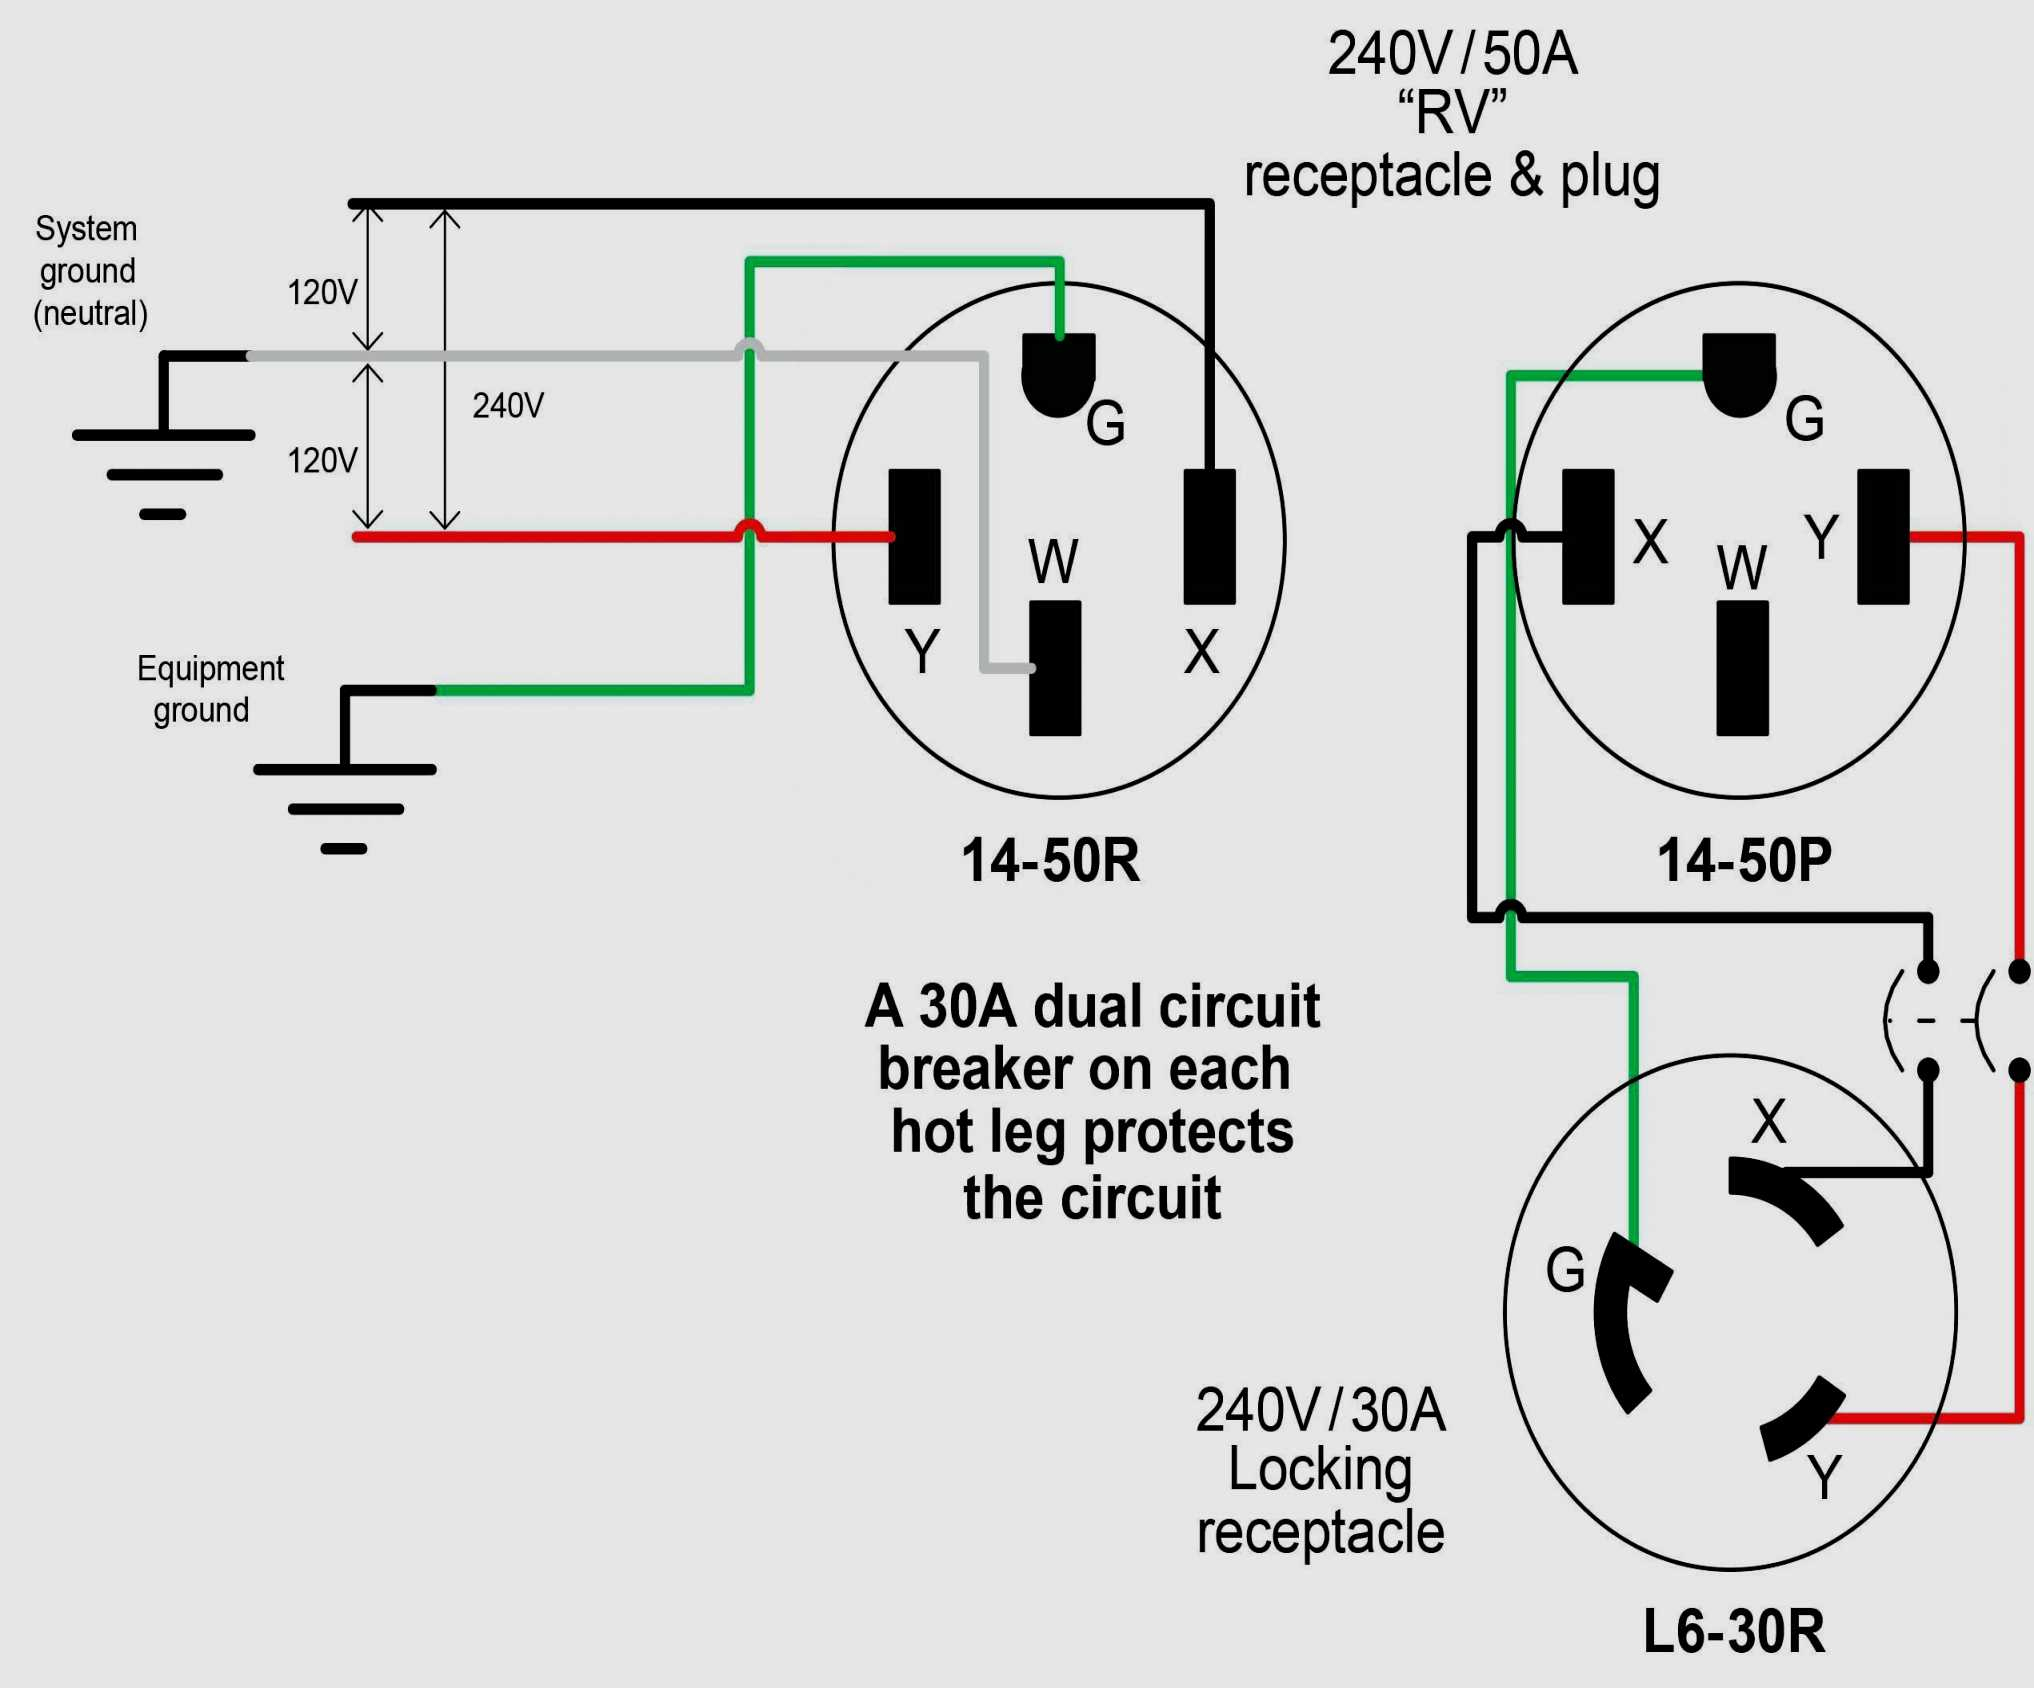

240V 3-Prong Plug Wiring Diagram – Safe Installation Guide
Are you looking to safely wire a 240V 3-prong plug for your appliance or electrical project? Understanding the correct wiring diagram is crucial for ensuring both the functionality of your equipment and, more importantly, your personal safety. This comprehensive guide provides a clear, step-by-step approach to wiring a 240V 3-prong plug, along with vital safety precautions and frequently asked questions to help you confidently tackle this task. Remember, if you are uncomfortable or unsure at any point, consult a qualified electrician.
Understanding the Basics: What is a 240V 3-Prong Plug?
A 240V 3-prong plug is designed to deliver a higher voltage (240 volts) compared to the standard 120V outlets found in most homes. This increased voltage is often required by appliances that consume significant power, such as:
- Electric ovens and ranges
- Clothes dryers
- Air conditioners
- Welding equipment
- Some power tools
The 3-prong design is critical for safety. The three prongs serve the following purposes:
- Two Hot (Line) Wires: These carry the electrical current and are typically colored black and red.
- One Ground Wire: This provides a safe path for electricity to flow in case of a fault and is typically colored green or bare copper.
Essential Safety Precautions Before You Begin
Working with electricity can be dangerous. Before you start, prioritize safety by following these crucial steps:
- Turn Off the Power: This is the most important step. Locate the circuit breaker that controls the outlet or circuit you’ll be working on and switch it to the “OFF” position. Verify the power is off using a non-contact voltage tester.
- Wear Appropriate Safety Gear: Always wear safety glasses and consider wearing insulated gloves.
- Inspect the Plug and Wires: Ensure the plug and wires are in good condition. Look for any damage, fraying, or exposed wires. Replace damaged components immediately.
- Work in a Dry Environment: Avoid working in wet or damp conditions.
- Double-Check Your Work: After completing the wiring, double-check all connections to ensure they are secure and correctly placed.
- Never Work on Live Wires: Never attempt to work on electrical wiring while the power is on.
Step-by-Step Guide to Wiring a 240V 3-Prong Plug
This guide provides a general overview. Always consult the specific wiring instructions for your appliance or project.
Prepare the Wires:
- Strip the insulation from the ends of the wires (black, red, and green/bare copper) using a wire stripper. The amount of insulation you strip will depend on the plug’s terminals; usually, about ½ inch is sufficient.
- Twist the strands of each wire together to prevent fraying.
Identify the Terminals on the Plug:
- Most 3-prong plugs have clearly marked terminals. You’ll typically find screws or push-in connectors.
- Consult the plug’s documentation or markings for specific terminal identification.
Connect the Wires:
- Hot Wires (Black and Red): Connect these wires to the appropriate terminals on the plug. These terminals are usually marked with “L1” and “L2” or “X” and “Y.” The specific arrangement might vary, so refer to the plug’s instructions.
- Ground Wire (Green or Bare Copper): Connect the ground wire to the ground terminal, which is usually a green screw or marked with a “G” or the ground symbol. Ensure this connection is secure.
Secure the Wires:
- Tighten the screws on the terminals firmly (if applicable) to secure the wires. Do not overtighten.
- If using push-in connectors, ensure the wires are fully inserted and locked in place.
- Make sure that the wires are not touching each other or the plug’s housing.
Assemble the Plug:
- Carefully assemble the plug, ensuring all wires are properly contained within the housing.
- Close the plug securely, following the manufacturer’s instructions.
Test the Connection:
- After the plug is assembled and the power is on, you can test the connection. Only do this after you are absolutely sure the wiring is done correctly.
Important Considerations and Troubleshooting
- Wire Gauge: Always use the correct wire gauge for the amperage of your appliance. Using a wire gauge that is too small can lead to overheating and fire hazards. Consult your appliance’s specifications or a qualified electrician.
- Polarity: Ensure the hot wires are connected to the correct terminals. Incorrect polarity can damage the appliance.
- Grounding is Critical: The ground wire is essential for safety. Never bypass or disconnect the ground wire.
- If in doubt, consult a professional: If you’re uncomfortable or unsure about any aspect of the wiring process, it’s best to consult a qualified electrician.
Frequently Asked Questions (FAQs)
1. What is the difference between a 240V 3-prong plug and a 120V plug?
A 240V 3-prong plug delivers 240 volts of electricity, while a standard 120V plug delivers 120 volts. 240V appliances generally require more power to operate and are used for high-demand applications like electric ovens and dryers. The 3-prong design in both cases is for safety, providing a ground connection.
2. What color wires are used for a 240V circuit?
Typically, 240V circuits use black and red wires for the hot (line) conductors, and a green or bare copper wire for the ground.
3. Can I use a 120V plug for a 240V appliance?
No, you cannot use a 120V plug for a 240V appliance. Doing so will not provide enough power to operate the appliance. Additionally, using the wrong plug can lead to electrical hazards and damage to the appliance.
4. What tools do I need to wire a 240V 3-prong plug?
You’ll need a wire stripper, screwdrivers (or the appropriate tool for your plug’s terminals), wire cutters, a non-contact voltage tester, and potentially a multimeter. Safety glasses and gloves are also essential.
5. How do I know if my appliance needs a 240V plug?
Check the appliance’s nameplate or the power cord itself. It will clearly indicate the voltage requirement. If it says “240V” or shows a specific voltage range that includes 240V, it requires a 240V plug.
Conclusion: Prioritize Safety and Accuracy
Wiring a 240V 3-prong plug requires careful attention and adherence to safety guidelines. By following the steps outlined in this guide, you can safely and correctly wire your appliance or project. Remember to always prioritize safety, turn off the power before working, and double-check your work. If you are unsure or uncomfortable at any point, consult a qualified electrician. Your safety and the proper functioning of your electrical equipment depend on it.
