Low battery
Battery level is below 20%. Connect charger soon.


AC Motor Forward Reverse Switch Wiring: The Easy Guide You’ve Been Waiting For
Do you need to control the direction of an AC motor but find the wiring process daunting? You’re not alone! Reversing an AC motor is a common requirement in various applications, from garage doors to industrial machinery. This comprehensive guide breaks down the AC motor forward reverse switch wiring process in a clear, step-by-step manner, making it easier than ever to understand and implement. We’ll cover the fundamentals, wiring diagrams, and safety precautions to ensure a successful and safe installation. Let’s get started!
Understanding the Basics: How AC Motors Reverse
Before diving into the wiring, it’s crucial to understand the core principle behind reversing an AC motor. The direction of rotation in a single-phase or three-phase AC induction motor is determined by the phase sequence of the power supply.
- Single-Phase Motors: Reversing a single-phase motor involves changing the connections of the start winding relative to the run winding.
- Three-Phase Motors: Reversing a three-phase motor involves swapping the connections of any two of the three power supply lines (L1, L2, L3). This changes the phase sequence, thereby reversing the motor’s rotation.
This guide will focus primarily on single-phase motor reversal, as it’s the more common DIY application. However, the principles of three-phase reversal are also briefly covered.
Choosing the Right Forward Reverse Switch
The key component in this process is the forward-reverse switch. Several types are available, each with its own advantages and disadvantages. The most common types include:
- DPDT (Double Pole Double Throw) Switch: This is a reliable and cost-effective option for single-phase motors. It has two poles and two throws, allowing you to switch the connections of the start winding.
- Drum Switch: Often used in industrial applications, drum switches are robust and offer multiple contact positions, providing more control options.
- Magnetic Contactor with Auxiliary Contacts: This is a more complex but often preferred method for larger motors or applications requiring remote control and safety features. It utilizes contactors and relays to handle the high currents involved.
Choosing the right switch depends on your application:
- Motor Power (Horsepower/Watts): Ensure the switch’s current rating exceeds the motor’s full load current.
- Voltage: Confirm the switch is rated for the supply voltage (e.g., 120V, 240V).
- Operating Environment: Consider factors like dust, moisture, and temperature when selecting a switch.
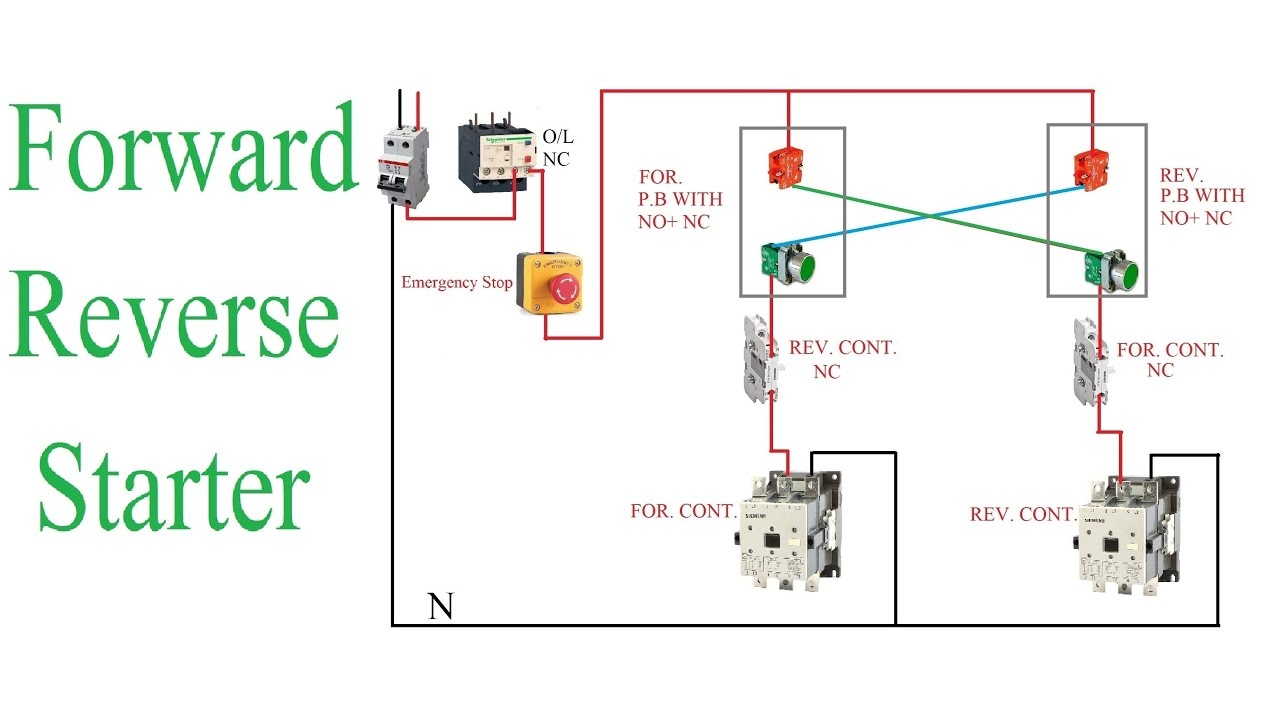
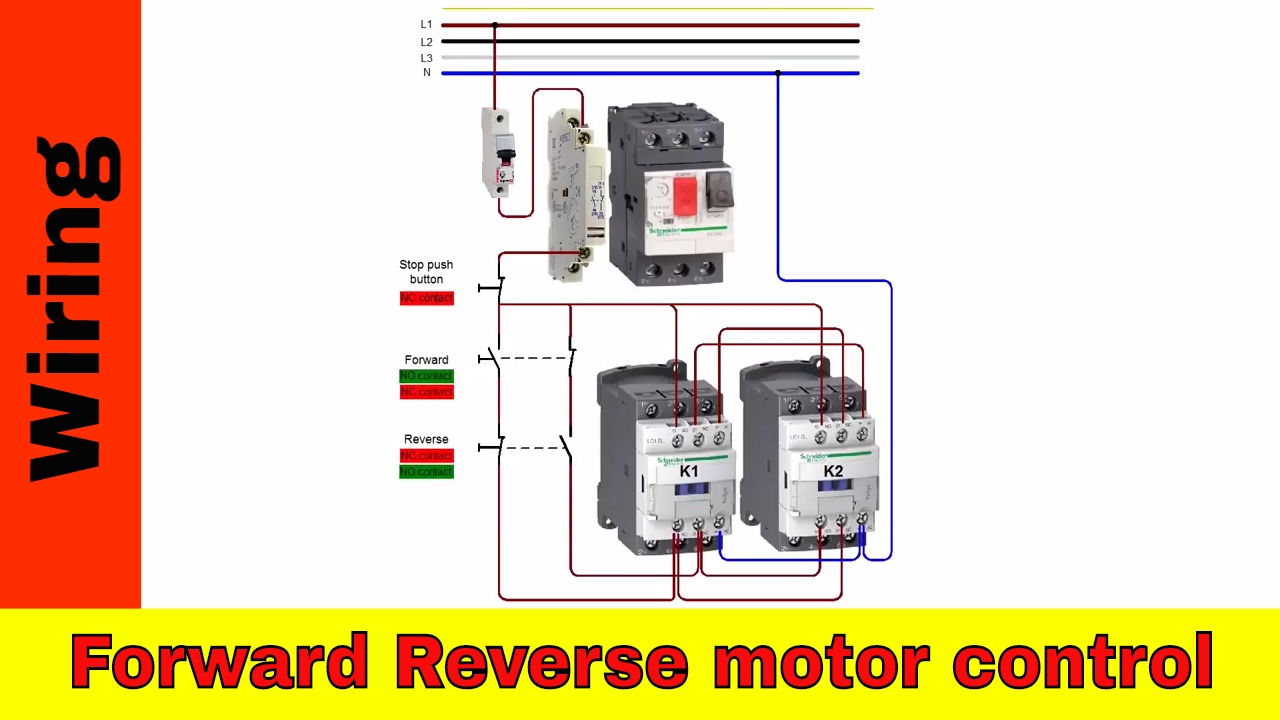
Single-Phase Motor Forward Reverse Wiring Diagram: Step-by-Step
This section provides a detailed wiring diagram and instructions for reversing a single-phase AC motor using a DPDT switch.
Materials Required:
- AC Single-Phase Motor
- DPDT Switch (Rated for motor voltage and current)
- Appropriate Gauge Wires (based on motor current)
- Wire Connectors (wire nuts, crimp terminals, etc.)
- Screwdriver
- Multimeter (for verifying connections)
- Safety Glasses
Wiring Steps:
- Identify Motor Terminals: Locate the motor’s terminals, typically labeled. Identify the start and run windings. This information is usually provided on the motor’s nameplate or in the motor’s documentation. Common labels include:
- Run Winding: T1, T2
- Start Winding: T3, T4
- Common: May be labeled C, or connected to the supply directly.
- Connect Power Supply: Connect the power supply (L1 and L2) to the appropriate terminals on the DPDT switch. Consult the switch’s documentation for terminal identification.
- Wire the Run Winding: Connect one terminal of the run winding (e.g., T1) directly to the power supply (L1). Connect the other run winding terminal (T2) to the other power supply terminal (L2) via the DPDT switch.
- Wire the Start Winding: This is the crucial step for reversing direction. Connect the start winding terminals (T3 and T4) through the DPDT switch, such that swapping them reverses the motor’s direction.
- In one switch position, connect T3 to L2 and T4 to T2.
- In the other switch position, connect T4 to L2 and T3 to T2.
- Verify Connections: Double-check all connections to ensure they are secure and correctly wired according to the diagram.
- Test the Motor: Apply power and switch the DPDT switch to test the forward and reverse operation. Observe the motor’s direction of rotation.
Important Note: The specific terminal connections on the DPDT switch will vary depending on the manufacturer and model. Always consult the switch’s wiring diagram for accurate guidance.
Three-Phase Motor Forward Reverse Wiring: A Simplified Overview
Reversing a three-phase motor is simpler in terms of wiring but requires understanding phase sequence.
Wiring Steps:
- Identify Motor Terminals: Locate the motor’s terminals (typically labeled T1, T2, and T3).
- Connect Power Supply: Connect the three-phase power supply (L1, L2, L3) to the motor’s terminals.
- Reverse Direction: To reverse the motor, swap any two of the three power supply lines. For example:
- Swap L1 and L2.
- You can achieve this using a three-pole, double-throw (3PDT) switch or, more commonly, with a magnetic contactor and auxiliary contacts.
- Safety: Always ensure the power is disconnected before making any wiring changes.
Safety Precautions: Your Top Priority
Working with electricity always carries risks. Prioritize safety at all times:
- Disconnect Power: Always disconnect the power supply before making any wiring connections or modifications. Use a lock-out/tag-out procedure if necessary.
- Use Proper Tools: Use insulated tools and wear safety glasses to protect yourself from electrical shocks and injuries.
- Verify Voltage: Use a multimeter to verify that the power supply is disconnected before working on the wiring.
- Proper Wire Sizing: Use wires of the correct gauge (AWG) for the motor’s current draw to prevent overheating and potential fire hazards.
- Grounding: Ensure the motor and all associated components are properly grounded for safety.
- Enclose Wiring: Protect wiring from physical damage and environmental factors by using appropriate enclosures and conduit.
- Consult Professionals: If you are unsure about any aspect of the wiring process, consult a qualified electrician.
Troubleshooting Common Issues
- Motor Doesn’t Run:
- Check power supply.
- Verify all connections.
- Ensure the switch is functioning correctly.
- Check for internal motor faults (e.g., open windings).
- Motor Runs in the Wrong Direction:
- Double-check the wiring diagram and ensure the start winding connections are reversed correctly.
- Motor Overloads:
- Check the motor’s load and ensure it’s not exceeding its rated capacity.
- Verify the switch is rated for the motor’s current.
- Check for mechanical issues causing excessive load.
Conclusion: Mastering the Forward Reverse Switch
Wiring an AC motor forward reverse switch doesn’t have to be complicated. By understanding the principles of motor reversal, following the step-by-step wiring instructions, and prioritizing safety, you can successfully control the direction of your AC motor. Remember to choose the right switch for your application, double-check all connections, and always consult a qualified electrician if you have any doubts. With this guide, you’re well on your way to mastering this essential electrical skill.
FAQs: Frequently Asked Questions
- Can I reverse a three-phase motor with a simple DPDT switch?
- No, a DPDT switch is not designed for three-phase motor reversal. You would need a 3PDT switch or, more commonly, a magnetic contactor setup.
- What happens if I wire the start winding incorrectly?
- Incorrect wiring of the start winding can prevent the motor from starting, cause it to run in the wrong direction, or damage the motor.
- What if the motor hums but doesn’t start?
- This could indicate a problem with the start winding or a mechanical issue. Check the wiring, the switch, and the motor’s load. Ensure the motor is receiving the correct voltage.
- Is it safe to switch the motor’s direction while it’s running?
- It’s generally not recommended to switch the direction of a motor while it’s running, especially with a DPDT switch. It can cause excessive current surges and potentially damage the motor or switch. Always allow the motor to come to a complete stop before reversing. (Magnetic contactors can be designed to allow this safely.)
- How do I determine the correct wire gauge for my motor?
- The wire gauge (AWG) should be selected based on the motor’s full load current (FLA). You can find the FLA on the motor’s nameplate. Use a wire size chart or consult an electrician to ensure the wire is adequately sized for the current.
