Low battery
Battery level is below 20%. Connect charger soon.


Aprilia Scarabeo 500 Wiring Diagram: The Essential Map to Keep It Running Smooth
The Aprilia Scarabeo 500, a popular maxi-scooter known for its stylish design and practical performance, relies on a complex network of electrical components to function. Understanding the Aprilia Scarabeo 500 wiring diagram is crucial for any owner, mechanic, or enthusiast who wants to diagnose issues, perform repairs, or simply maintain their scooter in optimal condition. This article provides a comprehensive guide to navigating the wiring diagram and its significance.
Why is the Wiring Diagram Important?
Think of the wiring diagram as the “nervous system” of your Scarabeo 500. It’s a detailed map that shows how all the electrical components – from the battery and ignition system to the lights and sensors – are interconnected. Without this map, troubleshooting electrical problems becomes a frustrating guessing game. Here’s why having access to and understanding the wiring diagram is essential:
- Accurate Troubleshooting: Quickly identify the source of electrical faults, saving time and money.
- Safe Repairs: Prevent accidental damage by correctly identifying wires and circuits.
- Preventative Maintenance: Understand how components interact to proactively identify potential problems.
- Component Replacement: Ensure correct wiring when replacing parts like lights, sensors, or the ECU.
- Modifications & Customization: Facilitate the safe integration of aftermarket accessories.
Decoding the Aprilia Scarabeo 500 Wiring Diagram
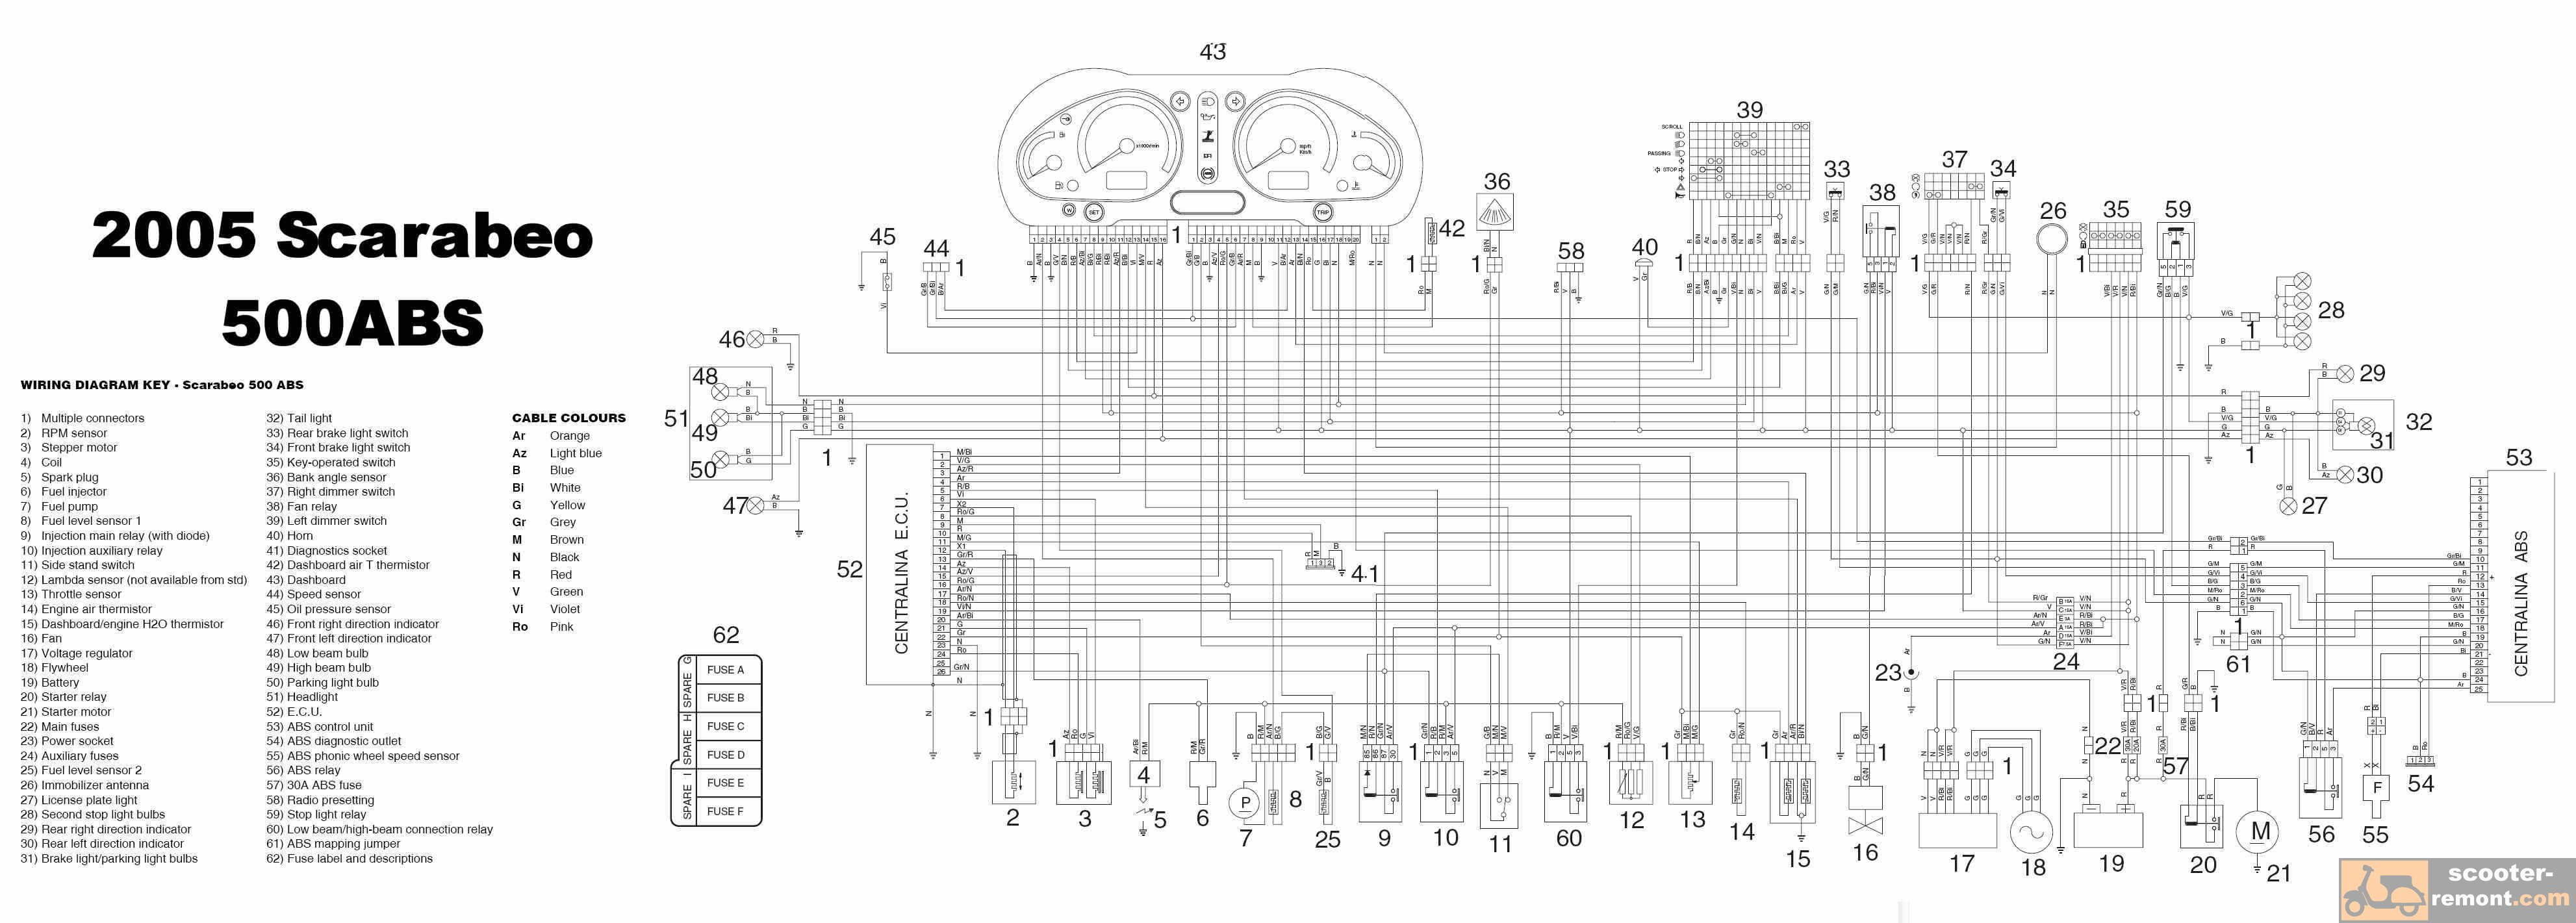
The Aprilia Scarabeo 500 wiring diagram typically uses a standardized color-coding system and symbols to represent the various components and connections. Here’s a breakdown of what you’ll typically find:
- Color-Coded Wires: Each wire is assigned a specific color or combination of colors to easily identify its function. Common colors include:
- Red: Typically for positive power (often directly from the battery).
- Black: Typically for ground (negative connection).
- Yellow: Often used for lighting circuits.
- Green: Commonly used for turn signals.
- Blue: Frequently used for circuits related to the engine control unit (ECU).
- Symbols: Standardized symbols represent various components, such as:
- Battery: A rectangular box with positive (+) and negative (-) terminals.
- Fuses: Small rectangles with a line inside, indicating a fuse.
- Relays: Small boxes with numbered terminals, showing how they switch circuits.
- Switches: Various symbols representing different switch types (e.g., ignition switch, light switch).
- Connectors: Circles or squares with numbered pins, illustrating where wires connect.
- Ground Points: Triangular symbols indicating where wires connect to the chassis (ground).
- ECU (Engine Control Unit): A rectangle with various pins labeled, indicating the brain of the scooter’s engine management system.
- Circuits: The diagram is organized into circuits, grouping components that work together (e.g., starting circuit, lighting circuit, charging circuit).
Where to Find the Wiring Diagram
Accessing the correct Aprilia Scarabeo 500 wiring diagram is critical. There are several avenues you can explore:
- Official Aprilia Service Manual: This is the most reliable source, providing detailed diagrams and information specific to your scooter’s year and model. These manuals can often be purchased online or through Aprilia dealerships.
- Online Forums and Communities: Scooter forums and enthusiast websites often have downloadable wiring diagrams or links to resources.
- Repair Manuals: Third-party repair manuals (e.g., Haynes, Clymer) often include wiring diagrams for the Scarabeo 500.
- Online Search Engines: Searching for “Aprilia Scarabeo 500 wiring diagram PDF” or “Aprilia Scarabeo 500 electrical diagram” can often yield results. Be sure to verify the diagram’s accuracy and applicability to your specific model year.
Practical Applications of the Wiring Diagram
Once you have the wiring diagram, here’s how you can use it:
- Locating Faulty Circuits: If a component isn’t working (e.g., a headlight), trace the wiring from the component back to the fuse box, switch, and power source to identify the problem.
- Testing Components: Use a multimeter to test for voltage and continuity at various points in the circuit to confirm if a component is receiving power and functioning correctly.
- Replacing Components: The diagram helps you ensure that replacement components are wired correctly, preventing short circuits or damage.
- Adding Accessories: When installing aftermarket accessories, the wiring diagram helps you identify the appropriate circuits to tap into for power and ground connections.
- Understanding Sensor Functionality: The diagram shows how sensors, such as those for the crankshaft or throttle position, are wired and how they communicate with the ECU.
Tips for Using the Wiring Diagram Effectively
- Identify Your Model Year: Ensure the diagram matches your specific Scarabeo 500 model year, as electrical systems can vary.
- Print or Save a Digital Copy: Having a hard copy or a digital copy on your phone or tablet can be immensely helpful when working on the scooter.
- Use a Multimeter: A multimeter is essential for testing circuits and diagnosing electrical problems.
- Be Patient and Methodical: Electrical work can be tricky; take your time and work systematically.
- Document Your Work: Keep track of any changes or repairs you make to the wiring system.
- Consult a Professional: If you’re unsure about any aspect of the wiring diagram or electrical work, consult a qualified motorcycle mechanic.
Conclusion
The Aprilia Scarabeo 500 wiring diagram is an indispensable resource for maintaining and repairing your scooter. By understanding the diagram’s layout, color-coding, and symbols, you can diagnose electrical problems, perform safe repairs, and keep your Scarabeo 500 running smoothly for years to come. Proper use of the diagram empowers you to be a more informed and effective owner.
FAQs about the Aprilia Scarabeo 500 Wiring Diagram
1. Where can I find the most accurate wiring diagram for my specific Scarabeo 500 model?
The official Aprilia service manual for your specific year and model of Scarabeo 500 is the most accurate and reliable source.
2. What tools do I need to use the wiring diagram effectively?
You will need a multimeter for testing circuits, wire strippers, crimpers (for connecting wires), and potentially a soldering iron for some repairs.
3. What should I do if I find a wire that doesn’t match the color in the diagram?
Double-check your model year and the diagram’s source. If you’re still unsure, carefully trace the wire to its origin and function, and compare it to the diagram. Be extremely cautious and consider consulting a professional.
4. Can I use a wiring diagram from a different Scarabeo 500 model year?
While some components and circuits may be similar, it’s best to use a diagram that matches your specific model year to avoid confusion and potential damage.
5. Is it safe to work with electrical systems on a scooter?
Always disconnect the battery before working on electrical systems. If you’re not comfortable with electrical work, it’s best to consult a qualified mechanic.
