Low battery
Battery level is below 20%. Connect charger soon.


Boat Trailer Light Wiring Harness: The Easy Installation Guide You’ve Been Waiting For
Tired of flickering, non-functional boat trailer lights? Frustrated by the spaghetti mess of wires and cryptic diagrams? You’re not alone. Maintaining a functional boat trailer light system is crucial for safe towing and legal compliance. Thankfully, replacing or installing a boat trailer light wiring harness doesn’t have to be a daunting task. This comprehensive guide will walk you through the process, making it easy to get your trailer lights shining bright. We’ll cover everything you need to know, from choosing the right harness to the final connection, ensuring a smooth and successful installation.
Choosing the Right Boat Trailer Light Wiring Harness
Before you even touch a wire, you need to select the correct wiring harness for your boat trailer. This is where understanding your trailer’s needs comes in. Here’s what to consider:
- Trailer Type: Is your trailer a standard utility trailer, or does it have specific features like disc brakes or LED lights? The harness needs to accommodate these requirements.
- Number of Lights: Determine how many lights you need to connect (running lights, brake lights, turn signals, etc.).
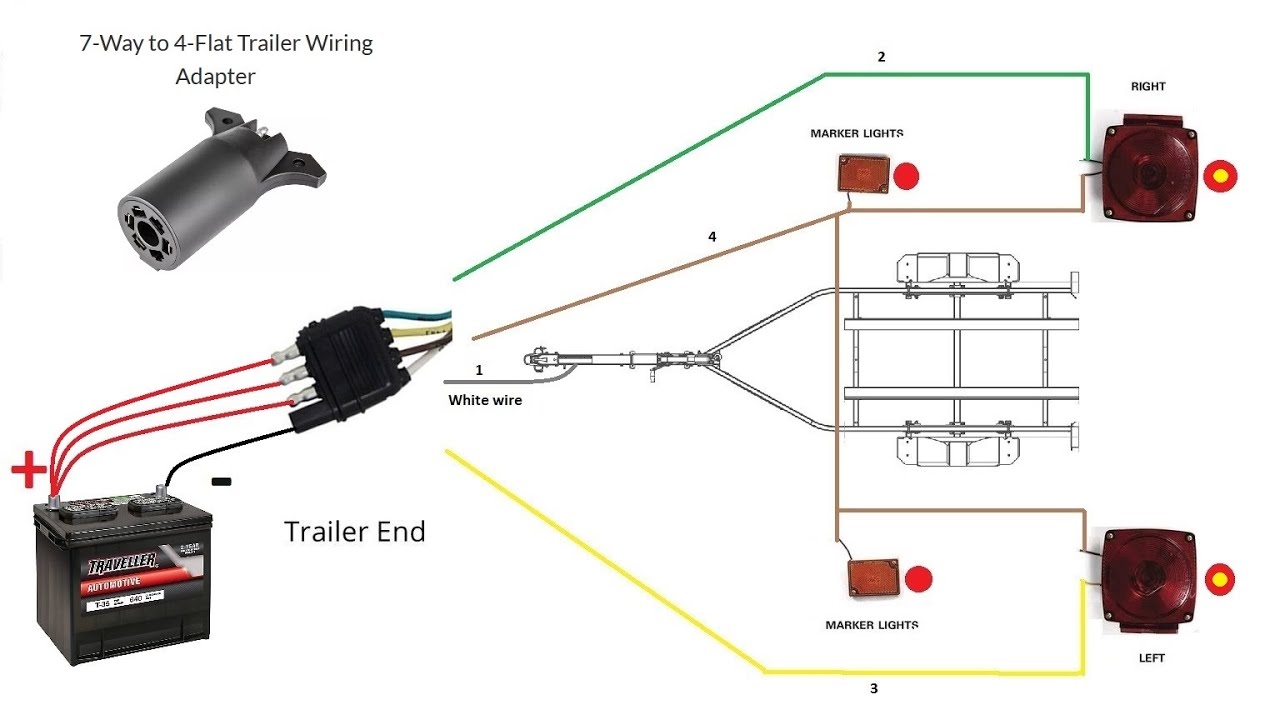
- Connector Type: The most common connector on your tow vehicle is a 4-way flat, a 5-way flat, or a 7-way round. Ensure the harness you choose matches your vehicle’s connector.
- Light Type: Are you using incandescent or LED lights? LED lights often require a specific wiring harness.
- Harness Length: Measure the distance from the trailer’s connector to the lights to ensure the harness is long enough.
- Quality: Opt for a harness made with durable, weather-resistant materials to withstand the elements.
Tools and Materials You’ll Need
Having the right tools and materials readily available will streamline the installation process. Here’s a checklist:
- New Boat Trailer Light Wiring Harness: Choose the correct harness based on the factors mentioned above.
- Wire Strippers/Crimpers: Essential for preparing and connecting wires.
- Crimping Tool (If Using Crimp Connectors): To properly secure crimp connectors.
- Splicing Connectors (Optional): Waterproof butt connectors or heat-shrink connectors are highly recommended for secure and weather-resistant connections.
- Electrical Tape or Heat Shrink Tubing: For insulating connections and protecting against moisture.
- Screwdrivers (Phillips and Flathead): For securing the lights and connectors.
- Pliers: For various tasks, including crimping and bending wires.
- Wire Cutters: For trimming wires to the correct length.
- Work Gloves: To protect your hands.
- Zip Ties or Wire Loom: For securing the wiring harness and preventing it from dragging on the ground.
- Test Light or Multimeter: To verify proper connections and light functionality.
- Safety Glasses: To protect your eyes.
Step-by-Step Installation Guide
Now, let’s dive into the installation process.
- Disconnect Power: Before starting any electrical work, disconnect your trailer from the tow vehicle and ensure the trailer battery, if equipped, is disconnected.
- Remove Old Wiring (If Applicable): If you’re replacing an old harness, carefully disconnect the old wiring from the lights and the trailer’s frame. Note the routing of the old wires to help guide the new installation.
- Mount the New Harness: Route the new wiring harness along the trailer frame, using zip ties or wire loom to secure it and prevent it from hanging or being damaged. Consider routing the wires to be out of the way of moving parts or sharp edges.
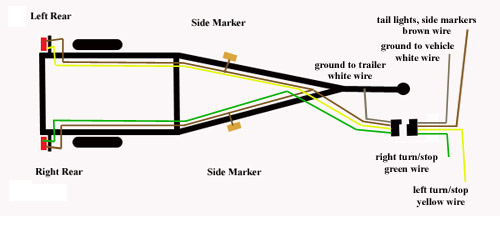
- Connect the Trailer Connector: Connect the trailer connector to the harness. If your harness comes with a pre-wired connector, this step is usually straightforward. If not, consult the wiring diagram included with your harness. Match the wire colors from the harness to the corresponding wires on your trailer connector.
- Common Wire Color Codes:
- Yellow: Left Turn Signal
- Green: Right Turn Signal
- Brown: Tail/Running Lights
- White: Ground
- Blue: Trailer Brakes (if equipped)
- Common Wire Color Codes:
- Connect the Lights: Connect the wires from the harness to the trailer lights.
- Identify the Wires: Each light typically has two or three wires: a ground wire, a running light wire, and a brake/turn signal wire.
- Make Secure Connections: Use splicing connectors or crimp connectors to securely join the wires. Ensure the connections are waterproof by using heat-shrink tubing or electrical tape.
- Grounding: Proper grounding is crucial. Connect the ground wire (usually white) from the harness to a clean, bare metal surface on the trailer frame. Use a ring terminal and a self-tapping screw to secure the connection.
- Test the Lights: Once all connections are made, reconnect the trailer to your tow vehicle and test the lights. Use the test light or multimeter to verify that the running lights, brake lights, and turn signals are functioning correctly.
- Secure the Wiring: After testing, double-check all connections and secure the wiring harness with zip ties or wire loom to prevent it from snagging or being damaged.
- Final Inspection: Inspect your work to ensure all connections are secure, properly insulated, and protected from the elements.
Troubleshooting Common Issues
- Lights Not Working: Double-check all connections, especially the ground wire. Verify that the trailer connector is properly connected to your tow vehicle. Test your tow vehicle’s connector to ensure it’s providing power.
- Flickering Lights: Loose connections or a poor ground can cause flickering. Inspect all connections and ensure the ground wire is securely fastened to a clean metal surface.
- One Side Not Working: Check the turn signal bulbs and the wire connections on the side that isn’t working. You might have a blown fuse in your tow vehicle.
Conclusion
Installing a boat trailer light wiring harness doesn’t have to be a headache. By following these steps, you can confidently replace or install a new harness, ensuring your boat trailer lights are functioning correctly and safely. Take your time, be meticulous with your connections, and always double-check your work. With the right tools and a little patience, you’ll be back on the road in no time, towing your boat with peace of mind.
Frequently Asked Questions (FAQs)
1. What is the most common type of trailer connector?
The most common trailer connectors are the 4-way flat (for basic lighting functions) and the 7-way round (for more advanced functions like brakes and auxiliary power).
2. Can I use regular electrical tape for all the connections?
While electrical tape can be used, it’s recommended to use waterproof connectors or heat-shrink tubing for more durable and weather-resistant connections, especially in marine environments.
3. How do I find the ground wire on my boat trailer lights?
The ground wire is usually white and is connected to the trailer frame. If you’re unsure, use a multimeter to test for continuity between the wire and the trailer frame.
4. What should I do if my trailer lights still aren’t working after following this guide?
If the lights still don’t work, there might be a problem with your tow vehicle’s wiring or the trailer lights themselves. Check the fuses in your tow vehicle, test the trailer lights with a separate 12V power source, and consult a professional if the issue persists.
5. Can I splice into the existing wiring on my tow vehicle?
It is generally not recommended to splice into the existing wiring on your tow vehicle. It’s safer and easier to use a plug-and-play wiring harness that connects directly to the vehicle’s existing wiring harness.
