Low battery
Battery level is below 20%. Connect charger soon.


Car Audio 4-Channel Amp Wiring Diagram: The Guide Every DIY Installer Needs
Upgrading your car’s sound system can dramatically enhance your driving experience. A 4-channel amplifier is a popular choice for powering multiple speakers and subwoofers, delivering a richer, more powerful audio output. However, installing a 4-channel amp correctly requires understanding its wiring diagram. This comprehensive guide breaks down the process, providing you with the knowledge and confidence to tackle this DIY project successfully.
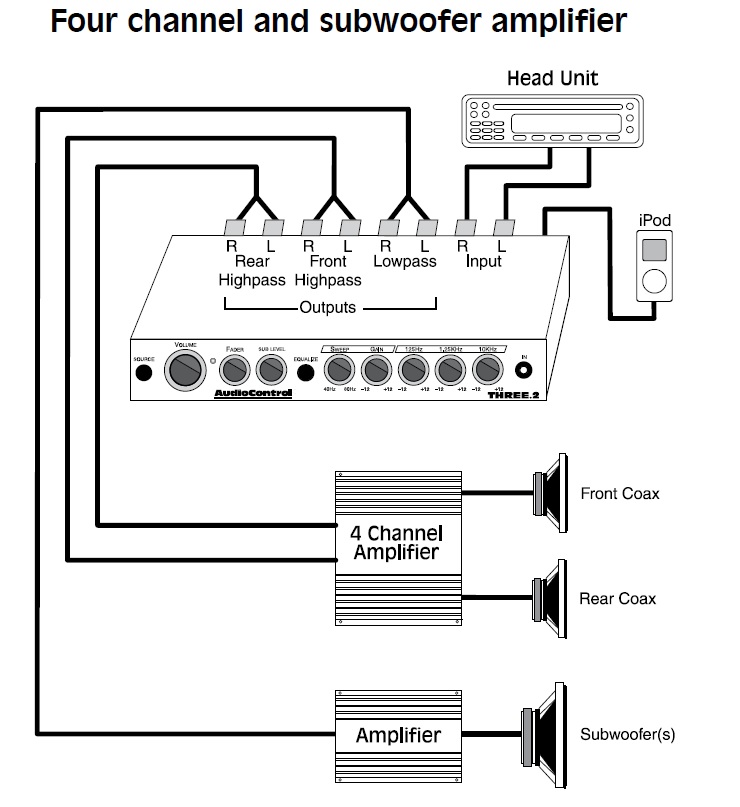
H2: Understanding Your 4-Channel Amp and its Components
Before diving into the wiring, it’s crucial to understand your amplifier’s specifications and components. This includes:
- Power Input: This is where your car’s battery power connects. Expect to see terminals for positive (+), negative (-), and possibly a remote turn-on wire.
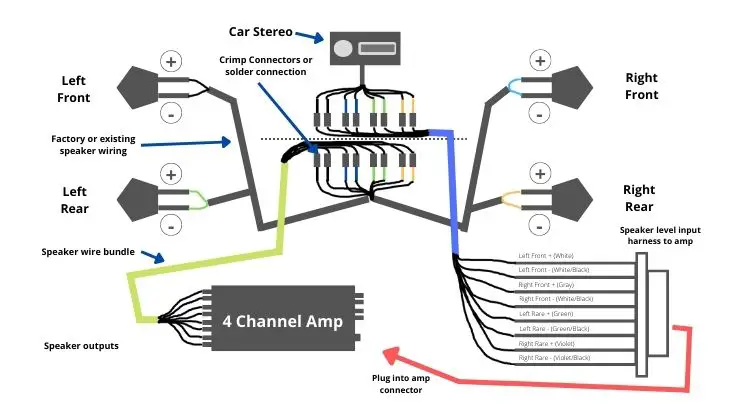
- Speaker Outputs: These terminals (typically labeled with speaker designations like Front Left (+/-), Front Right (+/-), Rear Left (+/-), Rear Right (+/-)) connect to your speakers. Pay close attention to the positive (+) and negative (-) terminals. Incorrect connection will result in no sound or damaged speakers.
- Ground Terminal: This connects the amplifier’s chassis to your car’s ground point, providing a complete electrical circuit. A clean, solid ground is vital for optimal performance.
- Fuse: Protects the amplifier and your car’s electrical system from overcurrent. Never operate the amplifier without a correctly rated fuse.
H2: Gathering Your Tools and Materials
Before you begin, ensure you have the following:
- 4-Channel Amplifier: The star of the show!
- Amplifier Wiring Kit: This typically includes power wire, ground wire, speaker wire, RCA cables (for signal input), fuse holder, and various connectors.
- Wire Strippers/Cutters: For precise wire preparation.
- Crimping Tool: For secure connections.
- Heat Shrink Tubing: For insulating wire connections.
- Soldering Iron (Optional): For more robust connections.
- Multimeter: To test your connections and ensure proper voltage.
- Screwdrivers: For securing the amplifier and connecting terminals.
H2: Step-by-Step Wiring Diagram and Installation
This guide assumes a basic understanding of car audio systems. Always consult your amplifier’s specific manual for detailed instructions.
H3: Step 1: Battery Connection
- Run a heavy-gauge power wire from your car’s battery (+) terminal to the amplifier’s power input terminal.
- Install an inline fuse close to the battery to protect the circuit.
- Connect the amplifier’s ground wire to a clean, bare metal point on your car’s chassis. Avoid painted surfaces.
H3: Step 2: Remote Turn-On Wire
- Connect the remote turn-on wire from the amplifier to a switched 12V source, usually from your car stereo’s head unit. This wire activates the amplifier when your stereo is turned on.
H3: Step 3: Signal Input (RCA Cables)
- Connect the RCA cables from the output of your car stereo (pre-amp outputs) to the amplifier’s RCA inputs. Make sure you match the left and right channels correctly.
H3: Step 4: Speaker Output Connections
- Connect the speaker wires from the amplifier’s speaker outputs to the corresponding speakers. Pay close attention to positive (+) and negative (-) polarity. Incorrect polarity can damage your speakers.
H3: Step 5: Secure and Test
- Securely mount the amplifier in a safe and stable location.
- Turn on your car stereo and test the sound system. Check for proper audio output from all speakers.
H2: Troubleshooting Common Wiring Issues
- No sound: Check all connections, fuses, and ensure the remote turn-on wire is connected correctly.
- Distorted sound: Check for grounding issues or incorrect speaker wiring.
- Amplifier overheating: Ensure adequate ventilation and check for excessive current draw.
H2: Conclusion
Installing a 4-channel amplifier can significantly improve your car audio experience. While it may seem daunting, following this guide and taking your time will result in a successful installation. Remember to prioritize safety and always consult your amplifier’s manual for specific instructions.
H2: FAQs
Q1: What gauge wire should I use for my 4-channel amp? The appropriate gauge depends on the amplifier’s power draw. Consult your amplifier’s manual for the recommended gauge.
Q2: Can I use speaker wire for the power connection? No, speaker wire is not suitable for carrying high amperage. Use a dedicated power wire of the correct gauge.
Q3: What happens if I reverse the speaker wire polarity? Reversing the polarity will result in out-of-phase sound, potentially damaging your speakers.
Q4: How do I choose the right fuse for my amplifier? The fuse rating should match or slightly exceed the amplifier’s maximum current draw, as specified in the amplifier’s manual.
Q5: My amplifier is making a buzzing noise. What could be causing this? This could be caused by a grounding issue, a faulty connection, or electrical interference. Check all connections and ground points. Consider using a noise filter if the problem persists.
