Low battery
Battery level is below 20%. Connect charger soon.


Car Horn Relay Wiring Schematic: The One Diagram That Fixes Everything Instantly (Well, Almost!)
Is your car horn suddenly silent? Do you rely on a blare to alert other drivers, and the absence of it has left you feeling vulnerable on the road? A faulty horn relay is a common culprit behind this frustrating issue. Fortunately, understanding the basic wiring of a car horn relay and having access to a clear schematic can often be the key to a quick and easy fix. This article delves into the intricacies of car horn relay wiring, equipping you with the knowledge to diagnose and address horn problems effectively. While we can’t guarantee instant success, a well-placed diagram and a bit of know-how can often get you back to honking in no time.
Understanding the Car Horn Relay: The Gatekeeper of the Blare
The car horn relay is a crucial component in your vehicle’s electrical system. Think of it as a gatekeeper, controlling the high current needed to power the horn. It’s a simple electromechanical switch that uses a small current to control a larger one. Here’s how it generally works:
- Low-Current Control Circuit: When you press the horn button on your steering wheel, a low-current signal is sent to the relay.
- Electromagnetic Activation: This signal energizes a small electromagnet inside the relay.
- Switching Action: The electromagnet pulls a set of contacts together, completing the circuit that powers the horn.
- High-Current Power to Horn: This closed circuit allows a high current to flow from the battery (usually through a fuse) to the horn itself, causing it to sound.
A malfunctioning relay can prevent this process from happening, leading to a silent horn. Understanding this basic principle is essential for troubleshooting.
The Car Horn Relay Wiring Schematic: Your Troubleshooting Compass
The wiring schematic is the key to understanding how the relay fits into the larger electrical picture of your car’s horn system. A typical car horn relay schematic will show the following connections:
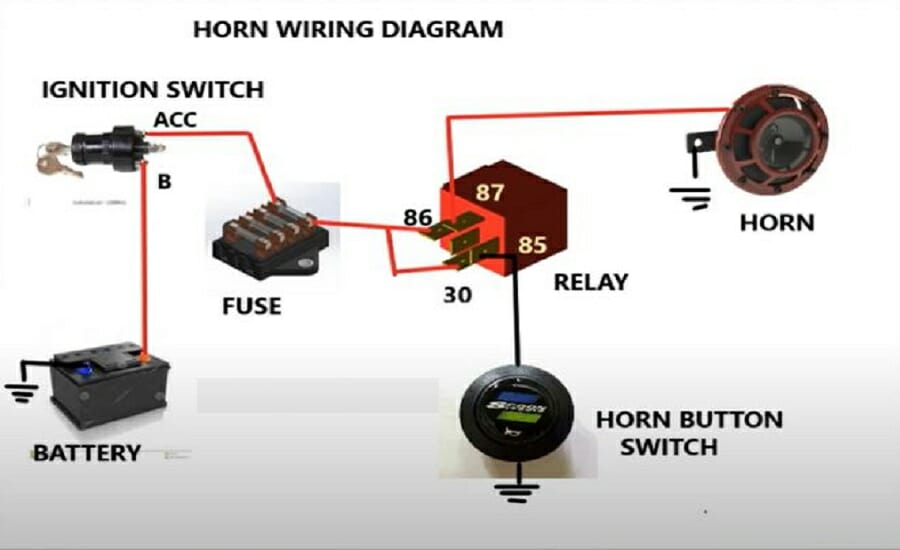
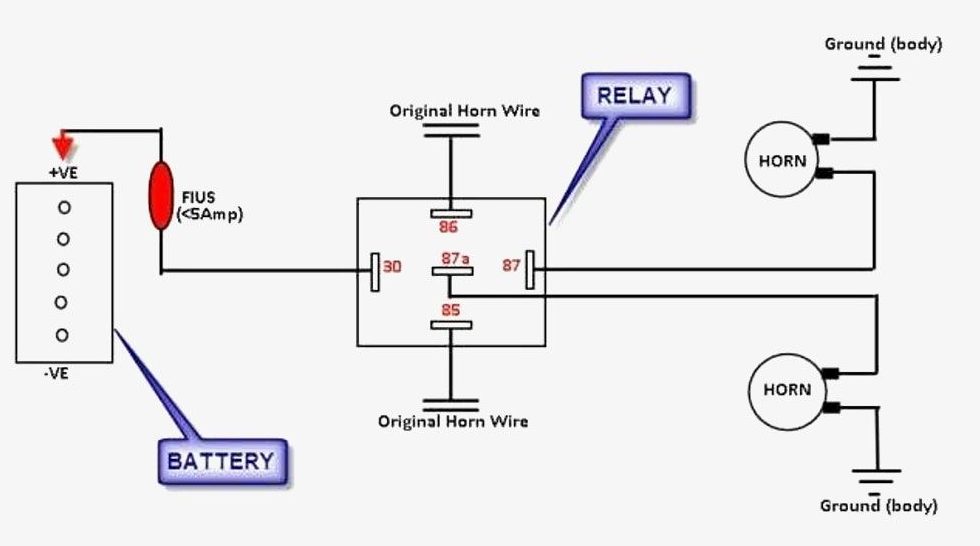
- Terminal 30 (Power In): This terminal connects directly to the battery, typically via a fuse. It provides the power to the horn.
- Terminal 85 (Coil Ground): This terminal connects to ground, completing the coil circuit that energizes the relay.
- Terminal 86 (Coil Power): This terminal receives the low-current signal from the horn button. When the button is pressed, this terminal receives power.
- Terminal 87 (Power Out to Horn): This terminal connects to one of the horn’s terminals. When the relay is activated, power flows from Terminal 30 to Terminal 87, powering the horn.
- Horn (Ground): The other terminal of the horn is grounded to the car’s chassis.
Where to Find a Schematic:
- Your Car’s Repair Manual: The most reliable source! This manual is specific to your make and model.
- Online Repair Databases: Websites like ALLDATA or Mitchell 1 (subscription required) offer detailed schematics.
- Online Forums & Communities: Often, other car owners have shared schematics on forums dedicated to your vehicle’s make and model.
- Generic Relay Diagrams: Simple diagrams showing the basic wiring principles can be found easily online.
Troubleshooting with the Schematic: A Step-by-Step Guide
Once you have the schematic, you can use it to systematically diagnose the problem:
Check the Fuse: Start with the simplest and most common issue. Locate the fuse for the horn circuit (usually in the fuse box under the hood or dashboard) and check if it’s blown. Replace it if necessary.
Test the Relay:
- Visual Inspection: Look for any signs of damage, corrosion, or burned terminals on the relay itself.
- Relay Function Test: You can usually test the relay using a multimeter. Consult your car’s repair manual for the specific procedure, but it typically involves applying power to the coil terminals (85 and 86) and checking for continuity between the power input (30) and power output (87) terminals.
- Relay Swap: If you suspect the relay is faulty, try swapping it with a known working relay from another similar circuit (e.g., headlight relay). If the horn starts working, the relay was the problem.
Check the Horn Button: Use a multimeter to check for continuity between the horn button contacts when pressed. If there’s no continuity, the button is faulty.
Inspect Wiring and Connections: Carefully examine the wiring harness and connections related to the horn, relay, and horn button. Look for:
- Corrosion
- Loose connections
- Damaged wires
- Grounding issues
Test the Horn Itself: Disconnect the wires from the horn and apply power directly to the horn terminals (using a jumper wire from the battery). If the horn doesn’t sound, it’s likely faulty.
Addressing Common Issues:
- Blown Fuse: Replace the fuse with one of the correct amperage rating. Investigate the reason for the fuse blowing – it could indicate a short circuit in the wiring or a faulty horn.
- Faulty Relay: Replace the relay.
- Faulty Horn Button: Replace or repair the horn button.
- Corroded Connections: Clean the connections with electrical contact cleaner.
- Broken Wires: Repair or replace the damaged wiring.
- Faulty Horn: Replace the horn.
Conclusion: Honk with Confidence!
A silent car horn is not only a nuisance but also a safety concern. By understanding the car horn relay wiring schematic and following a systematic troubleshooting approach, you can often diagnose and fix the problem yourself, saving time and money. Remember to consult your car’s specific repair manual for the most accurate and detailed information related to your vehicle’s horn system. With a little patience and the right diagram, you’ll be back to honking with confidence in no time!
FAQs:
Where is the horn relay located in my car? The location varies by make and model. It’s often found in the fuse box under the hood or dashboard. Your car’s owner’s manual or repair manual will provide the exact location.
What type of fuse does my car’s horn use? The fuse type and amperage rating are specific to your vehicle. Consult your owner’s manual or the fuse box itself to identify the correct fuse. Using the wrong fuse can damage your car’s electrical system.
Can I bypass the relay and connect the horn directly to the battery? While technically possible for testing purposes, it is generally not recommended as a permanent solution. The relay protects the horn and other components from excessive current. Bypassing the relay could overload the horn button or wiring.
What should I do if I have a short circuit in the horn circuit? If you suspect a short circuit (e.g., the fuse blows immediately upon replacement), carefully inspect the wiring for damage, exposed wires, or connections that are touching metal. You may need to consult a professional mechanic to diagnose and repair a short circuit.
Can I use a different relay if the original is unavailable? Yes, but ensure the replacement relay has the same voltage rating (typically 12V for cars) and the same pin configuration. The amperage rating should be equal to or greater than the original relay’s rating. Check with your local auto parts store for the correct replacement.
