Low battery
Battery level is below 20%. Connect charger soon.

CC3D to X8R Wiring Diagram: The Connection Guide Drone Pilots Rely On
The world of drone flying is exciting, but navigating the technical aspects can feel daunting. One of the most crucial connections you’ll make is between your flight controller and your receiver. This guide provides a clear and concise wiring diagram and essential information for connecting a CC3D flight controller to an X8R receiver, a popular combination for many drone builds. Whether you’re a seasoned pilot or a beginner, this article will equip you with the knowledge to establish a reliable connection and get your drone airborne.
Understanding the Components: CC3D and X8R
Before diving into the wiring diagram, let’s briefly review the components involved:
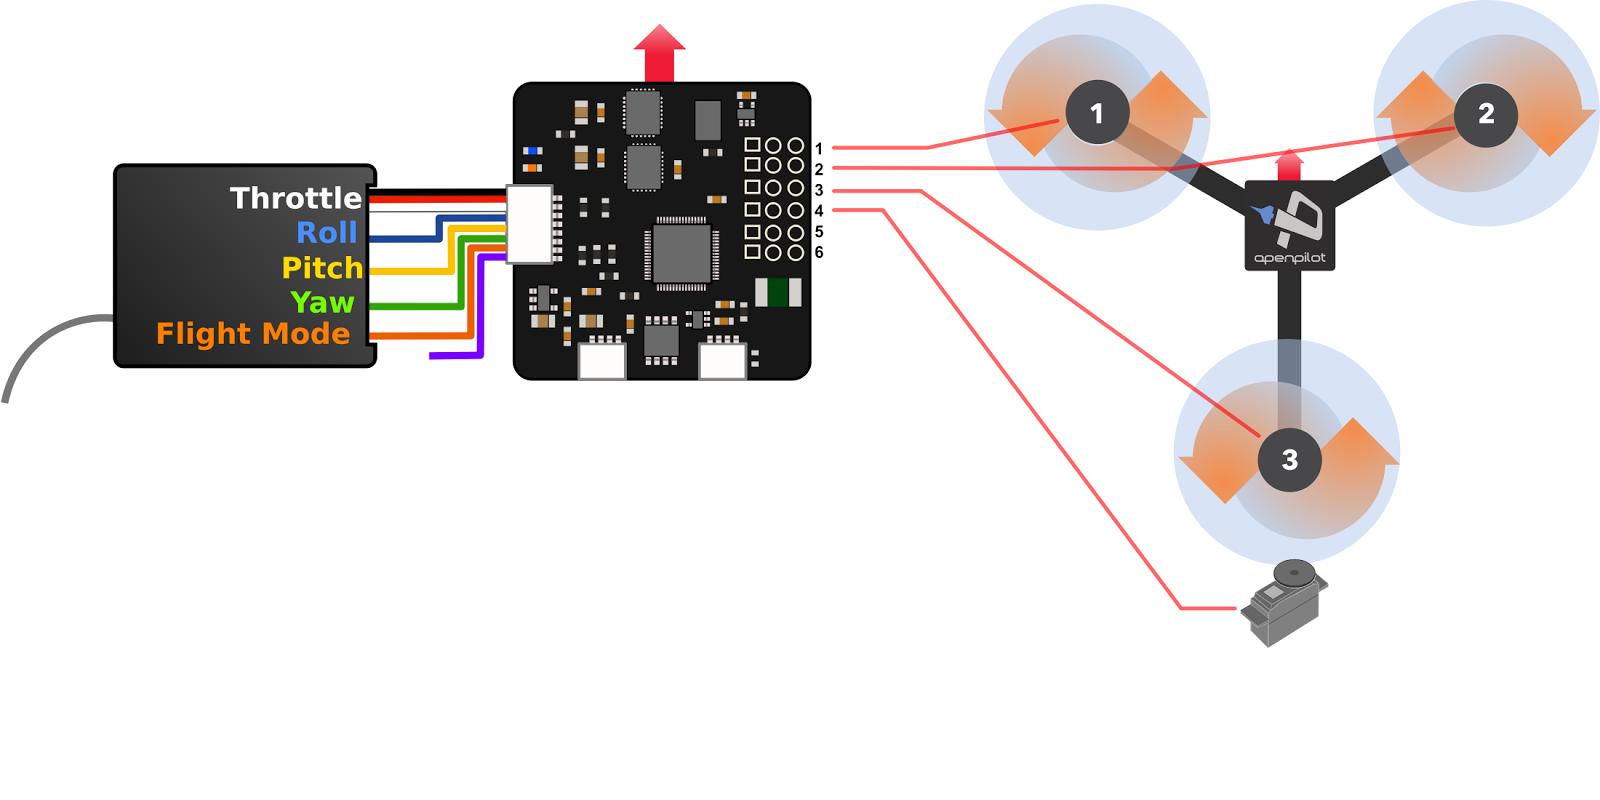
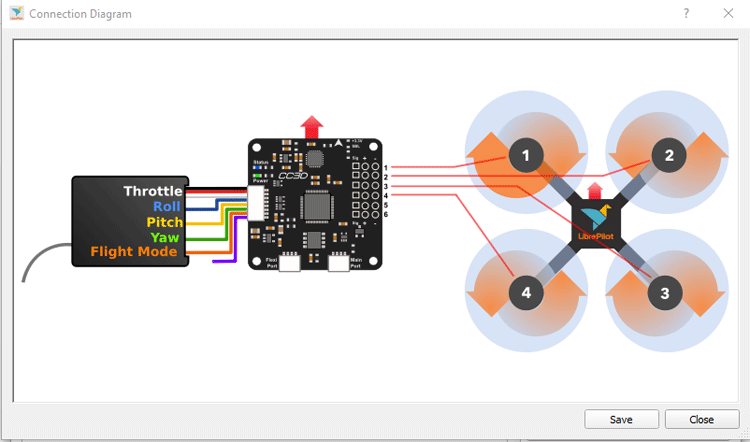
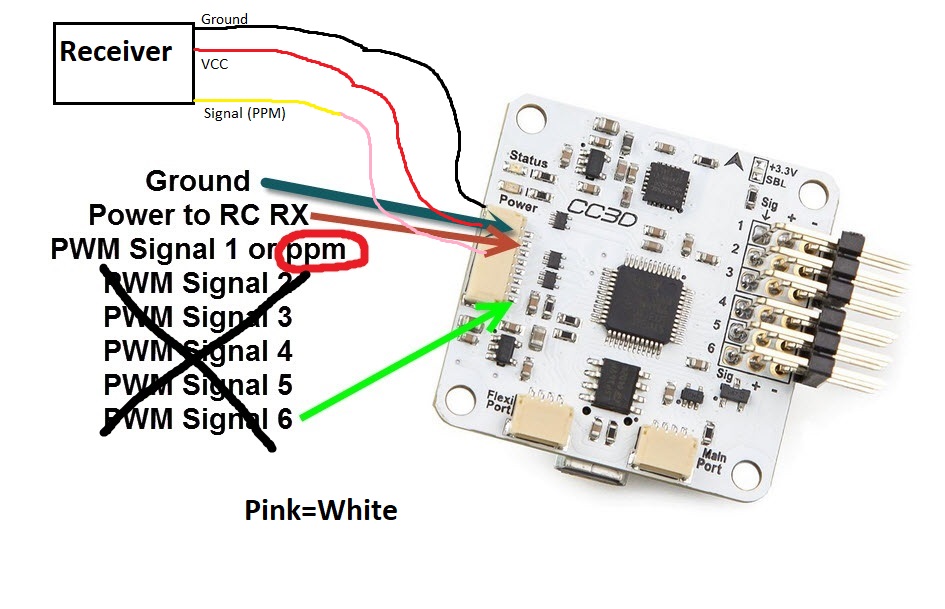
- CC3D Flight Controller: A popular and affordable flight controller known for its OpenPilot/LibrePilot firmware compatibility. It handles the processing of sensor data and controls the motors, ultimately determining your drone’s flight behavior.
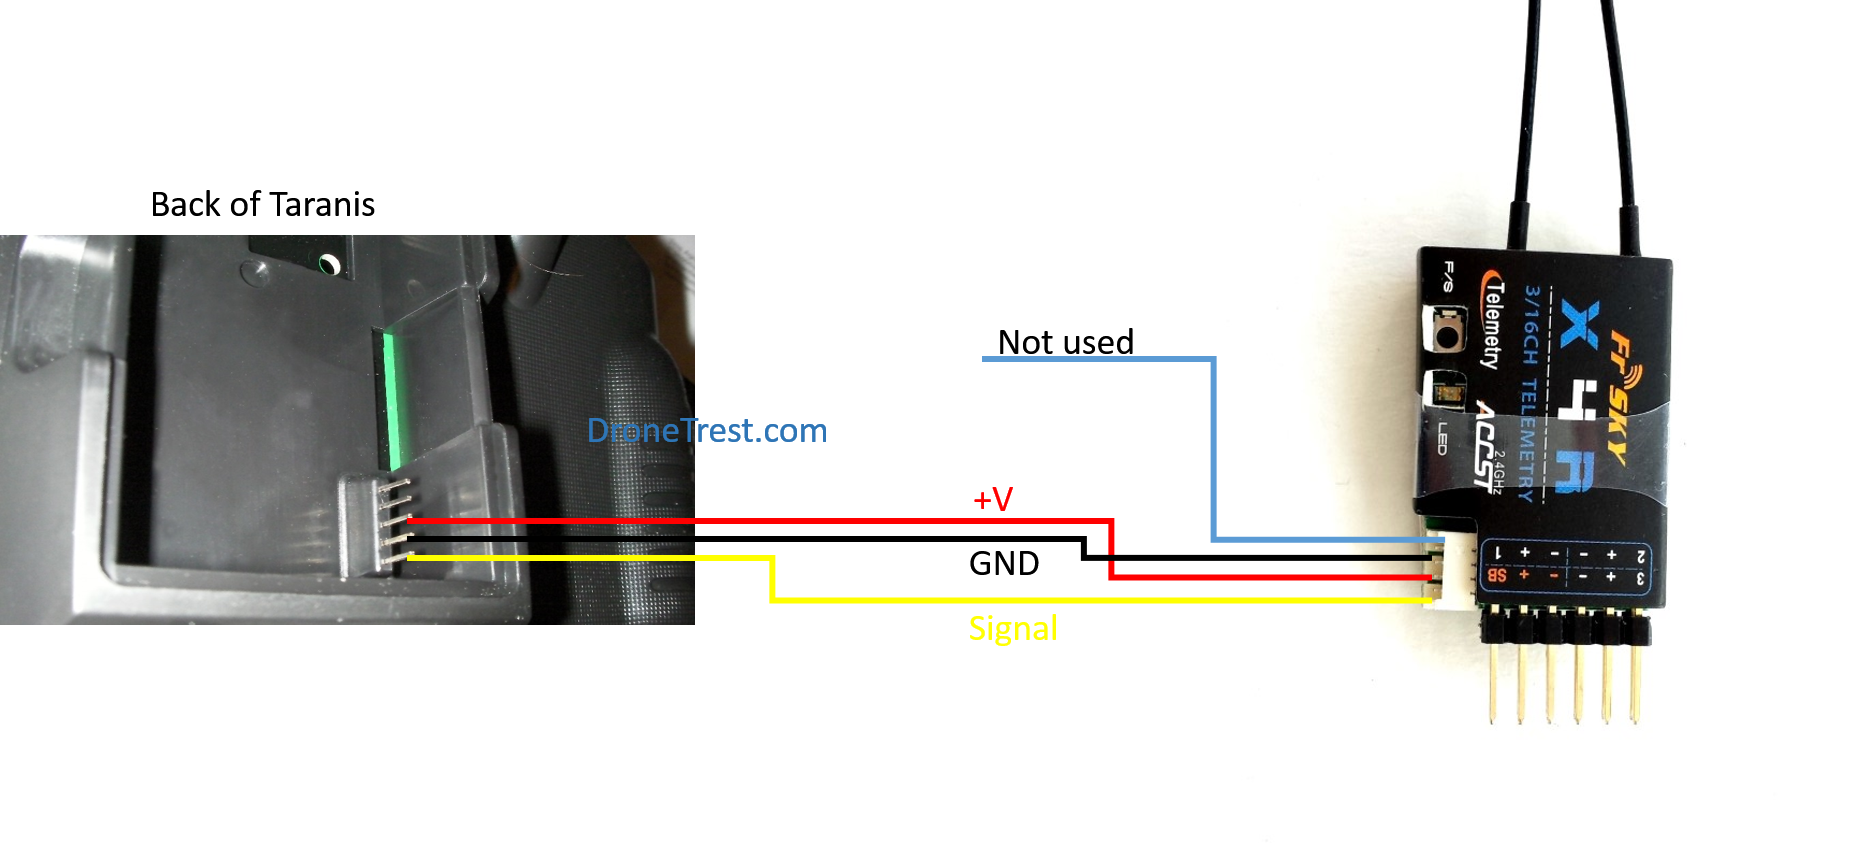
- X8R Receiver: A 8-channel receiver from FrSky, renowned for its reliability, extended range, and telemetry capabilities. It receives the control signals from your transmitter (radio) and relays them to the flight controller.
CC3D to X8R Wiring Diagram: Step-by-Step Connection
This section provides a detailed wiring diagram and step-by-step instructions for connecting your CC3D flight controller to your X8R receiver. It’s crucial to follow these steps precisely to ensure proper functionality.
Wiring Diagram:
(Insert a visual representation of the wiring diagram here. This could be a hand-drawn diagram, a screenshot from a reputable source, or a professionally created graphic. The diagram should clearly show the following connections.)
CC3D (Output/Input Pins):
- Pin 1 (PWM/PPM): Connected to the SBUS output of the X8R (Signal)
- Pin 2 (+5V): Connected to the +5V output of the X8R (Power)
- Pin 3 (GND): Connected to the GND output of the X8R (Ground)
X8R (Output/Input Pins):
- SBUS: Connected to the PWM/PPM input of the CC3D (Signal)
- +5V: Connected to the +5V input of the CC3D (Power)
- GND: Connected to the GND input of the CC3D (Ground)
Step-by-Step Instructions:
- Power Down: Ensure both your CC3D flight controller and X8R receiver are disconnected from any power source. Safety first!
- Identify the Pins: Locate the necessary pins on both the CC3D and X8R. Refer to your component manuals if needed.
- Connect the Wires:
- Connect the SBUS output pin of the X8R to the PWM/PPM input pin of the CC3D.
- Connect the +5V output pin of the X8R to the +5V input pin of the CC3D.
- Connect the GND output pin of the X8R to the GND input pin of the CC3D.
- Secure the Connections: Use appropriate connectors (e.g., JST connectors, Dupont connectors) and/or solder the wires to the pins, ensuring a secure and reliable connection. Solder joints should be clean and free of shorts.
- Double-Check: Carefully review all connections to ensure accuracy. A mistake here can lead to flight control issues.
- Power Up (Carefully): Once you are certain the connections are correct, you can power on your components. Begin by powering up your X8R receiver, then the CC3D flight controller.
- Configuration: Finally, configure your flight controller using the appropriate software (LibrePilot/OpenPilot) to recognize the SBUS input from the X8R. You’ll typically need to select “SBUS” as the receiver type in the software settings.
Important Considerations and Troubleshooting
- SBUS vs. PWM: The X8R typically uses SBUS for its main output. Make sure your flight controller is configured to receive SBUS.
- Firmware Compatibility: Ensure your CC3D flight controller has the latest firmware installed and is compatible with SBUS protocol.
- Polarity: Double-check the polarity (+/-) of the power connections. Reversing the polarity can damage your components.
- Testing: After connecting, bind your transmitter to the receiver and test your controls within the flight controller software to verify correct channel mapping and responsiveness.
- Troubleshooting: If you experience issues, check these common problems:
- Incorrect Wiring: Review your wiring diagram carefully.
- Binding Issues: Ensure your transmitter and receiver are properly bound.
- Software Configuration: Verify that your flight controller software is correctly configured for SBUS input.
- Damaged Components: Test the components if you suspect an issue.
Calibration and Software Setup
Once you’ve wired the components, the next step is calibrating your flight controller within the software (LibrePilot/OpenPilot). This process includes:
- Receiver Setup: Configuring the software to recognize the SBUS input from the X8R.
- Stick Mapping: Mapping your transmitter sticks and switches to the correct channels in the software.
- Sensor Calibration: Calibrating the accelerometer, gyroscope, and magnetometer (if applicable) to ensure accurate flight data.
- Motor Testing and Configuration: Confirming that your motors spin in the correct direction and are correctly mapped to the flight controller outputs.
Refer to the specific documentation and tutorials for your chosen flight controller software for detailed calibration instructions.
Conclusion: Take Flight with Confidence
Connecting a CC3D flight controller to an X8R receiver is a fundamental skill for any drone enthusiast. By following the wiring diagram and step-by-step instructions outlined in this guide, you can establish a reliable connection and set the stage for successful drone flights. Remember to double-check your connections, configure your software properly, and always prioritize safety. With careful attention to detail and a little practice, you’ll be well on your way to enjoying the exciting world of drone flying.
Frequently Asked Questions (FAQs)
Can I use PWM instead of SBUS with the X8R and CC3D? While the X8R supports PWM output on its individual channels, utilizing SBUS offers significant advantages, including fewer wires and the ability to use all 8 channels with a single connection. The CC3D is designed to work with SBUS, making this the recommended configuration.
My drone isn’t responding to my transmitter. What should I check first? First, verify that the transmitter and receiver are bound. Then, double-check your wiring diagram and connections. Finally, confirm the correct SBUS input and channel mapping in your flight controller software.
What if I accidentally connect the power wires in the wrong polarity? Reversing the polarity of the power wires can damage your flight controller and/or receiver. Always double-check the polarity before applying power. If you suspect damage, discontinue use and inspect the components.
Where can I find the latest firmware for my CC3D flight controller? The latest firmware for your CC3D flight controller can be found on the LibrePilot or OpenPilot website, depending on which software you’re using. Be sure to choose the correct firmware for your specific hardware.
What type of connectors should I use for the wiring? JST connectors are commonly used for connecting the receiver and flight controller. Dupont connectors are also frequently used and easier to work with. Soldering the wires directly to the pins is also an option, but this requires more soldering experience. Always ensure a secure connection.
