Low battery
Battery level is below 20%. Connect charger soon.


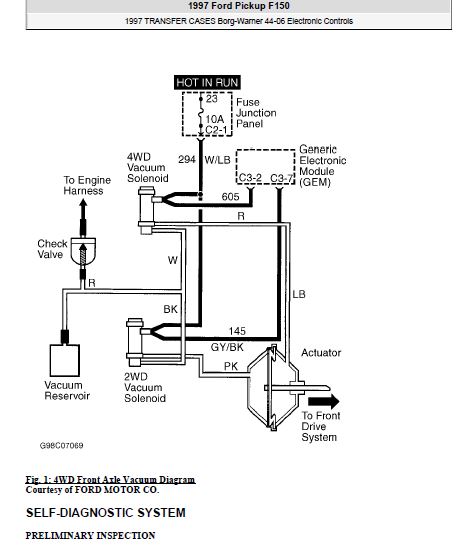

Ford F-150 Vacuum Wiring Diagram: The Complete Guide for Every Truck Owner
The Ford F-150. It’s the backbone of American trucking, known for its power, versatility, and enduring legacy. Owning one comes with the responsibility of understanding its inner workings, and one crucial system that often perplexes owners is the vacuum system. This intricate network of hoses and components plays a vital role in everything from engine performance to climate control. This guide provides a comprehensive overview of the Ford F-150 vacuum wiring diagram, empowering you to diagnose issues, perform repairs, and maintain your truck’s optimal functionality.
Understanding your F-150’s vacuum system is paramount for several reasons:
- Engine Performance: Vacuum leaks can lead to poor fuel economy, rough idling, and decreased power.
- Climate Control: The vacuum system often controls the operation of your heating and air conditioning vents.
- Emissions Control: Many emissions control components rely on vacuum for proper operation.
- Overall Reliability: A well-maintained vacuum system contributes to the longevity and reliability of your truck.
This guide aims to demystify the vacuum system, providing you with the knowledge to troubleshoot and maintain your F-150 effectively.
Understanding the Basics: What is a Vacuum System?
Before diving into diagrams, let’s establish the fundamentals. A vacuum system utilizes the principle of negative pressure (vacuum) to operate various components. This negative pressure is typically generated by the engine itself, specifically within the intake manifold. This “vacuum” is then distributed through a network of hoses to control various functions.
Think of it like this: the engine sucks in air, and that “sucking” creates a vacuum that can be harnessed to perform various tasks.
Key Components of the Ford F-150 Vacuum System
The vacuum system in your F-150 consists of several key components working in concert. Here are some of the most important:
- Vacuum Source: Typically the intake manifold, where vacuum is generated.
- Vacuum Hoses and Lines: These carry the vacuum to various components. They’re usually made of rubber or plastic and are susceptible to cracking and deterioration over time.
- Vacuum Reservoirs: These store vacuum, ensuring a consistent supply, especially during periods of high engine load.
- Vacuum Switches (VSVs): These valves control the flow of vacuum to different components based on engine operating conditions.
- Vacuum Actuators: These components use vacuum to perform a specific function, such as opening or closing vents in your climate control system or controlling the EGR valve.
- Check Valves: These prevent vacuum from flowing in the wrong direction.
Locating and Interpreting Your Ford F-150 Vacuum Wiring Diagram
The specific vacuum wiring diagram you need will depend on the year, engine, and trim level of your F-150. The best place to find this diagram is:
- Under the Hood: Often, a vacuum diagram is located on a sticker under the hood, typically on the radiator support or the underside of the hood itself.
- Repair Manuals: Chilton, Haynes, and specific Ford service manuals (available digitally or in print) provide detailed vacuum diagrams.
- Online Resources: Numerous websites and forums dedicated to Ford trucks offer vacuum diagrams for various models. Search specifically for your truck’s year, engine, and any relevant options (e.g., “1999 Ford F-150 5.4L Vacuum Diagram”).
Interpreting the Diagram:
Vacuum diagrams use a standardized set of symbols and abbreviations. Familiarize yourself with these:
- Hoses: Represented by lines, often color-coded to indicate different vacuum levels or purposes.
- Components: Represented by symbols specific to each component (e.g., VSVs, actuators, reservoirs).
- Connections: Points where hoses connect to components are clearly marked.
- Abbreviations: Commonly used abbreviations include:
- VAC: Vacuum
- EGR: Exhaust Gas Recirculation
- A/C: Air Conditioning
- CANP: Canister Purge Valve
- PCV: Positive Crankcase Ventilation
Troubleshooting Common Vacuum System Problems
Diagnosing vacuum system issues often involves a process of elimination. Here are some common problems and troubleshooting tips:
- Vacuum Leaks: These are the most common culprits.
- Symptoms: Rough idling, poor fuel economy, engine misfires, and unusual noises (hissing or whistling).
- Diagnosis:
- Visual Inspection: Carefully inspect all hoses for cracks, splits, or disconnections.
- Smoke Test: A professional smoke test can help pinpoint small leaks by injecting smoke into the vacuum system.
- Listen for Leaks: With the engine running, listen carefully for hissing sounds.
- Faulty Vacuum Switches (VSVs):
- Symptoms: Issues with specific components controlled by the VSV (e.g., EGR valve not functioning).
- Diagnosis:
- Testing with a Vacuum Gauge: Use a vacuum gauge to check if the VSV is correctly switching vacuum.
- Electrical Testing: Some VSVs have electrical connections that can be tested with a multimeter.
- Clogged Components:
- Symptoms: Reduced performance or failure of vacuum-operated devices.
- Diagnosis:
- Inspection and Cleaning: Disconnect and inspect components like the PCV valve, EGR valve, and canister purge valve. Clean or replace as needed.
Repairing and Maintaining Your F-150 Vacuum System
- Regular Inspections: Periodically inspect all vacuum hoses for cracks, wear, or disconnections. Replace hoses as needed, especially those exposed to heat or harsh conditions.
- Use Quality Replacement Parts: When replacing components, opt for high-quality OEM (Original Equipment Manufacturer) or reputable aftermarket parts.
- Proper Hose Routing: Ensure that all vacuum hoses are routed correctly according to the diagram. Incorrect routing can lead to significant performance issues.
- Consider a Vacuum Gauge: A vacuum gauge can be a valuable tool for diagnosing and monitoring the health of your vacuum system.
Conclusion: Mastering Your F-150’s Vacuum System
Understanding and maintaining the vacuum system in your Ford F-150 is crucial for optimal performance, fuel efficiency, and overall reliability. By using this guide and consulting your truck’s specific vacuum wiring diagram, you can confidently diagnose and repair vacuum-related problems. Regular inspections, timely replacements, and a proactive approach to maintenance will ensure your F-150 continues to perform at its best for years to come. Remember to always prioritize safety and consult a qualified mechanic if you are unsure about any repairs.
FAQs
1. Where can I find the vacuum diagram for my specific F-150 model?
The best places to look are on a sticker under the hood, in a repair manual (Chilton, Haynes, or Ford service manual), or online resources specific to your truck’s year, engine, and trim.
2. What are the common symptoms of a vacuum leak?
Common symptoms include rough idling, poor fuel economy, engine misfires, and unusual hissing or whistling noises.
3. Can I use generic vacuum hoses, or do I need specific types?
While you can often use generic vacuum hoses, it’s best to use hoses that are the correct size and material for your specific application. Check the diagram and your existing hoses for any specific requirements.
4. How often should I inspect my F-150’s vacuum system?
It’s recommended to inspect your vacuum system at least once a year or every time you perform routine maintenance, such as an oil change. Inspect hoses for cracks, wear, and disconnections.
5. Is it safe to work on the vacuum system if I have no prior experience?
While basic repairs like replacing hoses are manageable for a DIYer, more complex diagnostics and repairs may require experience. Always consult a qualified mechanic if you are unsure about any repair.
