Low battery
Battery level is below 20%. Connect charger soon.


Ford Focus 1.6 16V Timing Belt Setting: The Step-by-Step Rozrzad Guide (SEO-Optimized)
The Ford Focus 1.6 16V is a popular and reliable vehicle, but like all internal combustion engines, it requires regular maintenance to ensure optimal performance and longevity. One of the most critical maintenance tasks is the replacement of the timing belt, often referred to as the “rozrzad” in some regions. A broken timing belt can lead to catastrophic engine damage, making timely replacement crucial. This comprehensive guide provides a step-by-step approach to setting the timing belt on your Ford Focus 1.6 16V, helping you understand the process and potentially saving you money on costly repairs.
This guide aims to equip you with the knowledge to perform this task. However, if you are not comfortable with automotive repair, it’s highly recommended to consult a qualified mechanic. Incorrectly setting the timing belt can severely damage your engine.
H2: Understanding the Importance of Timing Belt Replacement
The timing belt is a crucial component of your Ford Focus 1.6 16V engine. It synchronizes the rotation of the crankshaft and camshaft, ensuring the valves open and close at the correct times in relation to the pistons’ movement. A worn or broken timing belt can cause:
- Valve damage: Valves can collide with pistons, leading to bent valves and piston damage.
- Engine failure: Severe damage can result in a complete engine rebuild or replacement.
- Reduced performance: Even before complete failure, a worn belt can affect engine timing and performance.
Ford recommends replacing the timing belt on the 1.6 16V engine at specific intervals, typically around every 100,000 miles or 10 years, whichever comes first. Consult your owner’s manual for the exact recommendations for your model year.
H2: Essential Tools and Materials You’ll Need
Before you begin, gather the necessary tools and materials. Having everything readily available will make the process smoother and more efficient.
- New Timing Belt Kit: This typically includes the timing belt, tensioner pulley, and often the water pump (recommended to replace while you’re in there).
- Crankshaft Pulley Holding Tool: Essential for loosening and tightening the crankshaft pulley bolt.
- Camshaft Locking Tool: This tool aligns and locks the camshafts in the correct position.
- Torque Wrench: For accurate tightening of bolts to their specified torque values.
- Socket Set and Wrenches: Including metric sizes.
- Screwdrivers (various types): Flathead and Phillips head.
- Jack and Jack Stands: For safely lifting and supporting the vehicle.
- Wheel Chocks: For safety.
- Pliers.
- Penetrating Oil: For loosening stubborn bolts.
- Workshop Manual or Repair Guide: Provides specific torque specifications and diagrams for your model year.
- Gloves: For keeping your hands clean.
- Safety Glasses: To protect your eyes.
- Clean Rags: For wiping up spills.
H2: Step-by-Step Timing Belt Setting Procedure
This guide provides a general outline. Always refer to your specific vehicle’s workshop manual for detailed instructions and torque specifications.
Safety First:
- Park the vehicle on a level surface.
- Engage the parking brake.
- Chock the rear wheels.
- Disconnect the negative battery terminal.
Prepare the Vehicle:
- Raise the front of the vehicle and securely support it with jack stands.
- Remove the front right wheel.
- Remove the splash guard and any other components that obstruct access to the engine.
Remove Serpentine Belt:
- Locate the tensioner pulley for the serpentine belt.
- Use a wrench to relieve the tension and remove the belt. Note the routing of the belt for later reinstallation.
Remove the Crankshaft Pulley:
- Use the crankshaft pulley holding tool to secure the crankshaft pulley.
- Loosen and remove the crankshaft pulley bolt. This bolt is often very tight.
- Carefully remove the crankshaft pulley.
Remove Timing Belt Covers:
- Remove the upper and lower timing belt covers. These are usually held in place by bolts or clips.
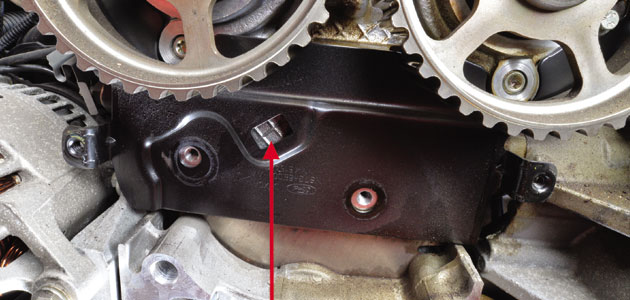
Align the Camshafts and Crankshaft:
- Crankshaft: Rotate the crankshaft clockwise until the timing marks align. These marks are typically on the crankshaft pulley and engine block. Consult your workshop manual for the specific location and alignment.
- Camshafts: Use the camshaft locking tool to lock the camshafts in the correct position. This tool ensures the camshafts are perfectly aligned.
Remove the Old Timing Belt:
- Loosen the timing belt tensioner pulley.
- Remove the timing belt.
Install the New Timing Belt:
- Install the new timing belt, ensuring it’s properly seated on all pulleys.
- Crucially, make sure the timing marks on the crankshaft and camshafts remain aligned. Double-check this before proceeding.
- Tighten the timing belt tensioner pulley according to the manufacturer’s specifications. This is critical for proper belt tension.
Reassemble the Components:
- Reinstall the timing belt covers.
- Reinstall the crankshaft pulley and tighten the bolt to the specified torque using the crankshaft pulley holding tool.
- Reinstall the serpentine belt, ensuring it’s routed correctly.
- Reinstall any other components you removed.
Final Checks and Testing:
- Remove the camshaft locking tool.
- Rotate the crankshaft by hand two full rotations to ensure the timing marks align correctly and that there is no interference between the valves and pistons. If you feel any resistance, stop immediately and recheck your work.
- Reconnect the negative battery terminal.
- Start the engine and listen for any unusual noises.
- Check for any leaks.
H2: Important Considerations and Tips
- Don’t overtighten the timing belt tensioner: Overtightening can damage the belt and other components.
- Inspect other components: While you have the timing belt off, inspect the water pump, tensioner pulley, and any other related components for wear. It is often cost-effective to replace them at the same time.
- Cleanliness is key: Keep the area around the timing belt clean to prevent contamination.
- Take your time: Rushing the process can lead to mistakes.
- Consult your workshop manual: This guide is a general outline; your workshop manual provides specific instructions and torque specifications for your vehicle.
- If in doubt, seek professional help: It’s always better to be safe than sorry. If you are not confident in your abilities, consult a qualified mechanic.
H2: Conclusion
Replacing the timing belt on your Ford Focus 1.6 16V is a crucial maintenance task that can prevent costly engine damage. By following these step-by-step instructions, and referring to your vehicle’s workshop manual, you can successfully replace the timing belt and keep your engine running smoothly. Remember to prioritize safety, take your time, and double-check your work throughout the process.
H2: Frequently Asked Questions (FAQs)
Q: How often should I replace the timing belt on my Ford Focus 1.6 16V?
- A: Typically every 100,000 miles or 10 years, whichever comes first. Consult your owner’s manual for your specific model year.
Q: What happens if the timing belt breaks?
- A: It can cause severe engine damage, including bent valves, piston damage, and potentially complete engine failure.
Q: Can I replace the timing belt myself?
- A: Yes, if you have the necessary tools, mechanical aptitude, and are comfortable following detailed instructions. However, it’s crucial to be accurate and precise. If you are unsure, seek professional assistance.
Q: Do I need to replace the water pump when replacing the timing belt?
- A: It’s highly recommended. The water pump is often located near the timing belt and is easily accessible during the timing belt replacement. Replacing it at the same time can prevent future failures and save on labor costs.
Q: What is the “rozrzad”?
- A: “Rozrzad” is a Polish word that is commonly used to refer to the timing belt and its related components (tensioner, pulleys, etc.). It’s a term often used in Eastern European countries.
