Low battery
Battery level is below 20%. Connect charger soon.

Ford Focus 1.8 TDCi EGR Valve Removal: The DIY Demontage Guide You Need
The Ford Focus 1.8 TDCi, a popular and reliable diesel workhorse, is known for its fuel efficiency and practicality. However, like all diesel engines, it’s susceptible to issues, and one of the most common culprits is the Exhaust Gas Recirculation (EGR) valve. A clogged or malfunctioning EGR valve can lead to decreased performance, increased emissions, and even engine damage. This guide provides a step-by-step approach to removing the EGR valve on your 1.8 TDCi Ford Focus, empowering you to tackle this repair yourself and potentially save on costly garage bills. This guide focuses on the removal process itself, and does not cover the legal implications of EGR valve removal. It’s crucial to be aware of and comply with all local regulations regarding vehicle emissions.
Understanding the EGR Valve and Why You Might Need to Remove It
Before you dive in, it’s essential to understand what the EGR valve does. The EGR valve’s primary function is to reduce nitrogen oxide (NOx) emissions by recirculating a portion of the exhaust gases back into the intake manifold. This lowers combustion temperatures, thereby reducing NOx formation. However, this process can also lead to:
- Carbon Build-up: Exhaust gases contain soot and carbon particles, which can accumulate within the EGR valve and the intake manifold.
- Reduced Performance: A clogged EGR valve restricts airflow, leading to a loss of power, rough idling, and hesitation.
- Increased Fuel Consumption: A malfunctioning EGR valve can negatively impact fuel efficiency.
- Check Engine Light: A faulty EGR valve often triggers the check engine light, alerting you to the problem.
Removing the EGR valve, while potentially improving engine performance and preventing future build-up, may have legal implications depending on your location. Research your local regulations before proceeding.
Tools and Materials You’ll Need
Gathering the right tools and materials beforehand will make the removal process smoother and more efficient. Here’s a list:
- Socket Set: Metric sockets, including various sizes (8mm, 10mm, 12mm, 13mm, etc.) – a comprehensive set is recommended.
- Wrench Set: Metric wrenches to complement your socket set.
- Screwdrivers: Phillips head and flathead screwdrivers.
- Torque Wrench: To ensure proper tightening of bolts upon reassembly (highly recommended).
- Penetrating Oil: Such as WD-40 or PB Blaster, to loosen stubborn bolts.
- Gloves: To protect your hands from dirt and grime.
- Safety Glasses: To protect your eyes.
- Jack and Jack Stands: For safely lifting and supporting the vehicle.
- Wheel Chocks: To prevent the vehicle from rolling.
- Rags or Shop Towels: For cleaning up spills and wiping down parts.
- EGR Valve Blanking Plate (Optional): If you choose to blank off the EGR system, you’ll need a blanking plate appropriate for your Ford Focus 1.8 TDCi.
- Replacement Gaskets (Recommended): New gaskets are often a good idea to ensure a proper seal upon reassembly.
- Wire brush or scraper: For cleaning any buildup around the EGR valve.
Step-by-Step EGR Valve Removal Procedure
Important Note: Always disconnect the negative terminal of the battery before working on any electrical components. This is a crucial safety precaution.
- Prepare the Vehicle:
- Park the vehicle on a level surface.
- Engage the parking brake.
- Chock the rear wheels.
- Disconnect the negative terminal of the battery.
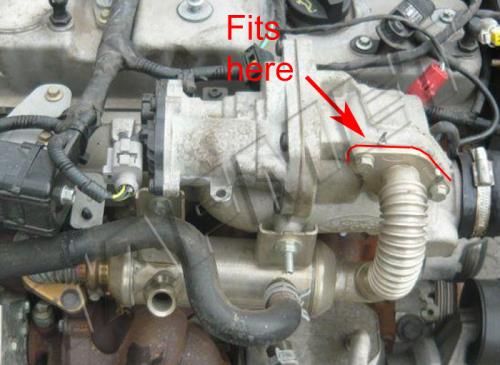
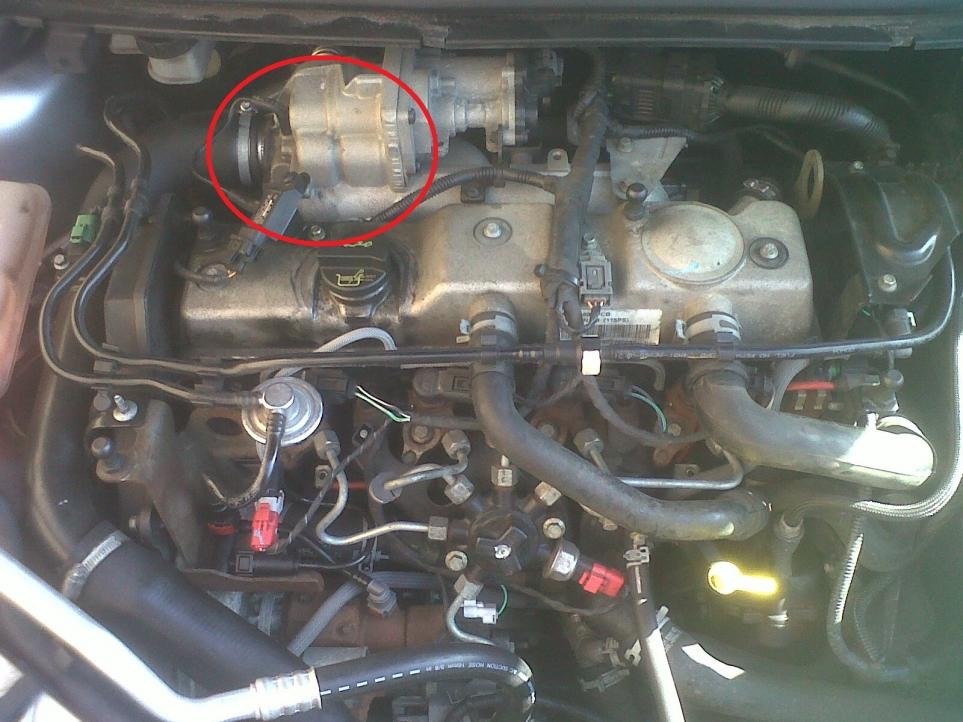
- Locate the EGR Valve: The EGR valve on the Ford Focus 1.8 TDCi is typically found towards the rear of the engine, often near the intake manifold. Consult your vehicle’s service manual for the exact location, as it might vary slightly depending on the model year.
- Disconnect Electrical Connectors: Carefully disconnect any electrical connectors attached to the EGR valve. These connectors usually have a locking mechanism that you’ll need to release before pulling them off.
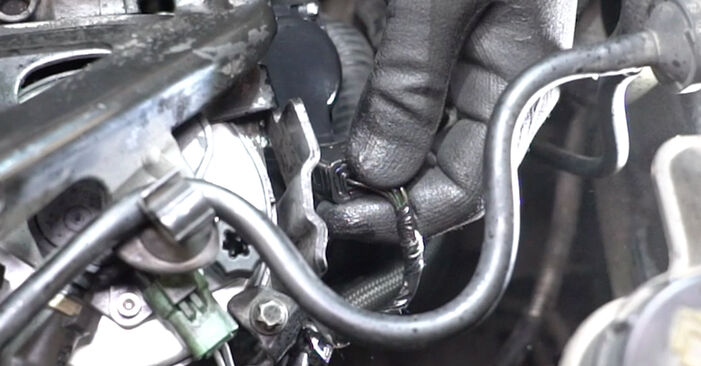
- Remove Vacuum Hoses (If applicable): Some EGR systems have vacuum hoses connected to the valve. Carefully disconnect these, noting their original positions for reassembly.
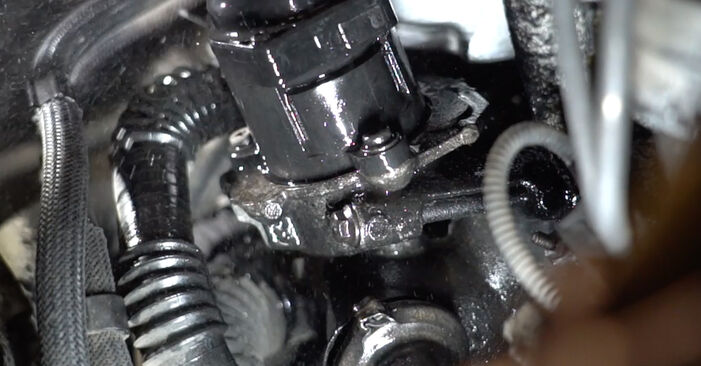
- Loosen and Remove the Bolts: Using your socket set or wrenches, carefully loosen and remove the bolts that secure the EGR valve to the engine. Penetrating oil can be helpful if the bolts are corroded.
- Remove the EGR Valve: Once the bolts are removed, carefully detach the EGR valve from the engine. It may be stuck due to carbon build-up. Gently wiggle and pry it loose if necessary.
- Clean the Mounting Surfaces: Thoroughly clean the mounting surfaces on both the EGR valve and the engine block to ensure a good seal during reassembly. Use a wire brush or scraper to remove any stubborn carbon deposits.
- Install Blanking Plate (Optional): If you’re installing an EGR blanking plate, now is the time to do it. Follow the manufacturer’s instructions for installation.
- Reassemble the Components:
- Install new gaskets (if applicable).
- Position the EGR valve (or blanking plate) onto the engine.
- Reinstall the bolts, tightening them to the manufacturer’s specified torque using a torque wrench.
- Reconnect any vacuum hoses and electrical connectors.
- Reconnect the Battery: Reconnect the negative terminal of the battery.
- Start and Test: Start the engine and check for any leaks or unusual noises. Drive the vehicle to ensure proper performance. You may need to reset the check engine light if it was triggered by the faulty EGR valve.
Important Considerations and Cautions
- Corrosion: Be prepared for potentially corroded bolts. Use penetrating oil and take your time to avoid breaking them.
- Carbon Build-up: The EGR valve and surrounding areas can be heavily coated in carbon deposits. Be patient and use appropriate cleaning methods.
- Torque Specifications: Always tighten bolts to the manufacturer’s specified torque to prevent leaks and ensure proper sealing. Consult your vehicle’s service manual for torque specifications.
- Check Engine Light: After removing the EGR valve, the check engine light may illuminate. This is normal if you haven’t taken steps to address the EGR system (e.g., blanking plate or ECU reprogramming).
- Legality: Be aware of the legal implications of EGR valve removal in your area.
Frequently Asked Questions (FAQs)
- Q: Will removing the EGR valve improve my fuel economy?
- A: Potentially. A clogged EGR valve can negatively impact fuel efficiency. Removing it and addressing any related issues might lead to a slight improvement.
- Q: What happens if I don’t use a blanking plate?
- A: If you remove the EGR valve without blanking the system or reprogramming the ECU, the engine management system will likely detect the missing valve and trigger the check engine light.
- Q: Can I just clean the EGR valve instead of removing it?
- A: Yes, cleaning the EGR valve is a valid option. However, if the valve is severely damaged or the underlying issues persist, removal and replacement (or blanking) might be necessary.
- Q: Do I need to reprogram the ECU after removing the EGR valve?
- A: This depends on your goals and local regulations. To prevent the check engine light from illuminating and optimize the engine’s performance after EGR removal, you may need to reprogram the ECU.
- Q: Is this a difficult DIY project?
- A: The difficulty level is moderate. It requires basic mechanical skills and the ability to follow instructions carefully. However, access to the EGR valve can sometimes be challenging.
Conclusion
Removing the EGR valve on your Ford Focus 1.8 TDCi can be a rewarding DIY project. By following this guide and taking the necessary precautions, you can potentially improve your engine’s performance and avoid costly repair bills. Remember to prioritize safety, adhere to local regulations, and consult your vehicle’s service manual for specific instructions and torque specifications. Good luck with your repair!
