Low battery
Battery level is below 20%. Connect charger soon.


Honda Reflex Wiring Diagram: The Hidden Shortcut to Fix Your Scooter Fast
Owning a Honda Reflex scooter offers a fantastic blend of practicality, fuel efficiency, and stylish design. However, like any machine, it can encounter electrical gremlins. When your lights flicker, your starter refuses to turn, or your scooter simply won’t start, the culprit often lies within the intricate network of wires that power your ride. This is where the Honda Reflex wiring diagram becomes your secret weapon – the hidden shortcut to fast and effective troubleshooting and repair. Forget costly trips to the mechanic; with the right diagram, you can often diagnose and fix electrical issues yourself, saving you time and money. This article provides a comprehensive guide to understanding and utilizing your Honda Reflex wiring diagram.
Why You Need a Honda Reflex Wiring Diagram
Understanding the importance of a wiring diagram is the first step towards successful scooter repair. It’s essentially a roadmap of your scooter’s electrical system, showing you:
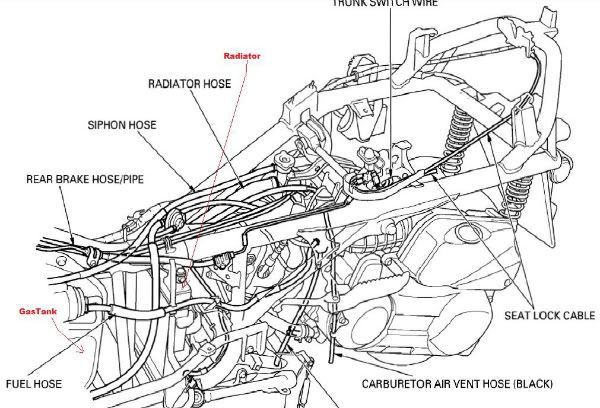
- Component Locations: Where each electrical component (lights, sensors, relays, etc.) is physically located on your scooter.
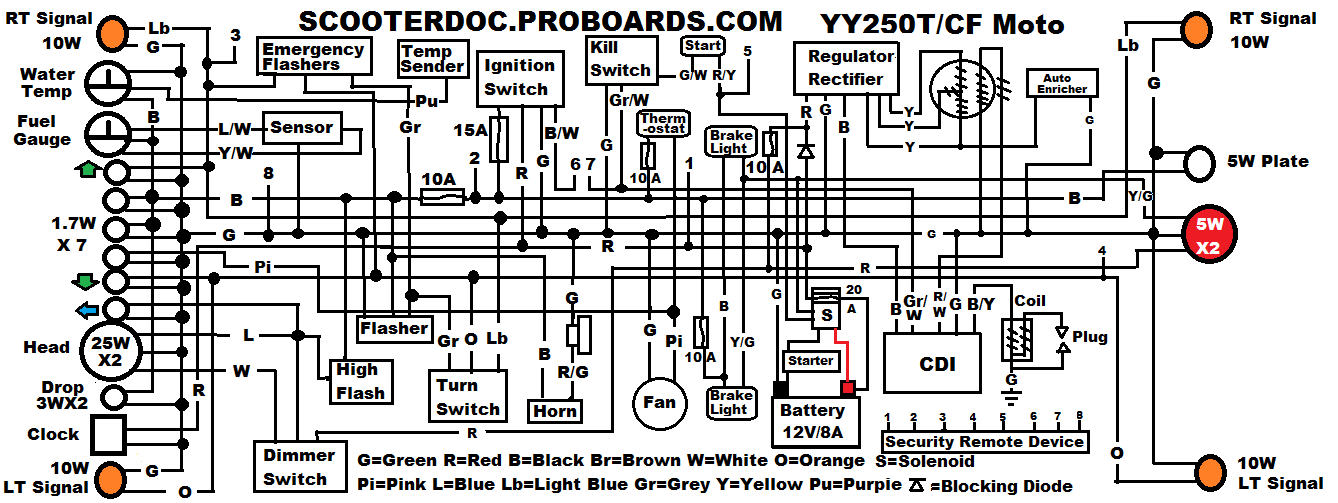
- Wire Connections: How each wire connects to other components, forming complete circuits.
- Wire Colors: The standardized color coding used to identify specific wires, making tracing them much easier.
- Circuit Protection: The location of fuses, circuit breakers, and other safety devices.
- Voltage and Current Specifications: Knowing the expected voltage and current for different circuits aids in diagnosing problems.
Without a wiring diagram, troubleshooting electrical issues becomes a frustrating and time-consuming guessing game. You risk damaging components, making the problem worse, or even creating new issues.
Finding and Understanding Your Honda Reflex Wiring Diagram
Obtaining the correct wiring diagram for your specific Honda Reflex model is crucial. Here’s how:
- Owner’s Manual: The owner’s manual sometimes includes a simplified wiring diagram. However, these are often not as detailed as a service manual.
- Service Manual: This is the best resource. You can purchase a digital or physical service manual specifically for your Honda Reflex. These manuals contain comprehensive wiring diagrams, troubleshooting procedures, and component specifications. Search for your year and model (e.g., “Honda Reflex 2001 Service Manual”).
- Online Resources: Numerous websites offer downloadable wiring diagrams for various Honda Reflex models. However, verify the source and ensure the diagram matches your scooter’s year and specifications.
- Professional Mechanics: Local mechanics might be willing to share or sell wiring diagrams, however, this is not guaranteed.
Understanding the Diagram:
Wiring diagrams use standardized symbols and color codes. Familiarize yourself with these common elements:
- Wires: Represented by lines, with color codes (e.g., “R” for Red, “B” for Black, “G” for Green).
- Connectors: Shown as boxes or circles, indicating where wires connect to components.
- Components: Represented by symbols (e.g., a light bulb for a headlight, a battery symbol).
- Fuses: Usually depicted as a rectangular box with a fuse symbol.
- Grounds: Often represented by a symbol resembling a fork and are crucial for circuit completion.
Troubleshooting Electrical Issues Using the Wiring Diagram
Once you have your wiring diagram, you can use it to diagnose and repair electrical problems. Here’s a step-by-step approach:
- Identify the Problem: Clearly define the issue. Is it a specific light that’s not working? Does the starter not engage? Is the scooter completely dead?
- Consult the Diagram: Locate the circuit related to the problem. For example, if the headlight isn’t working, find the headlight circuit in the diagram.
- Trace the Circuit: Follow the wire path from the power source (battery or fuse) through the components in the circuit to the affected device.
- Check for Power: Use a multimeter to test for voltage at various points in the circuit. Identify where the power stops or is interrupted.
- Check for Ground: Ensure the component has a good ground connection. Corrosion or loose connections can disrupt the ground path.
- Inspect Components: Check the fuses, relays, switches, and the affected component for damage.
- Test and Repair: Replace faulty components, repair broken wires, and ensure all connections are secure.
Common Electrical Problems and Solutions:
- Headlights Not Working: Check the headlight bulb, the fuse, the headlight switch, and the wiring in the headlight circuit.
- Starter Not Engaging: Inspect the starter relay, the starter motor, the ignition switch, and the wiring associated with the starter circuit.
- No Power: Examine the main fuse, the battery connections, and the ignition switch.
- Flickering Lights: Check for loose connections, corroded wires, or a faulty voltage regulator.
Safety Precautions
Working with electrical systems requires caution. Always:
- Disconnect the Battery: Before working on any electrical components, disconnect the negative (-) terminal of the battery to prevent short circuits.
- Use Proper Tools: Employ insulated tools and a multimeter for safe and accurate testing.
- Work in a Well-Lit Area: Ensure adequate lighting to see the wires and components clearly.
- Double-Check Connections: After making repairs, carefully inspect all connections to ensure they are secure and properly connected.
- If Unsure, Seek Professional Help: If you’re uncomfortable working with electricity or are unsure about a specific repair, consult a qualified mechanic.
Conclusion
The Honda Reflex wiring diagram is an invaluable tool for any scooter owner seeking to troubleshoot and repair electrical issues. By understanding how to find, interpret, and utilize the diagram, you can save money, time, and frustration. Armed with the right information and a little patience, you can keep your Honda Reflex running smoothly for years to come. Embrace the power of the wiring diagram and unlock the hidden shortcut to faster scooter repairs!
Frequently Asked Questions (FAQs)
1. Where can I find a wiring diagram for my specific Honda Reflex model?
The best place to start is the service manual for your year and model of Honda Reflex. You can also find diagrams online, but verify the source and ensure it matches your scooter’s specifications.
2. What tools do I need to use a wiring diagram?
You’ll need a multimeter to test for voltage and continuity, basic hand tools (screwdrivers, pliers), and possibly wire strippers and crimpers for making repairs.
3. Is it safe to work on electrical components myself?
Yes, it’s generally safe if you disconnect the battery, use the proper tools, and follow safety precautions. If you’re unsure, consult a professional mechanic.
4. What do the wire color codes mean in a Honda Reflex wiring diagram?
Wire color codes are standardized to identify specific circuits. For example, “R” usually indicates red, which often signifies a power wire. Consult your wiring diagram’s key to understand the specific color codes used.
5. What if I can’t find a wiring diagram for my model?
If you are unable to find a wiring diagram, your best bet is to consult a professional mechanic who has experience with your model. They may have access to a wiring diagram or be able to troubleshoot the issue based on their experience.
