Low battery
Battery level is below 20%. Connect charger soon.

How To Build a Wood Patio Cover: The Step-by-Step Guide Everyone Can Follow
Dreaming of a shady oasis in your backyard? A wood patio cover is the perfect solution! It provides protection from the sun, adds value to your home, and significantly enhances your outdoor living space. Building one might seem daunting, but with the right planning, tools, and this comprehensive step-by-step guide, you can create a beautiful and functional patio cover, even if you’re a beginner DIYer. Let’s dive in!
1. Planning and Preparation: Laying the Foundation
Before you even think about picking up a saw, meticulous planning is crucial. This initial phase sets the stage for a successful and structurally sound project.
Assess Your Space:
- Location: Determine the exact location of your patio cover. Consider sun exposure, existing structures, and any potential obstructions like trees or utility lines.
- Size: Decide on the desired dimensions of your patio cover. Measure your patio space carefully and consider how much shade you want.
- Local Codes and Permits: Research local building codes and regulations. You may need a permit before starting construction. This is especially important for structures like patio covers. Contact your local building department for guidance.
Design and Style:
- Consider Aesthetics: Choose a design that complements your home’s architecture and your personal style. Popular options include:
- Attached vs. Freestanding: Attached patio covers are connected to your house, while freestanding covers are independent structures.
- Gabled Roof: A classic pitched roof that offers good water runoff.
- Flat Roof: A simple, modern design, but requires careful consideration of drainage.
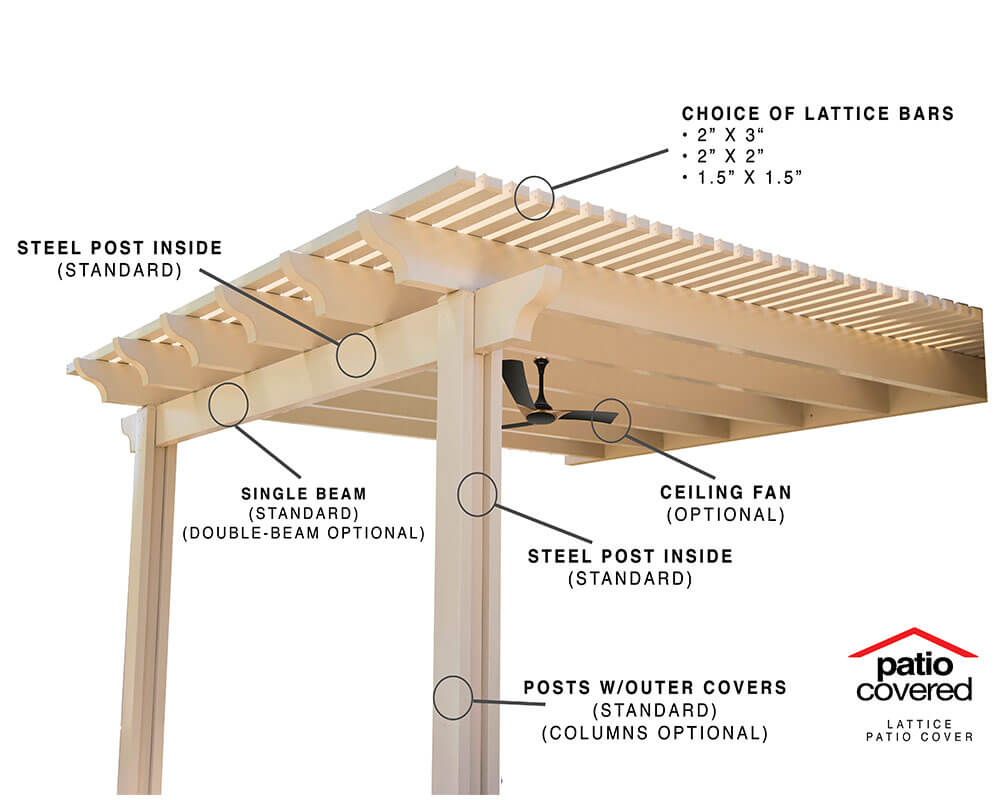
- Pergola: An open-lattice roof that provides partial shade and a decorative element.
- Create a Detailed Plan: Draw a detailed plan with measurements, material lists, and diagrams. This plan will be your roadmap for construction.
- Consider Aesthetics: Choose a design that complements your home’s architecture and your personal style. Popular options include:
Gather Your Materials:
- Lumber: Pressure-treated lumber is recommended for posts and beams that will be in contact with the ground or exposed to the elements. Choose wood that is structurally sound and suitable for outdoor use (e.g., cedar, redwood, or treated pine).
- Fasteners: Use exterior-grade screws, nails, and bolts designed for outdoor applications.
- Hardware: Consider brackets, post anchors, and other hardware to enhance structural integrity.
- Roofing Materials (if applicable): Depending on your roof design, you’ll need roofing materials like shingles, corrugated metal sheets, or polycarbonate panels.
- Concrete (for posts): If you are setting posts in the ground, you will need concrete mix and materials for setting the post like cardboard tubes.
Essential Tools:
- Measuring tape
- Level
- Circular saw or miter saw
- Drill/Driver
- Post hole digger or auger (for in-ground posts)
- Screwdriver/Hammer
- Safety glasses
- Work gloves
2. Building the Foundation: Setting the Posts
The posts are the backbone of your patio cover. Their proper installation is critical for stability and longevity.
- Determine Post Placement: Based on your plan, mark the locations for your posts.
- Dig Post Holes (for in-ground posts):
- Use a post hole digger or auger to dig holes to the required depth (typically below the frost line for your area). Consult local building codes for specific depth requirements.
- The diameter of the hole should be sufficient to accommodate the post and the concrete around it.
- Set the Posts:
- Insert the posts into the holes. Ensure they are plumb (perfectly vertical) using a level.
- Brace the posts temporarily to keep them in place while the concrete sets.
- Pour concrete into the holes, filling around the posts.
- Use a level again to ensure the posts remain plumb as the concrete sets.
- Allow the concrete to cure completely according to the manufacturer’s instructions (typically several days).
- Alternative: Surface-Mounted Posts: If you prefer not to dig holes, you can use post anchors to mount the posts directly to your patio surface. This method requires careful leveling and secure anchoring.
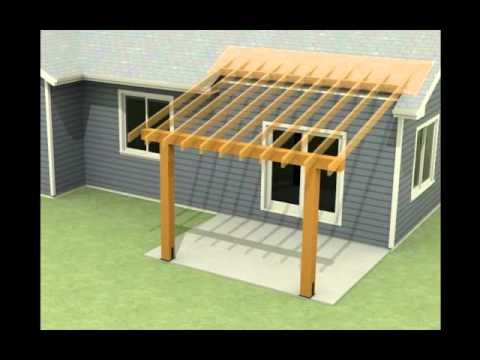
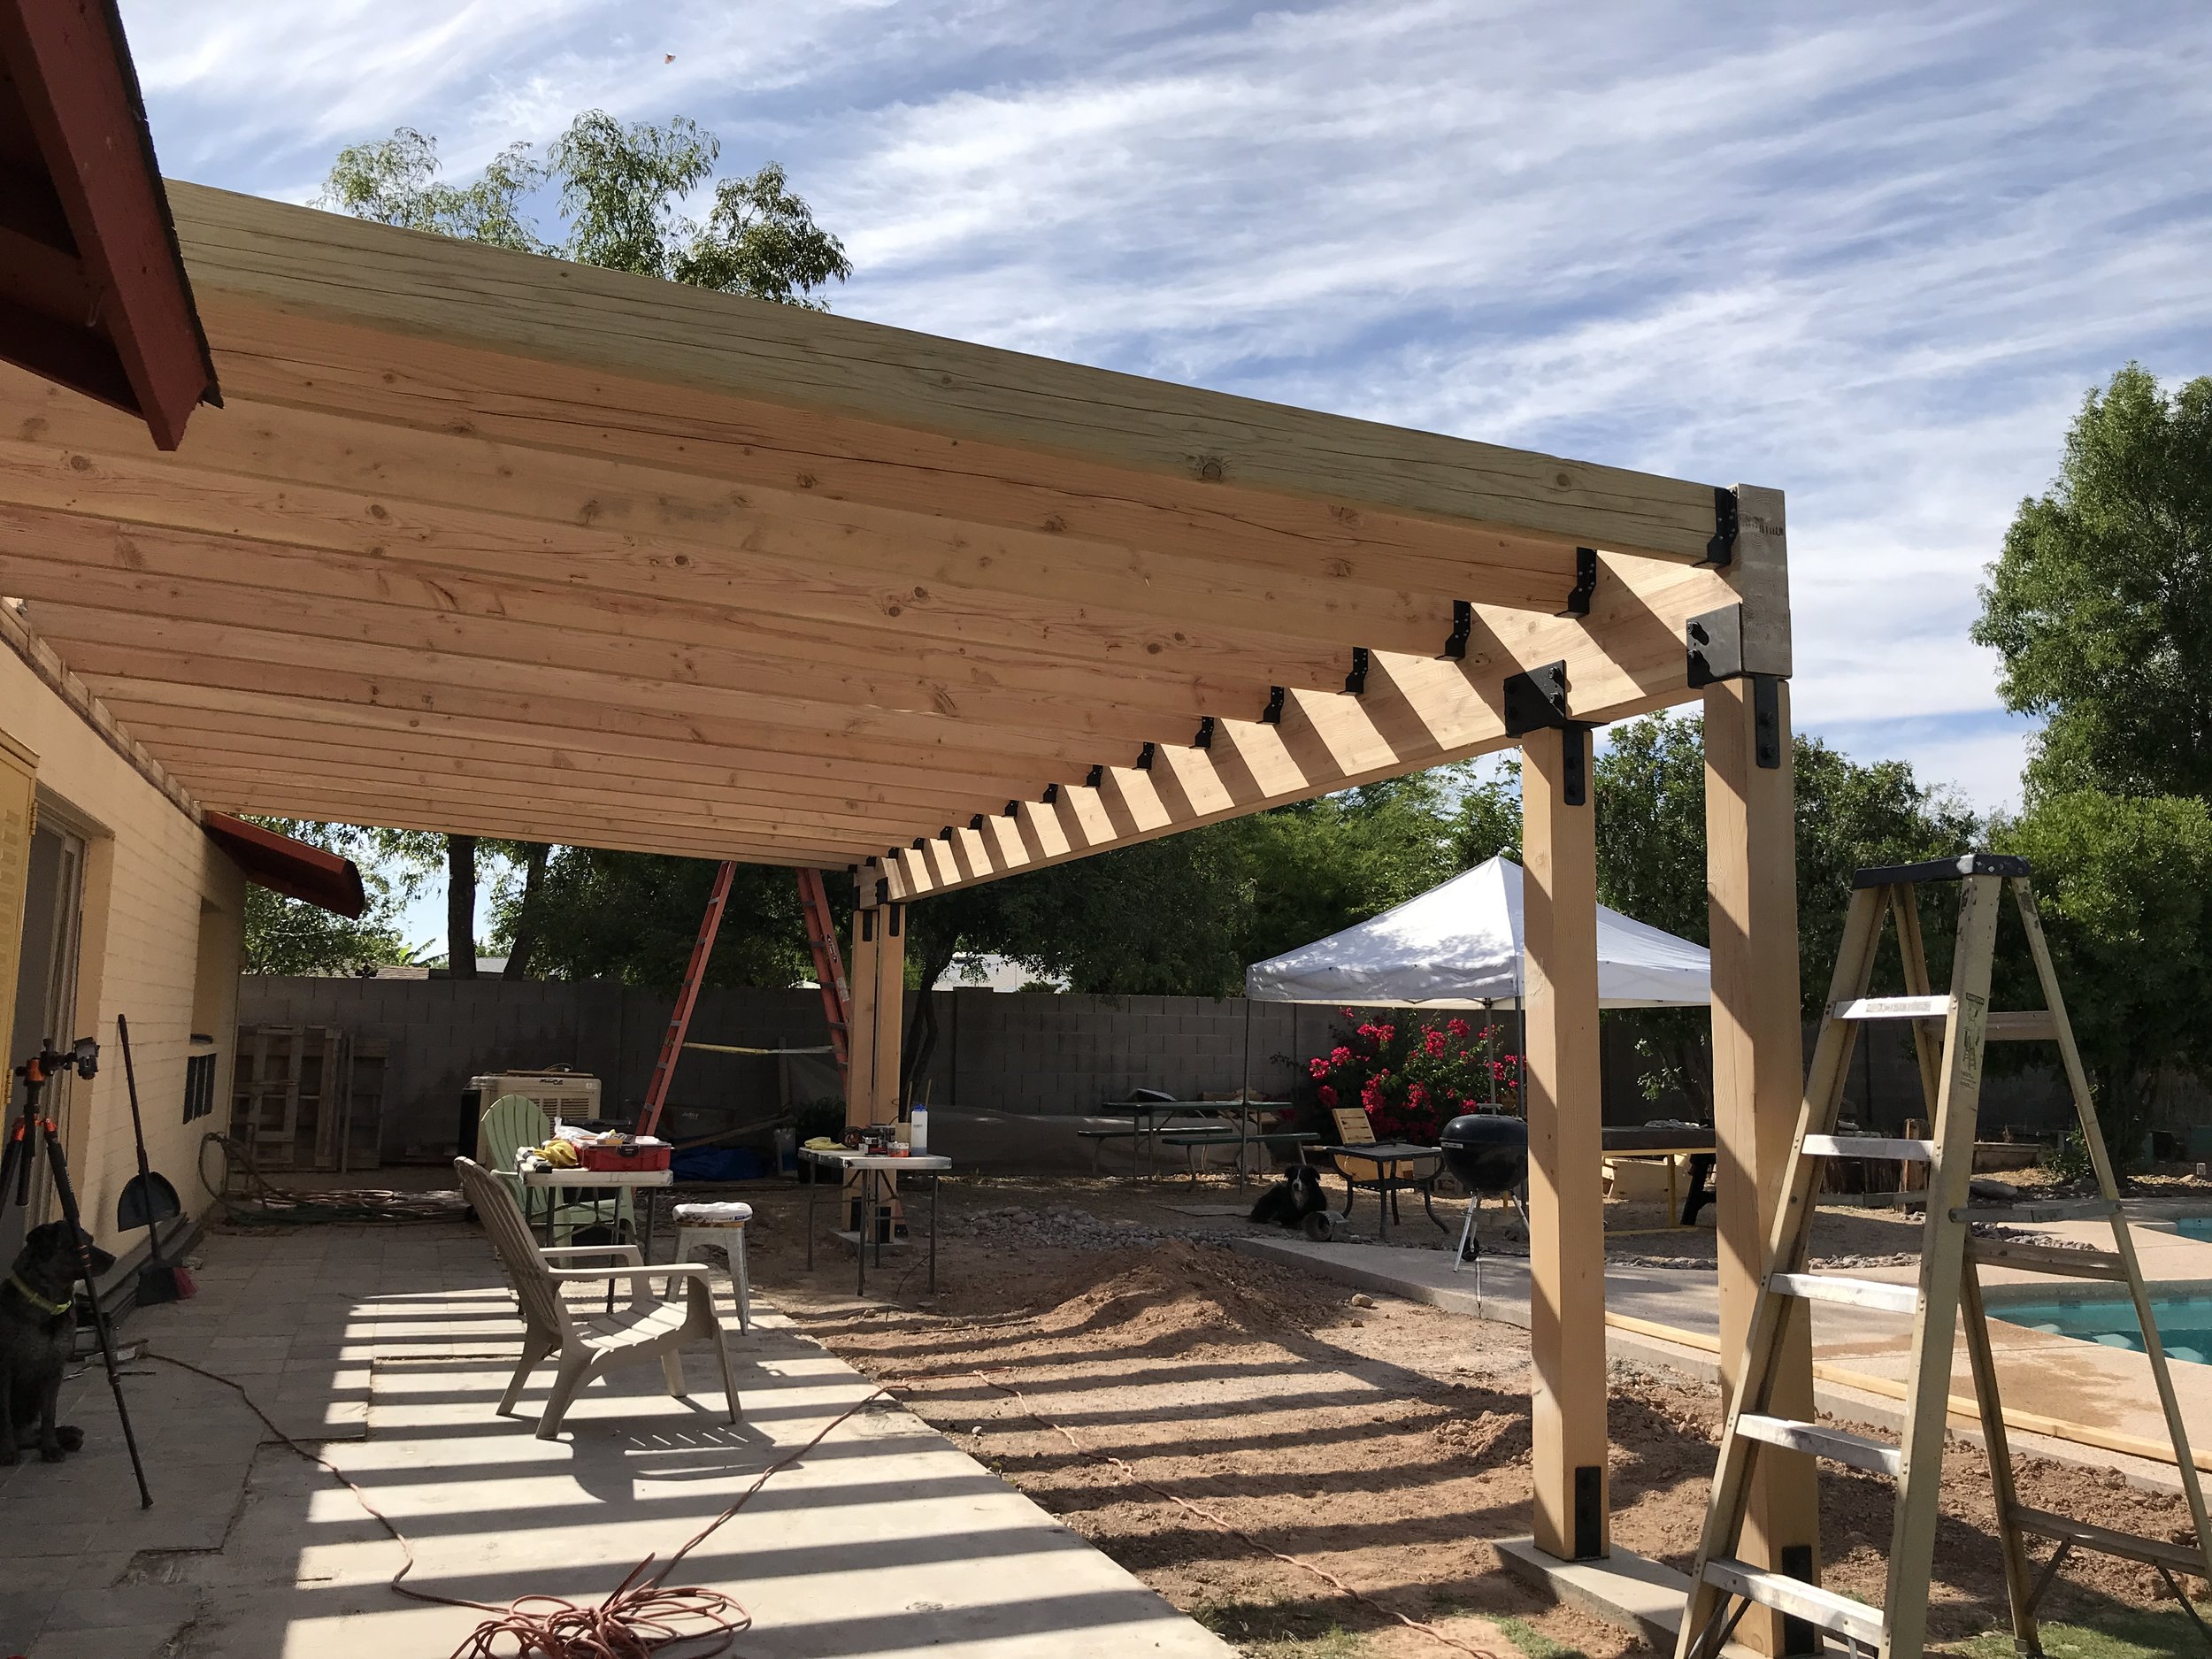
3. Framing the Structure: Building the Beams and Rafters
This step involves constructing the framework that supports the roof or the open-air design.
- Attach Beams to Posts:
- Cut the beams to the required length, according to your plan.
- Attach the beams to the posts using appropriate hardware (e.g., lag screws, bolts, or beam connectors). Ensure the beams are level.
- Install Rafters (for a roofed structure):
- Cut rafters to the correct length and spacing. The spacing will depend on the roofing material you choose.
- Attach the rafters to the beams using screws or nails.
- Ensure the rafters are level and evenly spaced.
- Consider Ledger Boards (for attached covers):
- For attached patio covers, a ledger board is attached to the house to support the beams. This requires careful measurement and secure attachment to the house framing.
4. Roofing (Optional): Adding Shade and Protection
If you’ve opted for a roofed patio cover, this is where you’ll add the roofing material.
- Install Sheathing (if required): If your roofing material requires it, install sheathing (plywood or OSB) over the rafters.
- Install Roofing Material:
- Follow the manufacturer’s instructions for your chosen roofing material (shingles, metal sheets, etc.).
- Ensure proper overlap and secure fastening to prevent leaks.
- Consider Drainage: Implement proper drainage systems to direct rainwater away from the structure and your patio.
5. Finishing Touches: Completing Your Project
The final steps involve adding the aesthetic and functional elements that make your patio cover complete.
- Trim and Finishing:
- Add trim boards to cover exposed edges and create a clean, finished look.
- Apply a protective finish to the wood (e.g., stain, paint, or sealant) to protect it from the elements and enhance its appearance.
- Electrical (Optional): If you plan to install lighting or outlets, now is the time to run electrical wiring and install fixtures. Hire a qualified electrician for this task.
- Clean Up: Remove any debris and clean up your work area.
Conclusion: Enjoying Your New Outdoor Space
Building a wood patio cover is a rewarding DIY project that can significantly enhance your outdoor living experience. By following these step-by-step instructions, you can create a beautiful, functional, and durable patio cover that you’ll enjoy for years to come. Remember to take your time, work safely, and consult with professionals if you have any questions or concerns. Happy building!
FAQs:
How much does it cost to build a wood patio cover? The cost varies widely depending on the size, design, materials, and whether you hire professional help. On average, you can expect to spend anywhere from a few hundred dollars for a simple pergola to several thousand dollars for a larger, roofed structure.
How long does it take to build a patio cover? The construction time depends on the project’s complexity and your DIY skills. A small, simple pergola might take a weekend, while a more elaborate roofed patio cover could take several weekends or longer.
What type of wood is best for a patio cover? Pressure-treated lumber is a great option for posts and any wood that will be in contact with the ground or exposed to the elements. Cedar and redwood are also excellent choices for their natural resistance to rot and insects. Always select wood that is rated for outdoor use and the climate you live in.
Do I need to waterproof my wood patio cover? Yes, it’s highly recommended to protect your wood patio cover from the elements. Applying a stain, paint, or sealant will help prevent water damage, rot, and insect infestation, extending the life of your structure.
Can I build a patio cover without a permit? It depends on your local building codes. Some smaller, simpler structures may not require a permit, but it’s always best to check with your local building department before starting construction. A permit ensures your project meets safety standards and building regulations.
