Low battery
Battery level is below 20%. Connect charger soon.


Mitsubishi Canter Wiring Diagram: The Essential Fix Truck Owners Can’t Ignore
The Mitsubishi Canter, a workhorse of the light-duty truck world, is renowned for its reliability and versatility. However, like any complex machine, it can encounter electrical gremlins. Faulty wiring can lead to a myriad of issues, from intermittent starting problems to complete system failures. For Canter owners, understanding the importance of the Mitsubishi Canter wiring diagram is not just helpful; it’s absolutely essential for effective troubleshooting and repairs. This article delves into the critical role of the wiring diagram, why it’s vital, and how to use it to maintain your Canter’s operational integrity.
Why the Mitsubishi Canter Wiring Diagram Matters
Electrical systems are the nervous system of your truck, controlling everything from the engine’s ignition to the dashboard lights. When wires corrode, connections loosen, or insulation degrades, the consequences can be significant. Without a proper wiring diagram, diagnosing and resolving these electrical problems becomes a frustrating and often costly guessing game.
Here’s why the wiring diagram is indispensable:
- Precise Component Identification: Pinpointing the exact location and function of each wire and component is the first step in any electrical diagnosis. The diagram provides this vital information.
- Simplified Troubleshooting: The diagram visually represents the electrical pathways, allowing you to trace circuits, identify potential faults, and systematically eliminate problems.
- Preventative Maintenance: Regular inspection of wiring, guided by the diagram, can help prevent future issues by catching potential problems early.
- Safe Repairs: Working on electrical systems without understanding the wiring can lead to short circuits, damage to sensitive electronics, and even personal injury. The diagram ensures safe and informed repairs.
- Reduced Downtime and Costs: Accurate diagnostics and efficient repairs translate to less downtime and lower repair bills.
Understanding the Components of a Mitsubishi Canter Wiring Diagram
A Mitsubishi Canter wiring diagram is a complex but organized document. Understanding its components is key to effective usage:
- Symbols: Electrical symbols represent various components, such as resistors, capacitors, switches, relays, and sensors. Familiarizing yourself with these symbols is crucial.
- Wire Colors and Gauges: The diagram uses color-coded wires to identify specific circuits. Wire gauges (thickness) are also indicated, helping you select the correct replacement wire.
- Connectors: Diagrams detail connector types, pin assignments, and locations, allowing for accurate connections and disconnections.
- Circuit Layouts: The diagram organizes electrical circuits, typically by system (e.g., engine, lights, starting system), showing the flow of current.
- Ground Points: Identifying ground points is critical, as poor grounding is a common cause of electrical problems.
How to Find and Utilize Your Mitsubishi Canter Wiring Diagram
Finding the correct wiring diagram for your specific Mitsubishi Canter model is the first step. Here’s how:
- Owner’s Manual: Often, a simplified wiring diagram for basic systems is included in the owner’s manual.
- Repair Manuals: Comprehensive repair manuals, such as those from Haynes or Chilton, often contain detailed wiring diagrams.
- Online Resources: Online forums, dedicated websites, and subscription services may offer downloadable wiring diagrams. Be sure to verify the source’s authenticity.
- Professional Assistance: Your local Mitsubishi dealer or a qualified auto electrician can provide access to official wiring diagrams.
Using the Diagram Effectively:
- Identify the Problem: Describe the electrical issue you’re experiencing. Is it a specific light, a starting problem, or something else?
- Locate the Relevant Circuit: Use the diagram’s table of contents or circuit index to find the relevant circuit for the issue.
- Trace the Circuit: Follow the wiring path from the power source (battery) to the component experiencing the problem.
- Inspect Components: Examine the wiring, connectors, and components within the circuit for damage, corrosion, or loose connections.
- Test Components: Use a multimeter to test for voltage, continuity, and resistance to identify faulty components.
- Make Repairs: Once the fault is identified, make the necessary repairs, such as replacing damaged wiring, cleaning corroded connections, or replacing faulty components.
Common Electrical Issues in Mitsubishi Canters and How the Diagram Helps
- Starting Problems: A faulty starter relay, ignition switch, or wiring issues in the starting circuit can prevent the engine from cranking. The diagram helps pinpoint the problem.
- Lighting Failures: Headlights, tail lights, and interior lights can fail due to blown fuses, faulty bulbs, or wiring problems. The diagram helps trace the circuit and identify the fault.
- Charging System Problems: A malfunctioning alternator, voltage regulator, or wiring issues can prevent the battery from charging. The diagram helps diagnose these problems.
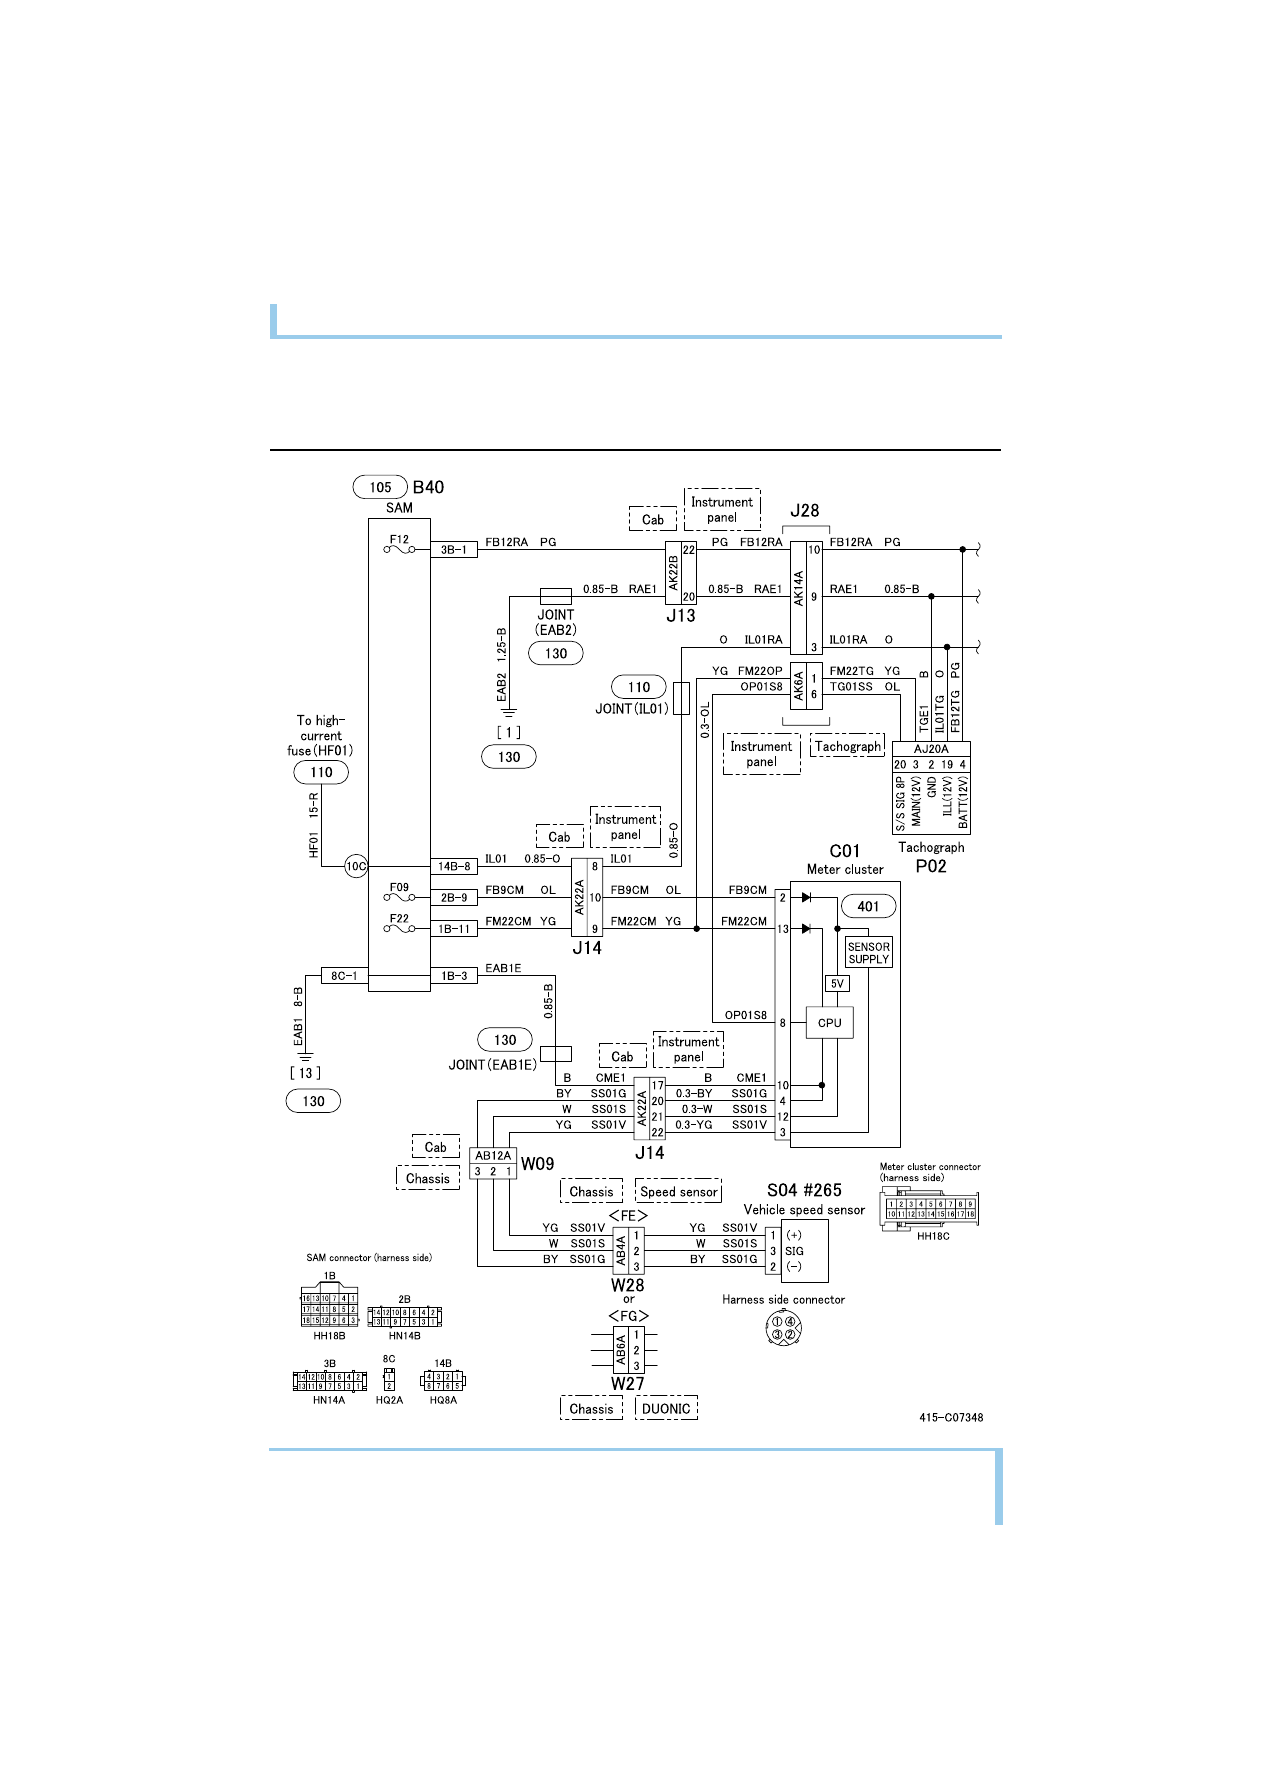
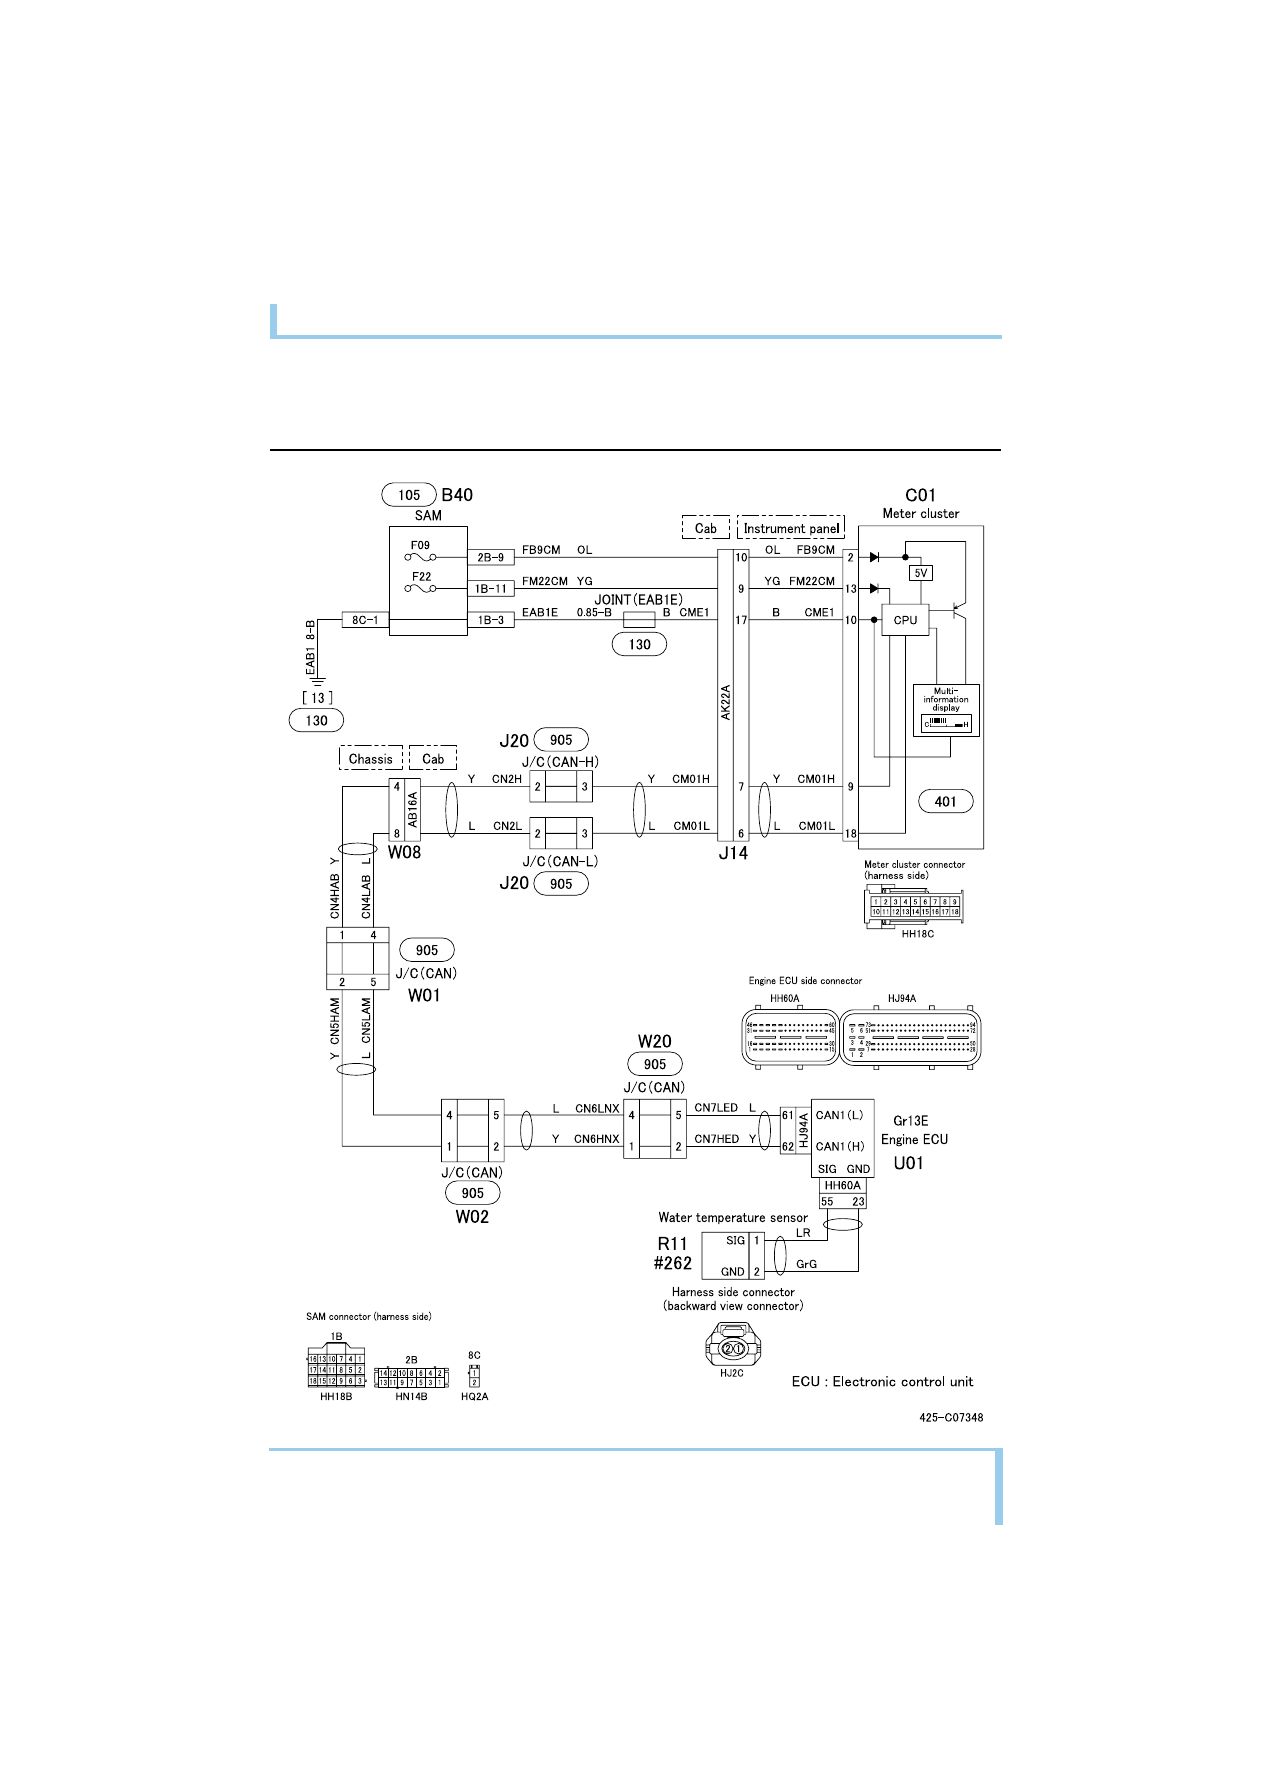
- Dashboard Instrument Issues: Speedometer, fuel gauge, and other instrument readings can be affected by faulty sensors, wiring problems, or instrument cluster failures. The diagram provides the wiring details needed for diagnosis.
Conclusion: Empowering Canter Owners with Electrical Knowledge
The Mitsubishi Canter wiring diagram is an indispensable tool for any truck owner who wants to maintain their vehicle’s electrical system efficiently and effectively. By understanding its components, knowing how to find it, and utilizing it correctly, you can diagnose and repair electrical problems, prevent costly repairs, and ensure your Canter remains a reliable workhorse for years to come. Don’t ignore the wiring diagram; it’s the key to keeping your Canter running strong.
Frequently Asked Questions (FAQs)
- Where can I find a wiring diagram for my specific Mitsubishi Canter model?
- Check your owner’s manual, consult repair manuals (Haynes, Chilton), search reputable online resources, or contact your local Mitsubishi dealer.
- What tools do I need to use a wiring diagram effectively?
- You’ll need a multimeter (voltmeter, ohmmeter), wire strippers, crimping tools, and a basic understanding of electrical principles.
- Is it safe to work on the electrical system of my Canter?
- Always disconnect the battery before working on any electrical components. Follow safety precautions and consult a professional if you’re unsure.
- What if I can’t understand the wiring diagram?
- Consider consulting a qualified auto electrician. They have the expertise to interpret wiring diagrams and diagnose electrical problems.
- Can I download a wiring diagram for free?
- While some free diagrams may be available online, ensure the source is reliable and the diagram is accurate for your specific model. Comprehensive and reliable diagrams often come from paid sources.
