Low battery
Battery level is below 20%. Connect charger soon.


Conquer the Chaos: Your Step-by-Step Guide to Pickup Trailer Wiring
Tired of trailer lights that flicker, fail, or simply refuse to work? You’re not alone! Trailer wiring can seem like a tangled web of wires and connections, but with the right knowledge and a little patience, you can ensure a safe and functional towing experience. This comprehensive guide provides a step-by-step connection process for your pickup truck’s trailer wiring, ensuring you’re ready to hit the road with confidence. We’ll break down the components, explain the wiring diagrams, and offer troubleshooting tips to make the process as smooth as possible.
Understanding the Basics: Components and Terminology
Before diving into the wiring, let’s establish a common understanding of the key components and terminology. This will make the subsequent steps much clearer.
- Trailer Connector (Plug): This is the component on your pickup truck that connects to the trailer. Common types include:
- 4-Way Flat: Typically used for smaller trailers, providing connections for running lights, brake lights, and turn signals.
- 5-Way Flat: Similar to 4-way, with an additional wire for a reverse light.
- 7-Way Round (RV-Style): Offers a more comprehensive connection, including running lights, brake lights, turn signals, reverse lights, and often a 12V power wire for charging a trailer battery or operating accessories.
- Pickup Truck Wiring Harness: This is the wiring system in your truck that provides power and signals to the trailer connector.
- Trailer Wiring Harness: The wiring system on your trailer that connects to the trailer connector.
- Color Codes: Standardized color codes are used for different functions within the wiring. These codes help identify the purpose of each wire. (Note: While standards exist, variations can occur. Always consult the specific wiring diagram for your vehicle and trailer.)
- Ground Wire: This wire provides a return path for the electrical current, completing the circuit. Proper grounding is crucial for all trailer lights and components to function correctly.
- Brake Controller (if applicable): For trailers with electric brakes, a brake controller is installed in the cab of the pickup truck to activate the trailer brakes.
Step-by-Step Connection Guide: Mastering the Wiring Process
Now, let’s get your trailer wired! This guide will cover the general process. Always consult your specific vehicle and trailer wiring diagrams for accurate information.
Gather Your Materials:
- Trailer wiring connector (matching your trailer’s connector type).
- Wire strippers/crimpers.
- Electrical tape or heat shrink tubing.
- Screwdrivers (Phillips and flathead).
- Test light or multimeter.
- Wiring diagram specific to your pickup truck and trailer.
- Optional: Wire connectors (butt connectors, etc.).
Locate Your Pickup Truck’s Wiring Harness:
- The location of the wiring harness varies depending on your truck’s make and model. It is often found near the rear bumper, under the bed, or inside the hitch receiver area.
- Consult your owner’s manual or a repair manual for your specific vehicle.
Identify the Wires:
- Using your truck’s wiring diagram, identify the function of each wire in the harness. Common wire functions include:
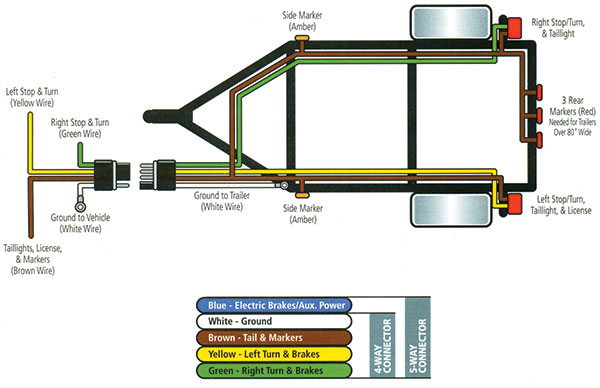
- Brown: Running lights (tail lights, side marker lights)
- Yellow: Left turn signal/brake light
- Green: Right turn signal/brake light
- White: Ground
- Blue (7-way): Electric brakes (if applicable)
- Black (7-way): 12V power (for charging a battery or powering accessories)
- Reverse (7-way): Reverse light
- Use a test light or multimeter to confirm the function of each wire as it is activated. For instance, turn on your left turn signal and test the corresponding wire with your test light to confirm it is functioning.
- Using your truck’s wiring diagram, identify the function of each wire in the harness. Common wire functions include:
Connect the Wires to the Trailer Connector:
- Strip the wires: Use wire strippers to carefully strip a small amount of insulation (about 1/2 inch) from the ends of the wires in both the truck harness and the trailer connector.
- Connect the wires: Use the wiring diagram for your trailer connector to connect the appropriate wires. This typically involves:
- Crimping: Use crimpers to attach the wires from your truck’s harness to the corresponding terminals on the trailer connector. Ensure the connections are secure.
- Soldering (optional): For a more robust connection, solder the wires.
- Wire Connectors (optional): Use wire connectors (butt connectors, etc.) to connect the wires, ensuring a secure and weather-resistant connection.
- Secure the connections: After connecting the wires, wrap them with electrical tape or use heat shrink tubing to protect them from moisture and the elements.
Grounding is Critical:
- Ensure a solid ground connection. The ground wire from your truck’s harness should be connected to the ground terminal on the trailer connector.
- Inspect the ground connections on your trailer. A poor ground can cause various electrical issues.
Test the Connections:
- Once the wiring is complete, connect the trailer to your truck.
- Test all the trailer lights, including running lights, brake lights, turn signals, and reverse lights (if applicable).
- If your trailer has electric brakes, test the brake controller to ensure it is functioning correctly.
Troubleshooting:
- Lights not working: Double-check all connections. Verify the fuses in your truck and trailer. Use a test light or multimeter to trace the circuit and identify the problem.
- Flickering lights: Check the ground connections. Loose connections can also cause flickering.
- Brake controller issues: Ensure the brake controller is properly wired and calibrated. Consult the brake controller’s manual.
Important Considerations and Safety Tips
- Disconnect the Battery: Before working on any electrical system, disconnect the negative terminal of your truck’s battery to prevent accidental shorts and electrical shocks.
- Use Quality Materials: Invest in high-quality wiring connectors, electrical tape, and other materials to ensure long-lasting and reliable connections.
- Route Wires Securely: Secure the wiring harness along the frame of your truck and trailer to prevent damage from road debris or snagging.
- Protect from the Elements: Use electrical tape, heat shrink tubing, or weather-resistant connectors to protect the wiring from moisture and corrosion.
- Consult a Professional: If you are not comfortable working with electrical systems, or if you are unsure about any part of the process, consult a qualified auto mechanic or trailer specialist.
- Regular Inspection: Regularly inspect your trailer wiring for damage, corrosion, or loose connections.
Frequently Asked Questions (FAQs)
What if my truck doesn’t have a factory-installed trailer wiring harness?
- You can purchase an aftermarket wiring kit designed for your specific vehicle. These kits typically plug into your truck’s existing wiring system and provide the necessary connections for the trailer. Installation instructions are usually included.
What is the difference between a 4-way and a 7-way trailer connector?
- A 4-way connector provides connections for running lights, brake lights, and turn signals. A 7-way connector offers these connections plus additional circuits for reverse lights, electric brakes, and 12V power.
My trailer lights are dim. What could be the problem?
- Dim lights can be caused by several factors, including a poor ground connection, corrosion in the wiring, or a weak battery (if your trailer has one). Check all connections, clean any corrosion, and test the battery voltage.
Can I use a 4-way connector on a trailer that requires a 7-way?
- No. You cannot use a 4-way connector on a trailer that requires a 7-way. The 7-way connector provides more functionality, including a connection for electric brakes and 12V power. You will need to install a 7-way connector on your truck and trailer.
What gauge wire should I use for trailer wiring?
- The appropriate wire gauge depends on the circuit and the current draw. Generally, 16-gauge wire is sufficient for most trailer lights. For electric brakes, which draw more current, 12-gauge or 10-gauge wire is recommended. Consult your trailer and brake controller manuals for specific recommendations.
Conclusion: Hit the Road with Confidence
By following this step-by-step guide and consulting the appropriate wiring diagrams, you can successfully wire your pickup truck for trailer towing. Remember to prioritize safety, use quality materials, and regularly inspect your wiring for any issues. With a properly wired trailer, you can enjoy a safer and more reliable towing experience. Happy trails!
