Low battery
Battery level is below 20%. Connect charger soon.


Seat Leon MK2 Grill Removal: The Quick Trick Every DIY Mechanic Should Know
Owning a Seat Leon MK2 is a rewarding experience, but like any vehicle, it requires maintenance and the occasional upgrade. Whether you’re looking to replace a damaged grill, install a new one for aesthetic reasons, or access components behind it, knowing how to remove the grill is a fundamental skill for any DIY mechanic. This guide will provide you with a clear, concise, and SEO-optimized walkthrough of the process, ensuring you can tackle this task with confidence. We’ll also unveil a handy trick to make the job even easier.
Understanding the Seat Leon MK2 Grill Design
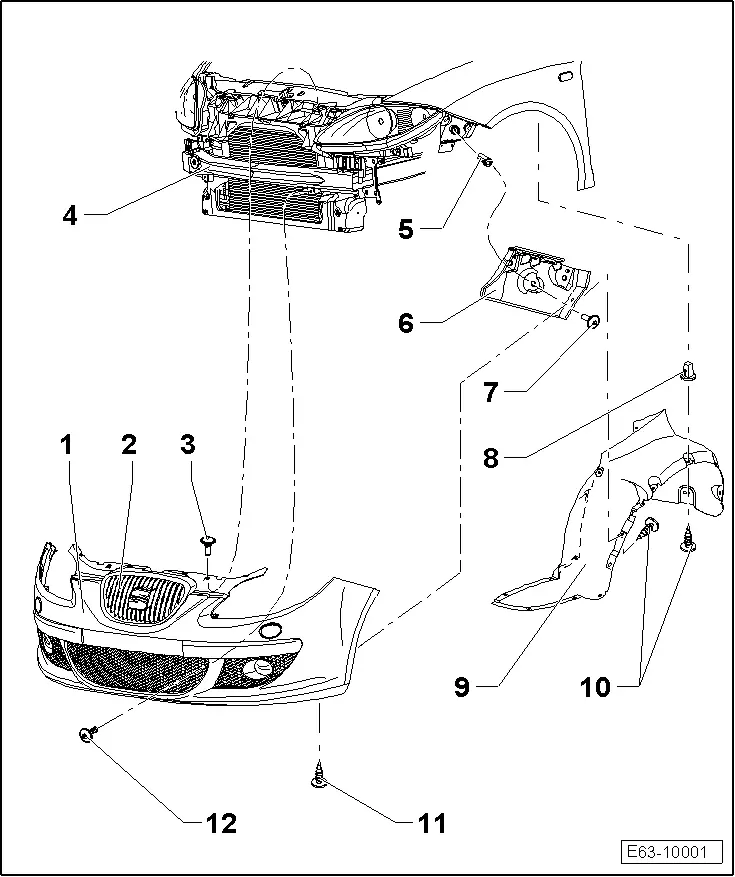
Before diving into the removal process, it’s essential to understand the grill’s design. The Seat Leon MK2 grill typically attaches to the front bumper using a combination of:
- Clips: These are usually plastic tabs that snap into corresponding slots on the bumper. They provide a secure hold.
- Screws (sometimes): Some models may have screws, particularly around the edges or the top of the grill, to further secure it.
- Potential for adhesive: In some cases, especially with aftermarket grills, a small amount of adhesive might be present.
Knowing these attachment points will help you identify where to apply pressure and avoid damaging the bumper or grill.
Tools You’ll Need
Gathering the right tools beforehand will streamline the removal process. Here’s what you’ll need:
- Plastic Trim Removal Tools: This is crucial. These tools, typically made of nylon, are designed to pry apart plastic components without scratching or damaging them. A set with various shapes and sizes is recommended.
- Screwdriver (Phillips head): If your grill has screws.
- Optional: Flathead Screwdriver: May be helpful for prying stubborn clips, but use with caution to avoid damage.
- Work Gloves: To protect your hands.
- Protective Covering (Optional): A soft cloth or blanket to place under the bumper to prevent scratches.
Step-by-Step Grill Removal Guide
Follow these steps for a successful grill removal:
- Preparation: Park your Seat Leon MK2 on a level surface and ensure the engine is off and the key is removed. Consider applying the parking brake for added safety.
- Locate and Remove Screws (If Applicable): Inspect the grill for any visible screws, typically around the top edge or sides. Use the Phillips head screwdriver to remove them.
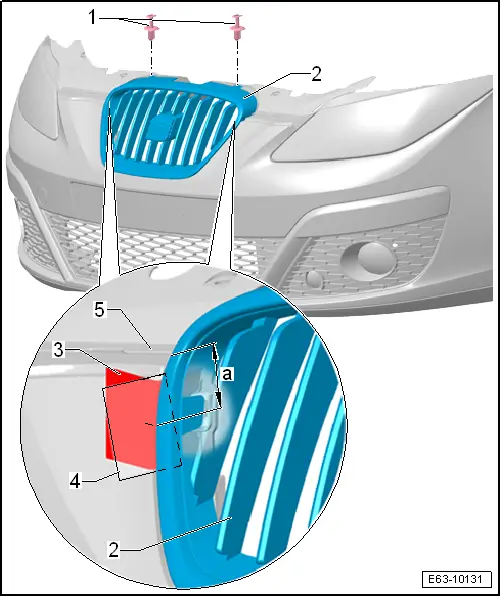
- The Quick Trick: Start at the Top: This is where our secret comes in. The top edge of the grill often has the most accessible clips. Use a plastic trim removal tool to gently pry the top edge of the grill away from the bumper. Work your way across the top, releasing the clips one by one. This often loosens the other clips as well.
- Work Around the Perimeter: Once the top clips are released, carefully work your way around the perimeter of the grill, using the plastic trim removal tools to release any remaining clips. Apply gentle and consistent pressure. Avoid yanking or forcing the grill.
- Handle the Bottom Clips: The bottom clips can sometimes be more challenging. You might need to angle your trim removal tool and apply a bit more pressure, but still, be careful.
- Release the Grill: Once all the clips are released, the grill should come free. If it’s still stuck, double-check for any missed clips or screws.
- Inspection and Cleaning: Before installing the new grill, inspect the bumper for any damage. Clean the contact surfaces to ensure a good fit for the new grill.
Installing the New Grill
Installation is essentially the reverse of removal:
- Align the Grill: Carefully align the new grill with the bumper.
- Engage the Clips: Start by engaging the clips, ensuring they snap securely into place. Begin with the top edge first.
- Secure Screws (If Applicable): Reinstall any screws you removed earlier.
- Final Check: Give the grill a gentle tug to ensure it’s securely attached.
Common Pitfalls and Troubleshooting
- Broken Clips: Be careful not to break the clips. If a clip breaks, consider replacing it with a new one or using a small amount of adhesive to secure the grill.
- Stuck Grill: If the grill is stuck, don’t force it. Double-check for any missed screws or clips. Ensure you’re applying pressure in the correct direction.
- Scratches: Always use plastic trim removal tools to avoid scratching the bumper or the grill.
Conclusion
Removing and replacing the grill on your Seat Leon MK2 is a straightforward task that any DIY mechanic can master. By following these steps and employing the “quick trick” of starting at the top, you’ll save time, money, and gain valuable experience in maintaining your vehicle. Remember to be patient, work carefully, and you’ll be enjoying the results of your work in no time.
FAQs
Q1: What if I break a clip during removal?
A: Don’t panic! You can typically find replacement clips at an auto parts store or online. If you can’t find a direct replacement, a small amount of automotive-grade adhesive can also secure the grill.
Q2: Can I use a screwdriver instead of plastic trim removal tools?
A: While a flathead screwdriver can be used, it’s strongly discouraged. Screwdrivers are more likely to scratch or damage the surrounding plastic. Plastic trim removal tools are specifically designed for this purpose and are highly recommended.
Q3: How long does it take to remove the grill?
A: The first time you do it, it might take 30 minutes to an hour. With practice, you can likely complete the task in 15-30 minutes.
Q4: What if the grill feels like it’s glued on?
A: Some aftermarket grills might use adhesive. If you suspect this, gently try to pry the grill away, but be very careful. You might need to use a plastic scraper or a heat gun (used very cautiously) to loosen the adhesive.
Q5: Where can I buy a replacement grill for my Seat Leon MK2?
A: Replacement grills can be found at auto parts stores, online retailers like Amazon or eBay, and specialist Seat performance parts suppliers. Be sure to specify your vehicle’s year and model for a perfect fit.
