Low battery
Battery level is below 20%. Connect charger soon.


Sony Car Stereo Circuit Diagram: The Wiring Guide That Makes Installation Simple
So, you’ve just purchased a shiny new Sony car stereo, brimming with features to elevate your driving experience. You’re eager to blast your favorite tunes, navigate with ease, and enjoy hands-free calling. But before you can crank up the volume, there’s the crucial step of installation. And that’s where the circuit diagram comes in. This guide will demystify the Sony car stereo wiring process, providing you with the knowledge you need to confidently connect your new audio system. We’ll delve into the importance of the diagram, break down common wiring configurations, and offer troubleshooting tips to ensure a smooth and successful installation.
Understanding the Importance of a Sony Car Stereo Circuit Diagram
The circuit diagram, often found in the owner’s manual or provided with the stereo, is the blueprint for your installation. Think of it as the key to unlocking your car stereo’s full potential. Without it, you’re essentially navigating in the dark, risking:
- Incorrect Wiring: Leading to blown fuses, damaged components (both in your stereo and your car), and even potential fire hazards.
- Non-Functional Features: Failing to connect the correct wires will leave you without essential functions like illumination, remote control, or even audio output.
- Warranty Voidance: Improper installation can often void your stereo’s warranty.
- Frustration and Wasted Time: Wiring errors can lead to hours of troubleshooting and repeated attempts.
The circuit diagram eliminates the guesswork, providing clear, concise instructions for connecting each wire to its designated function. It’s your best friend throughout the installation process.
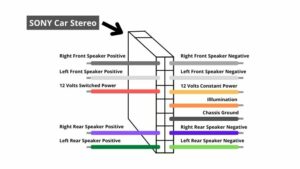
Decoding the Sony Car Stereo Wiring Diagram: A Wire-by-Wire Breakdown
Sony car stereo wiring diagrams, while specific to the model, generally follow a standardized color-coding system. Familiarizing yourself with these common wire colors will significantly simplify the process:
- Yellow (or sometimes Red): Constant Power (Battery Wire) – This wire provides continuous power to the stereo, allowing it to retain memory settings (like presets and clock) even when the car is off. Connect this to a constant 12V power source, typically found in the car’s fuse box.
- Red (or sometimes Yellow): Ignition Wire (Switched Power) – This wire receives power only when the ignition is turned on. It essentially “wakes up” the stereo. Connect this to a switched 12V power source, often found in the car’s ignition switch or fuse box.
- Black: Ground Wire – This is a crucial wire that completes the electrical circuit. Connect this to a solid ground point on your vehicle’s chassis. A poor ground connection can lead to a variety of problems, including static and low audio quality.
- Blue (or sometimes Blue/White): Remote Turn-On Wire (for Amplifier) – If you’re installing an amplifier, this wire signals the amplifier to turn on when the stereo is powered on. Connect this to the amplifier’s remote input.
- Orange (or sometimes Orange/White): Illumination Wire – This wire connects to your car’s illumination system. It dims the stereo’s display when the headlights are turned on.
- Speaker Wires: These are typically color-coded in pairs (e.g., White/White-Black for Front Left, Grey/Grey-Black for Front Right, Green/Green-Black for Rear Left, Purple/Purple-Black for Rear Right). These connect to the corresponding speakers.
- RCA Cables (for Amplifiers): These cables transmit audio signals from the stereo to the amplifier. The diagram will show the appropriate connections.
Important Note: Always double-check the specific wiring diagram for your Sony car stereo model, as color codes and functions can vary slightly. Refer to the diagram included in your stereo’s manual.
Step-by-Step Installation Guide: Making the Connections
Here’s a general guide to installing your Sony car stereo, keeping in mind that you must always refer to your specific wiring diagram and vehicle’s wiring harness:
- Preparation is Key:
- Disconnect the Car Battery: This is the most crucial safety step. Disconnecting the negative terminal prevents electrical shorts.
- Gather Your Tools: You’ll need wire strippers, crimpers, a multimeter, electrical tape, and possibly a wiring harness adapter (if available for your vehicle).
- Locate the Wiring Harness: Find the wiring harness in your car, usually behind the original stereo.
- Familiarize Yourself with the Sony Harness: Identify the wires on your Sony stereo’s harness.
- Connecting the Wires:
- Match Wire Colors: Compare the Sony harness wires to the corresponding wires in your car’s wiring harness (or the adapter).
- Crimping or Soldering: Securely connect the wires using crimp connectors or solder them together (soldering is generally more reliable but requires more skill).
- Insulate Connections: Wrap each connection with electrical tape to prevent shorts.
- Speaker Connections:
- Polarity Matters: Ensure you connect the speaker wires correctly (positive to positive, negative to negative) to maintain correct audio phasing.
- Testing and Finishing Touches:
- Reconnect the Battery: Once all connections are made, reconnect the negative battery terminal.
- Power On and Test: Turn on the ignition and test all functions of the stereo, including audio, radio, and any other features.
- Secure the Stereo: Install the stereo into the dashboard, using the provided mounting hardware.
- Tidy Up the Wiring: Secure any loose wires with zip ties or tape to prevent them from interfering with other components.
Troubleshooting Common Installation Issues
Even with careful planning, problems can arise. Here are some common issues and their solutions:
- No Power:
- Check the Fuse: Inspect the fuse in the stereo and your car’s fuse box. Replace if blown.
- Verify Power Connections: Ensure the constant power (yellow) and ignition (red) wires are correctly connected to their respective power sources.
- Check Ground Connection: Make sure the ground wire (black) has a solid connection to the car’s chassis.
- No Sound:
- Speaker Wire Connections: Double-check the speaker wire connections, ensuring they are connected to the correct speakers and that the polarity is correct.
- Volume and Mute: Make sure the volume is turned up and the stereo is not muted.
- Amplifier Issues: If using an amplifier, verify that it is powered on and the RCA cables are securely connected.
- Poor Sound Quality (Static, Distortion):
- Grounding Issues: A poor ground connection is a common culprit. Ensure a good ground connection.
- Speaker Wiring: Check the speaker wiring for loose connections or shorts.
- Interference: Route the RCA cables away from power wires to minimize interference.
- Stereo Loses Memory:
- Constant Power Connection: The constant power wire (yellow) may not be correctly connected to a constant 12V source.
Conclusion: Enjoy the Sound!
Installing a Sony car stereo can seem daunting, but with the right approach and the help of the circuit diagram, it’s a manageable DIY project. By understanding the wiring, following the steps carefully, and troubleshooting any issues, you can enjoy the enhanced audio experience your new stereo provides. Remember to prioritize safety, double-check your connections, and consult a professional if you’re unsure about any aspect of the installation. Now, crank up the tunes and enjoy the ride!
FAQs
1. Where can I find the Sony car stereo circuit diagram for my specific model?
The circuit diagram is usually included in the owner’s manual that comes with the stereo. If you’ve misplaced the manual, you can often download a digital copy from the Sony website by searching for your stereo’s model number.
2. What if my car’s wiring harness doesn’t match the Sony wiring?
You can purchase a wiring harness adapter specifically designed for your vehicle. These adapters plug into your car’s factory harness and provide pre-wired connections for your new stereo. This simplifies the process and avoids cutting any factory wires.
3. What is the best way to connect the wires? Crimp connectors or soldering?
Both methods are viable, but soldering generally provides a more secure and reliable connection, especially in a car where vibrations are common. However, soldering requires more skill and equipment. Crimp connectors are easier for beginners but ensure you use the correct size connectors and crimp them firmly.
4. Can I install a Sony car stereo without any prior experience?
Yes, but it requires patience and careful attention to detail. Study the wiring diagram thoroughly, take your time, and don’t hesitate to consult online resources or seek help from a knowledgeable friend. If you’re unsure at any point, it’s best to consult a professional car audio installer.
5. What if I accidentally connect the wrong wires?
If you suspect you’ve connected the wrong wires, immediately disconnect the car battery. Then, carefully inspect all connections, checking the wiring diagram again. If you’ve blown a fuse, replace it. If you’ve damaged any components, you may need to consult a professional.
