Low battery
Battery level is below 20%. Connect charger soon.


Stop, Turn, and Tail Light Wiring Diagram: The Simple Fix That Resores Your Lights
Are your brake lights, turn signals, or tail lights malfunctioning? A faulty light can lead to dangerous situations on the road, making it crucial to address the problem immediately. Before calling a mechanic, understanding your vehicle’s stop, turn, and tail light wiring diagram can often lead to a quick and inexpensive DIY fix. This guide will walk you through troubleshooting common issues and restoring your vehicle’s lighting system.
Understanding Your Vehicle’s Wiring System
Your vehicle’s lighting system is surprisingly simple, typically relying on a series of wires, bulbs, and fuses. The complexity varies depending on the vehicle’s year, make, and model, but the core principles remain the same. The system usually works as follows:
- Power Source: The battery provides the electrical power.
- Fuses: These protect the circuit from overloads. A blown fuse is a common cause of lighting failures.
- Wiring Harness: This carries the power to the lights. Wires can become corroded, damaged, or disconnected.
- Light Switches: These control the activation of the lights (brake pedal, turn signal stalk).
- Light Bulbs: These convert electrical energy into light. Burned-out bulbs are another common problem.
- Grounding: Proper grounding is essential for the circuit to complete and the lights to function correctly.
Troubleshooting Your Stop, Turn, and Tail Light System
Before diving into the wiring diagram, let’s troubleshoot the most common problems:
- Check the Bulbs: The simplest solution is often the most overlooked. Inspect all bulbs for signs of damage or burnout. Replace any faulty bulbs with the correct wattage and type.
- Check the Fuses: Consult your vehicle’s owner’s manual to locate the fuse box and identify the fuses responsible for the tail lights, brake lights, and turn signals. Use a fuse tester to check for blown fuses and replace them with fuses of the same amperage.
- Inspect the Wiring: Look for any visible damage to the wiring harness, such as fraying, cuts, or corrosion. Pay close attention to the connections at the light fixtures and the switches. Loose or corroded connections are a frequent culprit.
- Test the Switches: If the problem is intermittent, the switches themselves might be malfunctioning. Testing these components often requires specialized tools or knowledge.
- Grounding Issues: A poor ground connection can prevent the lights from functioning correctly. Inspect the grounding points for corrosion or loose connections.
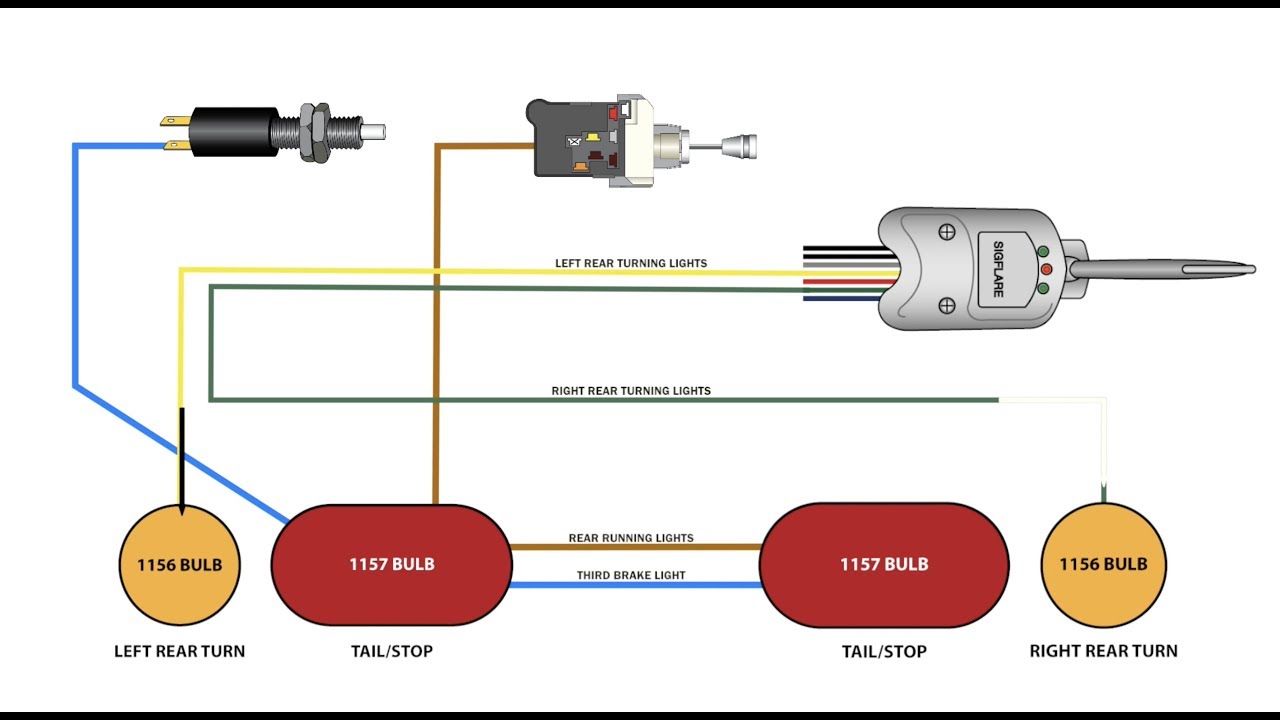
Locating and Interpreting Your Wiring Diagram
Your vehicle’s wiring diagram is usually found in your owner’s manual or online through a reliable source specific to your vehicle’s year, make, and model. These diagrams use symbols to represent different components, wires, and connections. They are color-coded, making it easier to trace the path of the electrical current. Understanding the symbols is key to deciphering the diagram. A simple Google search for “[Your Vehicle Year, Make, and Model] wiring diagram” will often yield results.
Repairing Faulty Wiring
Once you’ve identified the problem using the wiring diagram, you can begin repairs. Remember to disconnect the battery’s negative terminal before working on the electrical system. If you’re uncomfortable working with electrical systems, it’s best to consult a qualified mechanic. Minor repairs, such as replacing a blown fuse or a loose bulb, are relatively straightforward. More complex repairs, such as fixing damaged wiring, may require soldering and specialized tools.
Conclusion
Troubleshooting and repairing your stop, turn, and tail lights doesn’t have to be daunting. By understanding your vehicle’s wiring diagram and following the troubleshooting steps outlined above, you can often identify and fix the problem yourself, saving time and money. Remember safety first – if you’re unsure about any step, consult a professional.
Frequently Asked Questions (FAQs)
Q: My brake lights work, but my tail lights don’t. What could be the problem? A: This usually points to a faulty tail light bulb, a blown fuse specific to the tail lights, or a problem with the wiring dedicated to the tail lights. Check these components first.
Q: One of my turn signals is flashing rapidly. What does this mean? A: A rapidly flashing turn signal usually indicates a burned-out bulb in that circuit. Replace the bulb to resolve the issue.
Q: Where can I find a wiring diagram for my car? A: Your owner’s manual should have a wiring diagram section, or you can search online using your vehicle’s year, make, and model. Many online automotive repair resources offer free diagrams.
Q: Is it safe to work on my car’s electrical system myself? A: While many repairs are relatively simple, working with electricity can be dangerous. Always disconnect the battery’s negative terminal before working on the electrical system, and if you’re unsure about any step, consult a qualified mechanic.
Q: My lights are completely out. Where do I start troubleshooting? A: Begin by checking the fuses first. Then, inspect the bulbs. If neither of those resolves the issue, move on to inspecting the wiring and connections for damage or corrosion. A bad ground connection is also a possibility.
