Low battery
Battery level is below 20%. Connect charger soon.

Van Hool C2045 Wiring Diagram: Easy Walkthrough for Troubleshooting
The Van Hool C2045 is a workhorse in the motorcoach industry, known for its reliability and longevity. However, even the most robust vehicles require maintenance, and electrical issues are a common headache. Understanding your Van Hool C2045’s wiring is crucial for effective troubleshooting and repair. This article provides a comprehensive walkthrough, guiding you through the process of using the wiring diagram to diagnose and fix electrical problems, empowering you to keep your coach running smoothly.
Understanding the Importance of the Wiring Diagram
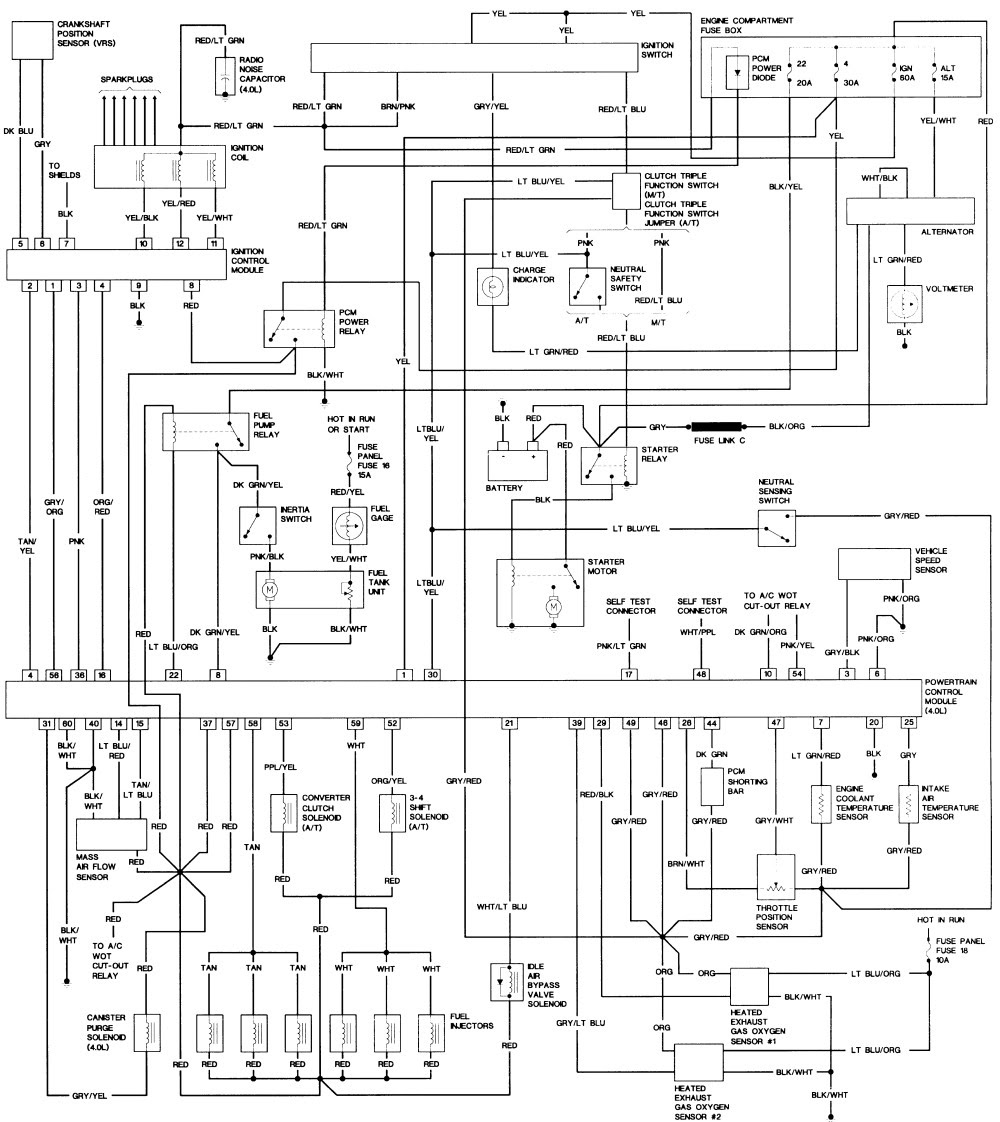
Before diving into the specifics, it’s vital to recognize the wiring diagram’s significance. This diagram acts as a blueprint for your coach’s electrical system, providing a visual representation of:
- Circuit Pathways: Shows the complete routes of electrical circuits, from the power source to the component.
- Component Identification: Details each component, including its location and function.
- Wire Color Coding: Uses standardized colors to easily identify wires throughout the system.
- Fuse and Relay Locations: Highlights the location and amperage of fuses and relays, critical for protection.
- Connector Pinouts: Provides detailed information on the pin configurations of connectors, simplifying diagnostics.
Without the wiring diagram, troubleshooting becomes a guessing game, leading to wasted time, potential damage, and safety hazards.
Accessing and Interpreting the Van Hool C2045 Wiring Diagram
The first step is obtaining the correct wiring diagram for your specific C2045 model and year. These diagrams are usually available:
- From Van Hool: Contacting Van Hool directly or through an authorized dealer is the most reliable source.
- Online Resources: Specialized automotive parts and repair websites might offer digital copies.
- Service Manuals: Comprehensive service manuals often include detailed wiring diagrams.
Once you have the diagram, familiarize yourself with its key elements:
- Symbols: Learn the standard symbols used to represent components like switches, relays, fuses, and lights.
- Wire Color Codes: Understand the color-coding system (e.g., red = power, black = ground, etc.) to quickly identify wires.
- Circuit Identification: Locate the specific circuit you are troubleshooting (e.g., headlights, starter, air conditioning).
- Pages and Sections: Wiring diagrams are often split into multiple pages or sections. Learn to navigate the diagram efficiently.
Troubleshooting Steps Using the Wiring Diagram
Now, let’s walk through a practical troubleshooting scenario, using the wiring diagram as your guide:
- Identify the Problem: Clearly define the electrical issue. Is it a non-functioning light, a dead starter, or an intermittent fault?
- Consult the Wiring Diagram: Locate the relevant circuit for the problem. For example, if the headlights aren’t working, find the headlight circuit diagram.
- Trace the Circuit: Follow the circuit from the power source (usually the battery or fuse panel) through the various components to the affected device (e.g., the headlight bulb).
- Check Fuses and Relays: Use the diagram to identify the fuses and relays associated with the circuit. Inspect them for damage or blown elements. Replace if necessary.
- Inspect Wiring and Connections: Examine the wiring and connections along the circuit path. Look for:
- Loose Connections: Wiggle connectors to ensure they are secure.
- Corrosion: Clean any corroded terminals with a wire brush and electrical contact cleaner.
- Broken Wires: Check for breaks, cuts, or damage to the insulation.
- Short Circuits: Look for wires touching metal surfaces or other wires.
- Test Components: If the wiring and fuses/relays are good, test the components themselves. Use a multimeter to check for voltage, continuity, and resistance. The wiring diagram often indicates the expected values.
- Isolate the Fault: By systematically checking each component and section of the circuit, you can pinpoint the source of the problem.
- Make the Repair: Once the fault is identified, repair or replace the defective component or wiring.
- Verify the Repair: After making the repair, test the circuit to ensure the problem is resolved.
Common Electrical Issues and their Wiring Diagram Solutions
Here are some common electrical issues and how the wiring diagram can help:
- Headlights Not Working: Check the headlight circuit, including the fuses, relays, headlight switch, and wiring to the bulbs.
- Starter Not Engaging: Examine the starter circuit, including the ignition switch, starter relay, and wiring to the starter motor.
- Air Conditioning Malfunction: Consult the air conditioning circuit, including the compressor clutch, blower motor, and associated controls.
- Interior Lights Failing: Inspect the interior lighting circuits, including the fuses, switches, and wiring to the lights.
Safety Precautions
- Disconnect the Battery: Always disconnect the negative battery terminal before working on any electrical components.
- Use Proper Tools: Use insulated tools and a multimeter to prevent electrical shock.
- Work in a Well-Lit Area: Ensure good visibility to see wiring and components.
- Follow the Diagram: Always refer to the wiring diagram when troubleshooting.
- If Unsure, Seek Professional Help: Electrical work can be dangerous. If you’re not comfortable, consult a qualified technician.
Conclusion
Mastering the Van Hool C2045 wiring diagram is a valuable skill for any owner or technician. By understanding the diagram, following the troubleshooting steps, and prioritizing safety, you can effectively diagnose and repair electrical issues, minimizing downtime and maximizing the lifespan of your coach. Remember to always consult the specific diagram for your model and year for accurate information. With patience and a methodical approach, you can confidently tackle electrical problems and keep your Van Hool C2045 running smoothly.
FAQs
1. Where can I find the specific wiring diagram for my Van Hool C2045?
The best sources are Van Hool directly, authorized dealers, or specialized automotive parts and repair websites. Always ensure the diagram matches your coach’s model year and specific configuration.
2. What tools do I need for electrical troubleshooting?
You’ll need a multimeter, insulated tools, a wire stripper/crimper, and electrical contact cleaner. A good flashlight and a set of small screwdrivers are also helpful.
3. Can I damage the electrical system if I make a mistake?
Yes, improper troubleshooting or incorrect wiring can cause damage. Always disconnect the battery before working on electrical components and consult the wiring diagram carefully. If you are unsure, seek professional help.
4. What should I do if I find a wire with damaged insulation?
Repair or replace the damaged wire. Use proper crimping techniques with insulated connectors and ensure the connection is secure.
5. How do I identify a blown fuse?
Visually inspect the fuse. A blown fuse will have a broken filament inside. You can also use a multimeter to test for continuity across the fuse.
