Low battery
Battery level is below 20%. Connect charger soon.


XLR Male Connector Wiring: The Simple Guide Audio Pros Always Rely On
Connecting audio equipment professionally requires understanding the intricacies of XLR connectors. While seemingly simple, incorrect wiring can lead to signal loss, hum, and even damage to your equipment. This guide provides a straightforward approach to wiring an XLR male connector, ensuring you achieve a reliable and clean audio signal every time. Whether you’re a seasoned audio professional or a passionate hobbyist, mastering XLR wiring is crucial for a successful audio setup.
Understanding the XLR Connector
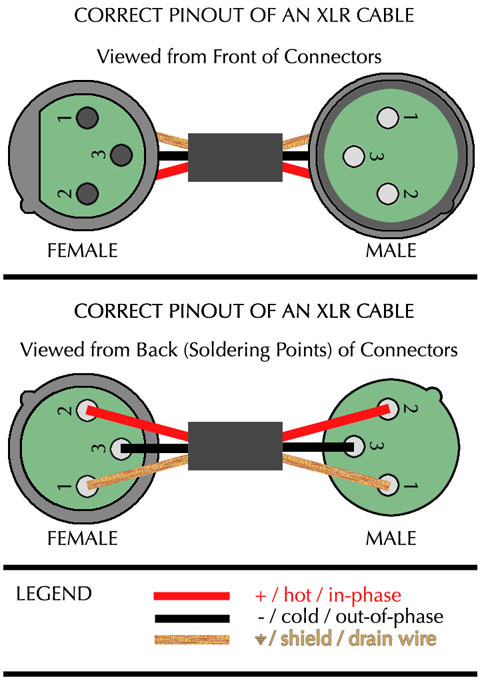
The XLR connector, formally known as an “external line return” connector, is a three-pin connector predominantly used in professional audio applications. Its robust design and locking mechanism ensure a secure and reliable connection, minimizing interference and signal loss. Each pin serves a specific purpose:
- Pin 1: Ground (Shield): This pin is responsible for grounding the signal, reducing noise and protecting against interference.
- Pin 2: Positive (+): This pin carries the audio signal’s positive phase.
- Pin 3: Negative (-): This pin carries the audio signal’s negative phase (often referred to as “hot” in balanced audio).
It’s crucial to remember the pin configuration, as reversing the positive and negative pins will result in an inverted or out-of-phase signal.
Step-by-Step Guide to Wiring an XLR Male Connector
Wiring an XLR male connector is a straightforward process once you understand the pin assignments. Here’s a step-by-step guide:
Gather Your Materials: You’ll need an XLR male connector, a suitable length of microphone cable (typically 22-26 AWG), a wire stripper, and a soldering iron with solder.
Prepare the Cable: Carefully strip approximately ½ inch of the outer jacket from the cable end, exposing the three individual wires (ground, positive, and negative). Be cautious not to nick the individual wires during this process. If your cable is color-coded, identifying the wires is easier. Common color codes include:
- Ground (Pin 1): Usually Green, Bare, or Black
- Positive (Pin 2): Usually Red or White
- Negative (Pin 3): Usually Blue or Black
Tin the Wire Ends: Apply a small amount of solder to each of the exposed wire ends. This ensures a cleaner and more secure solder joint.
Insert and Solder: Carefully insert each wire into its corresponding pin on the XLR connector, ensuring the wire is firmly seated. Solder each connection, ensuring a strong and reliable bond. Avoid excessive solder, which can create cold solder joints and reduce conductivity.
Strain Relief: After soldering, use heat shrink tubing or electrical tape to provide strain relief around the solder joints, securing the wires to the connector body and preventing them from pulling loose.
Test Your Connection: Before using the connector, test the continuity of each connection using a multimeter. This step helps ensure a secure and reliable connection.
Troubleshooting Common Wiring Issues
Even with careful wiring, problems can arise. Here are some common issues and their solutions:
- No Audio: Double-check all solder joints for proper connections. Ensure the cable is correctly connected to both the XLR connector and the device.
- Hum or Noise: This often indicates a grounding issue. Check all ground connections and ensure proper shielding of the cable.
- Inverted Signal: This results from reversing the positive and negative wires. Recheck the pin assignments and re-solder if necessary.
Conclusion
Wiring an XLR male connector correctly is essential for maintaining high-quality audio signals. By following these steps and paying close attention to detail, you can ensure reliable and consistent performance from your audio equipment. Remember to always prioritize safety and take your time during the soldering process.
Frequently Asked Questions (FAQs)
Can I use different gauge wire with XLR connectors? While 22-26 AWG is standard, slightly thicker or thinner gauge wire might work, but thicker wires might be difficult to fit, and thinner ones could be more prone to breakage.
What happens if I reverse the positive and negative pins? Reversing the positive and negative pins will result in an out-of-phase signal, potentially leading to cancellation or a significantly weakened signal.
How important is strain relief? Strain relief is crucial for preventing the wires from pulling loose from the solder joints, extending the lifespan of your cable and connector.
Are there different types of XLR connectors? Yes, there are male and female XLR connectors, and different sizes, but the wiring principles remain consistent.
Can I use an XLR connector for other applications besides audio? While primarily used for audio, XLR connectors are also used in lighting and other professional applications. However, the wiring might differ depending on the specific application.
